Hi all,
a few weeks ago I was asking you how I could add two SSDs in RAID 0 configuration and still keep the HDD. Well I didn't really get the right answer so I figured it out myself.
You may ask yourself, why would I want to do this? Simply because I was curious if I can and because I found only one person who did something similar before me. Also I'm really excited about writing and reading speeds with two SSDs plugged in two SATA III ports in RAID 0 configuration. It still gives me goosebumps.
I described the following procedure on my blog, but I doubt you understand Slovene, so I wrote this one in English. You can still check out the original link for a nicer guide with detailed photos.
Disclaimer 1: Please don't do the following procedure if you have no experience with hardware. iMac is an expensive piece of hardware and you don't wan't it broken. Proceed at your own risk!
Disclaimer 2: Because iMac has only three SATA ports on logic board you'll have to sacrifice your SuperDrive. For me that really wasn't a hard decision.
And here is what you need if you want to do it yourself:
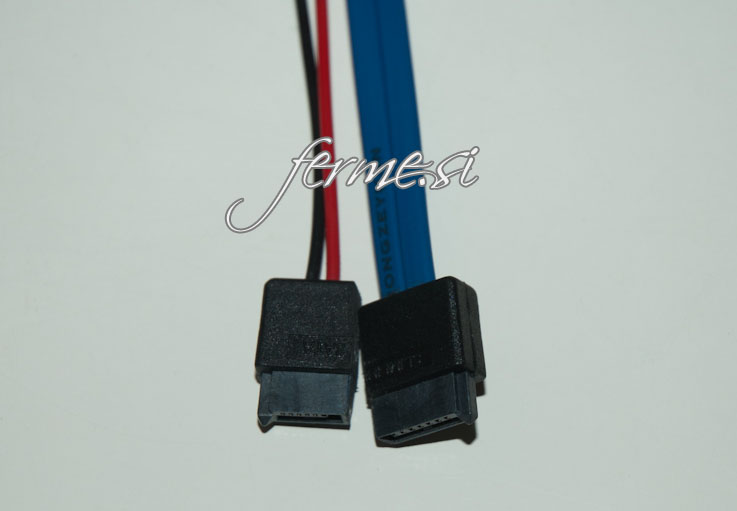
SSD cable preparation
So we've ordered two Slimline 13 pin SATA Female to 22 Pin SATA Female Cables and now we have to prepare one. Do you see the narrower end of the cable, the one which goes into logic board? This one:

Now take your jewelers saw frame and saw plastic between both cables. Do it very carefully. That's the result:
Installation of SSDs
I followed a great guide from Brian Tobey about How to open and remove a logic board. I suggest you follow it too until logic board is removed, then return to this guide.
Once you removed the logic board you can unplug the Superdrive from SATA 2 port.

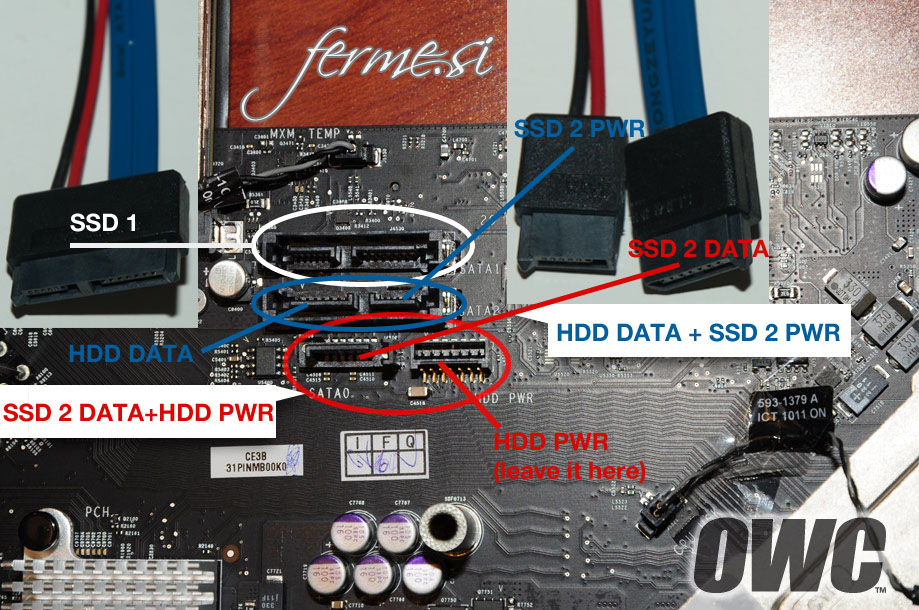
Now plug the slimline cables in following order:
I tried to explain the upper instructions in this photo:
Once you have all the cables in place I recommend you to remove that fake SSD wall so you gain enough space for two SSDs. Now prepare the first SSD and attach some double sided tape on it, then carefully tape it to the iMac's body, be careful and leave enough space for another SSD! Now plug in the cable for the SSD 1.

Now it's time to place the logic board back. I highly recommend you to remove RAM before positioning the logic board back in its place. I also advise you to be very careful when positioning the logic board so you don't damage it. Once you have it in place attach some double sided tape to the SSD 2 and connect the cable.
My configuration now looks something like this:

Put now everything together, plug in all the cables and screw all the screws. Remove all the dust between the glass and the LCD panel.
Let's make a software RAID 0 configuration
Unfortunately iMac doesn't have hardware support for RAID 0 configuration, but we can do a software RAID 0 configuration instead. Here's an excellent guide you should follow.
Now reinstall your favorite Mac OS X.
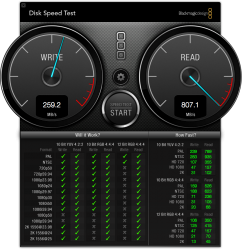
Various tests
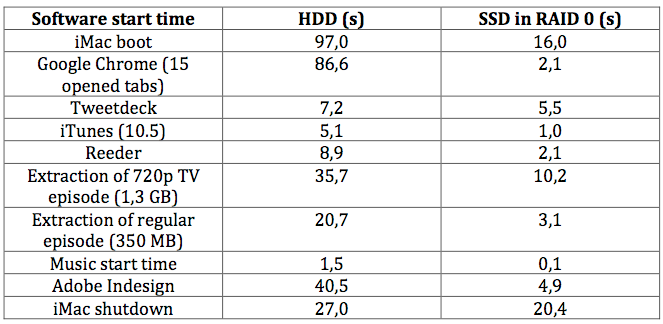
Here's a table of various tests I did after the install:
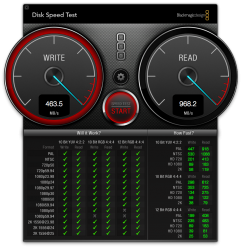
And the best photo for last:

Remember to have your Time Machine attached to your iMac at all times, because RAID 0 configuration is a liability. But it's still so awesome! What are your thoughts on my installation?
a few weeks ago I was asking you how I could add two SSDs in RAID 0 configuration and still keep the HDD. Well I didn't really get the right answer so I figured it out myself.
You may ask yourself, why would I want to do this? Simply because I was curious if I can and because I found only one person who did something similar before me. Also I'm really excited about writing and reading speeds with two SSDs plugged in two SATA III ports in RAID 0 configuration. It still gives me goosebumps.
I described the following procedure on my blog, but I doubt you understand Slovene, so I wrote this one in English. You can still check out the original link for a nicer guide with detailed photos.
Disclaimer 1: Please don't do the following procedure if you have no experience with hardware. iMac is an expensive piece of hardware and you don't wan't it broken. Proceed at your own risk!
Disclaimer 2: Because iMac has only three SATA ports on logic board you'll have to sacrifice your SuperDrive. For me that really wasn't a hard decision.
And here is what you need if you want to do it yourself:
- 2 x OWC Mercury Extreme Pro 6G
- 2 x Slimline 13 pin SATA Female to 22 Pin SATA Female Cable
- 2 x Suction cups
- Torx screwdriver set (T5 - T10)
- some double sided tape
- a flat screwdriver
- 1 x compressed air in a can
- jewelers saw frame
- 2 to 3 hours of your time
SSD cable preparation
So we've ordered two Slimline 13 pin SATA Female to 22 Pin SATA Female Cables and now we have to prepare one. Do you see the narrower end of the cable, the one which goes into logic board? This one:
Now take your jewelers saw frame and saw plastic between both cables. Do it very carefully. That's the result:
Installation of SSDs
I followed a great guide from Brian Tobey about How to open and remove a logic board. I suggest you follow it too until logic board is removed, then return to this guide.
Once you removed the logic board you can unplug the Superdrive from SATA 2 port.
Now plug the slimline cables in following order:
- SSD 1 plug in with untouched Slimline cable to SATA 1 port
- SSD 2 DATA cable (blue) plug in SATA 0 data port and SSD PWR plug in SATA 2 port
- HDD DATA cable plug in SATA 2 port and leave HDD PWR as it is
I tried to explain the upper instructions in this photo:
Once you have all the cables in place I recommend you to remove that fake SSD wall so you gain enough space for two SSDs. Now prepare the first SSD and attach some double sided tape on it, then carefully tape it to the iMac's body, be careful and leave enough space for another SSD! Now plug in the cable for the SSD 1.
Now it's time to place the logic board back. I highly recommend you to remove RAM before positioning the logic board back in its place. I also advise you to be very careful when positioning the logic board so you don't damage it. Once you have it in place attach some double sided tape to the SSD 2 and connect the cable.
My configuration now looks something like this:
Put now everything together, plug in all the cables and screw all the screws. Remove all the dust between the glass and the LCD panel.
Let's make a software RAID 0 configuration
Unfortunately iMac doesn't have hardware support for RAID 0 configuration, but we can do a software RAID 0 configuration instead. Here's an excellent guide you should follow.
Now reinstall your favorite Mac OS X.
Various tests
Here's a table of various tests I did after the install:
And the best photo for last:
Remember to have your Time Machine attached to your iMac at all times, because RAID 0 configuration is a liability. But it's still so awesome!
What are your thoughts on my installation?