Got a tip for us?
Let us know
Become a MacRumors Supporter for $50/year with no ads, ability to filter front page stories, and private forums.
'how to' swap iphone housings...
- Thread starter mdwsta4
- Start date
- Sort by reaction score
You are using an out of date browser. It may not display this or other websites correctly.
You should upgrade or use an alternative browser.
You should upgrade or use an alternative browser.
iJimmy
macrumors regular
This is the best way (IMO) to ruin a fine iphone.
The vendor of that case should charge $50 bucks more and provide it with all the hardware already in place.
the vendor should provide all the hardware and maybe charge $20 extra,
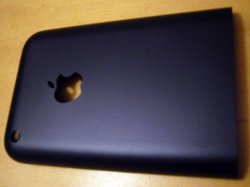
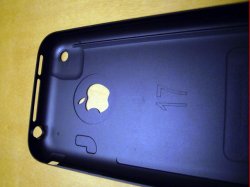
Just Replaced the iPhone Rear Case With a Black One
I would just like to say thanks to the original poster for his pioneering expedition into the unknown, because there's very little info out there that show you how to perform this procedure. It was truly an act of bravery.
I would just like to do my part and add a few other tips to complement the procedure.
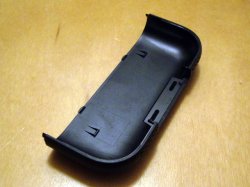
Please follow the various instructions to remove the original back casing & antenna housing.
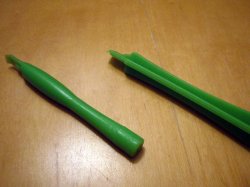
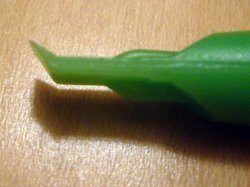
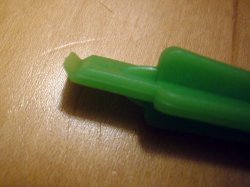
Tip 1. The plastic iPod / iPhone repair tools (that slide in and separate joints) are readily available on the web... You will need 2 sets. They become marred very easily (are designed to do so) and will only last for the first task, which is the case removal. They are a throw away item. DO NOT try and use a screwdriver or the like.. The old case might be considered expendable but you might end up damaging the bezel or internal components. Only use a screwdriver to pry up the initial opening as instructed on ifixit.
Tip 2. This will save you some time, some expense and return a better result. My advice is DO NOT USE A SOLVENT TO REMOVE THE INTERNAL CHASSIS.
This is a messy and unnecessary part of the process. With all respect to the original poster as he was the first - I must emphasize this.
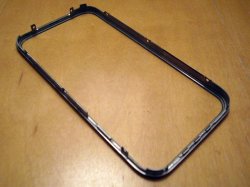
By now your old outer casing will probably be a little bent and scraped from your wrestlings to get it off - well, don't look back... you first need to free the buttons on the side (you would need to do this whichever way you choose as solvent would just dissolve them). Small nosed tin snips or wire-cutters and carefully chew away at the case where the buttons sit (without bending the rest of the case). Take your time and eventually you should free the small silent toggle switch and the volume buttons. Next make sure you have removed the camera lens (this is held down by doubled-sided tape and should just pull away quite easily, the tiny chrome frame falls away also).
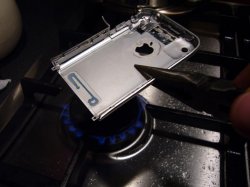
Next you will need a pair of long-nosed pliers, a small flat-head screwdriver and a gas stove or a plumbers small blow lamp.
The glue Apple uses is VERY strong and unlike Super Glue which is very brittle the Apple glue is flexible and just softens when heat is applied. You have to work round the casing methodically I started at the base end, holding the case with my pliers at the top I SLOWLY heated the casing, focusing the heat underneath the area I wanted to remove (in this case it was the shiny metal shield with the screw hole for the antenna casing). After a few seconds the glue softened and the piece just fell out. It did not distort or discolor. In fact the outer casing was also fine. I moved around the casing and one by one each piece fell out - the screwdriver is only used to gently peel back the parts once the glue gives.
BE CAREFUL the parts will be hot.. allow them to cool on something hard and flat and non-flammable! DO NOT USE COLD WATER TO QUENCH THEM.
The stove process took me 10 mins to remove all the chassis components. Very little glue residue remained attached to the chassis. I was extremely pleased.
The original casing, well there's no going back now!..
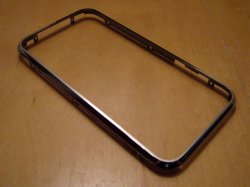
Tip 3. When gluing the chassis back to the new casing be very patient. You are only halfway there! Don't get too excited this is possibly the hardest part. The iPhone is manufactured to tiny tolerances so gluing one part out of place could have disastrous consequences, it might not fit back together properly and look shoddy. My advice is use a strong glue that doesn't go-off within seconds. Super Glue (or crazy glue) doesn't allow you the time to slide your piece into place or reposition it. Find something strong but perhaps needs to cure overnight. DON'T BE IN A HURRY. Perhaps divide the job into 2 halves, start in the evening when the kids have gone to bed then take it up again in the morning when the glue has gone-off.
Tip 4. Putting it back together - It's only here where you really find out how well it went.. do the components fit? Will it switch on again? Will everything work as it should?? You can test it before you snap the new back into place. See what happens. Coz when you snap that new case into position you would have to go through that nightmare again of taking it off if somethings not right!
I finished mine, eventually - yes, there is one problem.. The vibrating function no longer works... A tiny annoyance which I can live with. The vibrating motor needs to spin in that tiny space and there are no guides for gluing the headphone chassis into place so a fraction of a millimeter out means no vibrate! Other than that the project was a success.
Good Luck
I would just like to say thanks to the original poster for his pioneering expedition into the unknown, because there's very little info out there that show you how to perform this procedure. It was truly an act of bravery.
I would just like to do my part and add a few other tips to complement the procedure.
Please follow the various instructions to remove the original back casing & antenna housing.
Tip 1. The plastic iPod / iPhone repair tools (that slide in and separate joints) are readily available on the web... You will need 2 sets. They become marred very easily (are designed to do so) and will only last for the first task, which is the case removal. They are a throw away item. DO NOT try and use a screwdriver or the like.. The old case might be considered expendable but you might end up damaging the bezel or internal components. Only use a screwdriver to pry up the initial opening as instructed on ifixit.
Tip 2. This will save you some time, some expense and return a better result. My advice is DO NOT USE A SOLVENT TO REMOVE THE INTERNAL CHASSIS.
This is a messy and unnecessary part of the process. With all respect to the original poster as he was the first - I must emphasize this.
By now your old outer casing will probably be a little bent and scraped from your wrestlings to get it off - well, don't look back... you first need to free the buttons on the side (you would need to do this whichever way you choose as solvent would just dissolve them). Small nosed tin snips or wire-cutters and carefully chew away at the case where the buttons sit (without bending the rest of the case). Take your time and eventually you should free the small silent toggle switch and the volume buttons. Next make sure you have removed the camera lens (this is held down by doubled-sided tape and should just pull away quite easily, the tiny chrome frame falls away also).
Next you will need a pair of long-nosed pliers, a small flat-head screwdriver and a gas stove or a plumbers small blow lamp.
The glue Apple uses is VERY strong and unlike Super Glue which is very brittle the Apple glue is flexible and just softens when heat is applied. You have to work round the casing methodically I started at the base end, holding the case with my pliers at the top I SLOWLY heated the casing, focusing the heat underneath the area I wanted to remove (in this case it was the shiny metal shield with the screw hole for the antenna casing). After a few seconds the glue softened and the piece just fell out. It did not distort or discolor. In fact the outer casing was also fine. I moved around the casing and one by one each piece fell out - the screwdriver is only used to gently peel back the parts once the glue gives.
BE CAREFUL the parts will be hot.. allow them to cool on something hard and flat and non-flammable! DO NOT USE COLD WATER TO QUENCH THEM.
The stove process took me 10 mins to remove all the chassis components. Very little glue residue remained attached to the chassis. I was extremely pleased.
The original casing, well there's no going back now!..
Tip 3. When gluing the chassis back to the new casing be very patient. You are only halfway there! Don't get too excited this is possibly the hardest part. The iPhone is manufactured to tiny tolerances so gluing one part out of place could have disastrous consequences, it might not fit back together properly and look shoddy. My advice is use a strong glue that doesn't go-off within seconds. Super Glue (or crazy glue) doesn't allow you the time to slide your piece into place or reposition it. Find something strong but perhaps needs to cure overnight. DON'T BE IN A HURRY. Perhaps divide the job into 2 halves, start in the evening when the kids have gone to bed then take it up again in the morning when the glue has gone-off.
Tip 4. Putting it back together - It's only here where you really find out how well it went.. do the components fit? Will it switch on again? Will everything work as it should?? You can test it before you snap the new back into place. See what happens. Coz when you snap that new case into position you would have to go through that nightmare again of taking it off if somethings not right!
I finished mine, eventually - yes, there is one problem.. The vibrating function no longer works... A tiny annoyance which I can live with. The vibrating motor needs to spin in that tiny space and there are no guides for gluing the headphone chassis into place so a fraction of a millimeter out means no vibrate! Other than that the project was a success.
Good Luck
EarthDawn
macrumors 6502a
now that would be sick !!!!
I did toy with the idea of Gold Plating the Apple & Bezel !!
Glowing Apple is a good idea for attracting thieves!
Thanks for the compliments!!
the main point of the solvent is to loosen the glue without ruining your original housing. obviously i found that out too late, but for people that were attempting it, it would be beneficial. as far as the solvent dissolving the plastic buttons... i didn't dip the housing in solvent, i put it around the glue. i didn't need to get it on the plastic buttons and didn't ruin mine at all. yeah, my first attempt i put the vibrate/ring switch in the wrong position, but after taking it apart again i put it back so it worked properly.
i couldn't agree more about taking your time when gluing things back together. if you don't align things properly everything won't sit flush.
sold the black iphone months ago. been thinking about doing it again with my latest. we'll see.
I would just like to say thanks to the original poster for his pioneering expedition into the unknown, because there's very little info out there that show you how to perform this procedure. It was truly an act of bravery.
I would just like to do my part and add a few other tips to complement the procedure.
Fonzijr1964
macrumors 68000
crazy but cool. i want to take apart and rebuild mine so i liked the pics i wish more people would post pics like you
Point taken about keeping the original housing intact, but I guess the majority of folks performing this procedure would be doing it because they are replacing a damaged casing. In which case the old casing will be trashed anyway.
Doing it once is brave enough.. Twice is downright masochistic.
sold the black iphone months ago. been thinking about doing it again with my latest. we'll see.
Doing it once is brave enough.. Twice is downright masochistic.
if that's directed at me, i took it apart a week or so later and fixed that part. then i sold the phone back in december or so.
man, what a bummer about it being stuck on vibrate!!
that must really suck. aren't you upset after all that hard work???
Red One
People i wish i could know what i need to do. And i didnt know about this forum, so what i done its just my expirense 😕 Im going crazy, I spend 40$ and now i need to buy broken iphone because when i was replacing all buttons i guess i dameged wire, but you cant see where is damage. so my 🙁volume buttons dosnt work, power on/off, and vibrate swich, only headphones works. thats all what i can say. My question is where i can find time machine? JK 🙂 if any body know where i can find back cover with all buttons> LET ME KNOW. Please, Thanks
People i wish i could know what i need to do. And i didnt know about this forum, so what i done its just my expirense 😕 Im going crazy, I spend 40$ and now i need to buy broken iphone because when i was replacing all buttons i guess i dameged wire, but you cant see where is damage. so my 🙁volume buttons dosnt work, power on/off, and vibrate swich, only headphones works. thats all what i can say. My question is where i can find time machine? JK 🙂 if any body know where i can find back cover with all buttons> LET ME KNOW. Please, Thanks
Attachments
7on
macrumors 601
People i wish i could know what i need to do. And i didnt know about this forum, so what i done its just my expirense 😕 Im going crazy, I spend 40$ and now i need to buy broken iphone because when i was replacing all buttons i guess i dameged wire, but you cant see where is damage. so my 🙁volume buttons dosnt work, power on/off, and vibrate swich, only headphones works. thats all what i can say. My question is where i can find time machine? JK 🙂 if any body know where i can find back cover with all buttons> LET ME KNOW. Please, Thanks
OMG it's Tony Hawk! 😱 😛
Here's a link for ya, http://cnn.cn/shop/apple-iphone-earphone-flex-cable-p-1935.html
Mr. Giver '94
macrumors 68000
"America's #1 Stripper Brand"🙄 Hmmmmmmmmmmm....LOLOL If it's good enough for strippers, it's good enough for me. Do they use it to clean the poles, or something?😕 IDK, but all of these iPhones look really cool!!😀
acfusion29
macrumors 68040
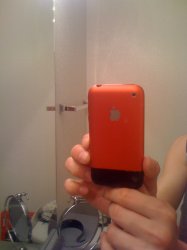
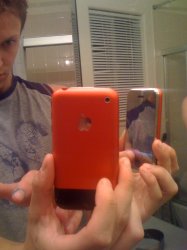
Hey everyone. I bought the red housing and I'm in the process right now of changing my iPhone from stock to red 🙂
I'm kinda stuck here though. I need to buy that stuff that removes the strong glue, but before I do that, I want to take off the Apple logo.
How were the people that did it, able to take it off without using the product to take off the adhesive?
Thanks.
I'm kinda stuck here though. I need to buy that stuff that removes the strong glue, but before I do that, I want to take off the Apple logo.
How were the people that did it, able to take it off without using the product to take off the adhesive?
Thanks.
i've swapped the housing on 4 iphones.
once the original housing is off and has all the electronics removed...
the best way to get the skeletal parts off is to pop it in the oven at 500 degrees for about 15-20 min.
the glue gets baked and becomes super brittle.
the parts will then pop off with very little/if any force.
make sure you remove the plastic vibrate and volume buttons first.
bmw77887967
macrumors newbie
Questions
How do u take the Apple Logo out???
where can i get the remover from canada
when i pour the reomver, do i have to take the ringer switch/ slient buttons? the black one
http://www.mobiletracker.net/archives/images/apple-iphone-side.jpg
do u have more close up pictures??
How do u take the Apple Logo out???
where can i get the remover from canada
when i pour the reomver, do i have to take the ringer switch/ slient buttons? the black one
http://www.mobiletracker.net/archives/images/apple-iphone-side.jpg
do u have more close up pictures??
badfish9
macrumors newbie
First Try Success! Sort of...
First of all, I would like to thank the original poster of this thread because I never would have attempted this procedure without an excellent guide like this. Next, those users who posted helpful, encouraging replies (not you pessimistic idiots that spoke out against the idea of replacing the back cover all together).
I purchased a new (original 8GB) silver iPhone back casing and antenna cover from ebay for about 40 bucks (including shipping). Fortunately, this deal also provided me with size "000" flat and phillips head screw drivers along with two different iPod opening tools (a total of 3 separate opening devices since one was double sided!). I followed these instructions precisely, including using the original adhesive remover solvent method, also bearing in mind the noted issues with the vibrate, brittle skeleton, removing buttons first, etc. I took my time, amounting to a total of about 3 and a half hours, and now have a beautiful, new looking, original functioning 8GB iPhone with working vibrate, ring, and all sound functions. There are, however, a few suggestions I have that I feel MUST be noted for anyone who might attempt this procedure:
1. First of all, USE THE ADHESIVE REMOVER/SOLVENT METHOD! Beyond the easy, necessary procedure of removing the original antenna cover and back casing, I feel that a good adhesive remover will make the "un-gluing" process of the iPhone skeleton the easiest step! I simply removed the headphone jack, switches, vibrator, etc., RIPPED APART THE INSIDE LEFT SIDE OF MY ORIGINAL CASING IN ORDER TO REMOVE THE RING/VIBRATE AND VOLUME BUTTONS, and just let it soak in the strongest adhesive remover I could find at Sears Hardware (different brand than in the guide) for about a half hour, and when I pulled it out, literally 3 of the pieces just fell off!
2. You will notice that the skeleton pieces around the perimeter of the casing are the most difficult to dislodge from Apple's "evil" adhesive. Just be very careful when using the mini flat head screw driver to pry them off, because as originally noted, THEY ARE INCREDIBLY BRITTLE AND DON'T BEND! The very thin, shiny metal pieces are actually quite simple to remove with a sharp razor blade after allowing the original casing to soak in the adhesive remover.
3. I absolutely have to note this because I literally had my heart broken twice during this procedure... WHEN GLUING THE INSIDE LEFT FRAME PIECE TO THE CASING, REMEMBER TO PUT IN BOTH THE VOLUME AND RING/VIBRATE SWITCHES FIRST! Believe it or not, I glued it on the first time with only the ring/vibrate switch in, and had to use the adhesive remover again to remove the entire piece. Unfortunately, when removing it, I broke off one of the inside tabs, and when I was trying to clean the glue off of the skeleton piece, the corner portion of the piece broke off. Then, I GLUED THEM ON AGAIN WITHOUT PUTTING IN EITHER BUTTON FIRST! I truly cease to amaze myself sometimes.. Fortunately, the missing tab proved insignificant, and I was able to attach the corner piece separately, with no issues whatsoever, on my third attempt (I finally remembered to put in the ring/vibrate switch and volume button!).
4. The ABSOLUTE MOST DIFFICULT step for me was getting the mini screws back in. Even with a magnetic "000" phillips head screw driver, this was painstakingly tedious. I honestly have no good advice for this step besides have patience, and don't dip (chew tobacco) while attempting (even the most advanced nicotine abusers will have some shake to their hands whilst and after using). Don't push too hard when you first get the screws in the holes- just gently tighten because sometimes the magnetic power of the screw driver will work against you.
5. BE CAREFUL TO NOT GET WHATEVER ADHESIVE YOU ARE USING ON YOUR NEW BACK CASING DURING THE PROCEDURE! After I finished, I realized there were a few "super glue" spots on my new casing and it took me over and hour with a razor blade and calm nerves to get (most of) it off.
This truly is not that difficult a process! Granted I am a computer science major, I have had very little experience with "dissecting" electronics, but just an interest and determination, and I succeeded just fine. Simply take your time and let the perfectionist within shine through. I couldn't stand seeing my iphone dented and scratched and feel this was well worth the effort. Unfortunately (since my iPhone is my camera) I could not photographically document my experience, but the photos provided in the initial post helped immensely. Also, this YouTube video (not sure if recommended earlier in the thread) http://youtube.com/watch?v=qbvV2SITpPU made the process a lot easier.
Thanks again, and good luck to any and all of you other brave souls out there!
-----------------------------------------------
√ iMac 20" 2.4GHz
√ MacBook White 2.0GHz
√ iPhone 8GB
dieselboy27
macrumors member
I have a problem with my vibrate on my 2g iphone. I was wondering how difficult it is to just take out the existing headphone jack assembly and replace it with a new one that I have bought online? I understand that your process seems much more difficult because you had to remove the entire skeleton form the old backplate and transfer it to the new one. Basically I'm just wondering if it's possible to repair the vibrate and not break anything else while doing it.
If anyone else is attempting this I would love to see a youtube video.
If anyone else is attempting this I would love to see a youtube video.
badfish9
macrumors newbie
Replacing Original iPhone headphone jack
If you have a new headphone jack assembly, this should not be that hard of a task. All you need to be careful about is prying the backplate off, and replacing the tiny screws. You certainly don't want to bend or break any pieces on your backplate because then you would have to attempt the entire process with a fresh one. Also, I noticed that I put a small nick in the rubber casing of the wifi antenna wire while prying the backplate off of mine, so take care not to place your size 000 flathead screwdriver or prying tool on top of this wire while prying. Luckily, the nick on mine had no affect on my iPhone's wifi performance, or any other feature for that matter. You can see the whole process described with good pictures in this youtube video. http://www.youtube.com/watch?v=qbvV2SITpPU
This was the best one I could find. Hope it helps.
 iMac 20" 2.4GHz
MacBook White 2.0GHz
iPhone 8GB
If you have a new headphone jack assembly, this should not be that hard of a task. All you need to be careful about is prying the backplate off, and replacing the tiny screws. You certainly don't want to bend or break any pieces on your backplate because then you would have to attempt the entire process with a fresh one. Also, I noticed that I put a small nick in the rubber casing of the wifi antenna wire while prying the backplate off of mine, so take care not to place your size 000 flathead screwdriver or prying tool on top of this wire while prying. Luckily, the nick on mine had no affect on my iPhone's wifi performance, or any other feature for that matter. You can see the whole process described with good pictures in this youtube video. http://www.youtube.com/watch?v=qbvV2SITpPU
This was the best one I could find. Hope it helps.
iMac 20" 2.4GHz MacBook White 2.0GHz iPhone 8GB