If all FAILS...
I just spent 3 hours connecting my SCX-4500W to my wireless network, and found none of the above replies or any other forums worked for me.
I'm not a tech-y person at all, so to do something like this is complicated in my book. Find a time to do this when you are calm and rational. Being frustrated with machines do not work - your anger and fear will only blind you further and do really stupid things.
---------------------------------------------------------------
My system consists of:
Printer - Samsung SCX-4500W
Router - Airport express base station (old version)
Computer - iMac with Snow Leopold
---------------------------------------------------------------
- Find the brochure, "Samsung - Network Installation Guide". It came with the printer box; the cover has a blue band on the top and the rest is grey. If you can find this, READ it first before you proceed.
- It seems there are two types of pre-existing condition with your current computer-to-router setup. You have already setup a home network yourself, or in my case, you didn't (ie. you only plugged the ethernet into your router, and access internet from your mac's airport). I think this is the simplest setup, which is peer-to-peer, ad-hoc connection.
1. I disconnected the ethernet cord from the ethernet modem to my airport express, and I used the same cord to connect my airport express to the ethernet slot at the back of the printer.
2. Make sure your printer has both lights on (power AND a mini light right next to it - its wireless status). Both lights should be on, but if only the power is on and nothing else, touch and hold the Stop/Clear button until either the wireless light comes on.
3. On your mac, go to System Preferences, click Network, turn Airport On, check Ask to join new networks. Open the Network Name list and select the "airportthru" network.
4. Select Advanced, select + sign, add "airportthru" to the preferred networks list. Double click on "airportthru" in this list, and click save. Then back to the Preferred Networks list, underneath is an option called "Remember networks this computer has joined" and check this.
5. Select TCP/IP among the menu tabs, unless your Configure IPv4 is automated (no manual input), you should copy down all the settings on this page, like IPv4 Address, subnet mask, router, and Configure IPv6 setting, as we will need to revert the settings later on. So now, change your Configure IPv4 to "manually", and enter the following numbers and dots:
IPv4 Address: 192.0.0.196
Subnet Mask = 255.255.255.0
Then try "off" under Configure IPv6, click OK.
6. Back to the Network tab, click Apply
7. On your mac, make sure you are now connecting to the network called "airportthru". Don't use your printer installation CD; chances are the installer have updated. Go directly to Samsung website
http://www.samsung.com/us/support/s...d_mdl_cd=SCX-4500W/XAA&prd_mdl_name=SCX-4500W
select driver, and make sure your OS matches your computer.
8. Install the scanner driver and smart panel, then install the printer driver last and make sure you select "typical installation for a network printer", select OK.
9. Soon, safari will automatically open, select Trust or Run. The browser will open the SetIPapplet.html file, so if it doesn't open automatically or you closed it by accident, don't panic, go to the folder you downloaded your printer driver zip file and locate SetIPapplet.html and double click it.
10. When it's opened, it will show the printer's name and IP address information. This is milestone #1; if you don't see your printer listed here, you need to check points 1-9, troubleshoot things until you see your printer listed on the SetIPapplet.html page.
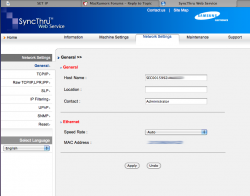
11. The hardest part is over. Now you see your printer listed in the SetIPapplet.html page, select it, click the Web Service icon which is the fourth icon from the left. A second safari window opens, the SyncThru Web Service.
12. There are five menu tabs, select the third, Network Settings. On the left panel, select Wireless. Now on the right, under Wireless Settings, select Wizard and then click Next.
13. Now you are in the SSID Setup, which lists all the wireless networks your printer finds. You are now looking at this list of network through "airportthru", so under this list, MAKE SURE you select your original router you use for internet access. Select your router name, and click next.
14. When prompted, enter your router password.
15. Wizard will then give you a confirmation of WHERE you are attaching your printer network to. So double-check that you selected the correct wireless network you want your printer to be attached to (ie. in the future when your mac is connected to the specific router, you will automatically be able to print through your samsung).
16. Under all these steps, your operation mode should be Infrastructure and not ad-hoc (since you are now LINKING your printer with your router, so through this process you have created your very own network).
17. Click Apply. Another browser pops up showing the process.
18. Now during this time, you should disconnect the ethernet cord from the printer as well as your router. Don't turn anything off until the process is done, the browser will indicate whether the linkage was successful or not. This is milestone #2. Make sure you get the confirmation window saying the linkage or syncing was established (between printer and router).
19. Restart your mac, router, and printer. Reconnect the ethernet cord between your modem and wireless router, but now, there should be no physical connection between the computer, printer, and router. After everything is turned on, from the mac side, open system preferences, network, and select your original router or network name (for wireless internet). Click advance and go into TCP/IP. Change the Configure IPv4 back to "Using DHCP" or your original setting, and change the Configure IPv6 back to "Automatically" or your original setting (that you wrote down back in step 5). Click OK, Apply. Make sure you are on your original router wireless network now, NOT "airportthru".
20. Check on your printer, see if both power and wireless indicator lights are both on. If the wireless one is off, touch and hold the stop/clear button until it lights up. This time, hold the button until it prints a configuration report. Pay attention to the third line from the bottom - IP Address.
21. Go to System preferences, print & fax. If you don't see your printer, don't panic, click + sign, under the left panel, to add a printer. In the address field, type in the IP address from your configuration report. Wait for the system to validate the IP, and then under Print Using, select printer software, and find Samsung SCX-4500W.
*** You are technically done! When I arrived to #21, I entered what I thought was the right IP address and managed to get the printer connected. I tried to test print a page and the printer dialog box read "printer is offline". So that was when I realized the wireless light on my printer was OFF, and I promptly touched and held the Stop/Clear button. Then suddenly, the wireless light turned on, and the configuration report came out with a DIFFERENT IP address. I went back to my MAC and saw a dialog box that warned this "different IP address" was connecting to my network! I knew this was finally working. Then I revisited system preferences, print&fax, and saw the old IP address named printer (a bunch of numbers), AND a new one named "Samsung SCX-4500W Series plus a bunch of numbers. Finally, selecting this as the default printer worked.
**** To check whether the printer is properly connected to the network, in the Print&Fax settings, click options and supply, click Supply levels, and you should be able to see how much toner is left.
That's it! You made it!