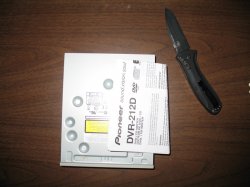
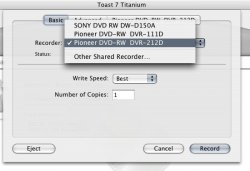
OK So I bought and installed a SATA burner which was previously reviewed here on the board.
I'm in the middle of some hard drive juggling and am looking at some 3-hour progress bars so I decided to post how it's going.
The thing is really damn fast, first of all. It's also really quiet, no vibration, just a subtle hiss when it does something at high speed, keep in mind I have it running outside the case.
I usually write lengthy reviews but I really installed this thing half-assed today for a lot of reasons.
I will, however, teach you all, once and for all, how to take off the front plate to an optical drive so it will work in the mac pro.
As anyone who has tried to use a 3rd party drive in a mac pro will tell you, it will not eject out of the box.
There is a plate on the front of the tray that prevents this from happening.
How does apple get around this? they buy the drives, snap off the plate, and GLUE a piece of plastic on it BY HAND (I've had a few that were crooked!!)
Anyways, you're going to need to know how to do this quickly, easily, and painlessly if you want to upgrade your mac pro's drive for under the cost of a replacement part from Apple (probably over a hundred dollars for a $15 drive).
First, take a paper clip and shove it in the tiny hole under the tray. This will unlock the tray and nudge it outside the drive. Grab the tray and slowly pull it out a couple inches.
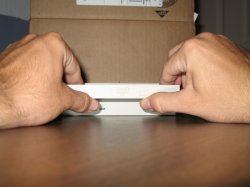
Then, grab the thing like I am doing in the picture below--index fingers on the tray itself, and only the thumbs touching the plate.
Keep in mind, you will do NO DAMAGE to the plate and it should COME OFF EASILY.. just thought I should mention that...
Pull OUT, away from the drive using your THUMBS touching only the plate, you're pulling the plate towards you slightly. This will disengage the little grabby things. While doing so, push UP--towards your index fingers. Please note that UP is the only direction these things like to go.
I've had a lot of practice doing this. I had a job in PC salvage up until a few months ago and I really destroyed the hell out of a bunch of QA-failure drives in very creative ways.
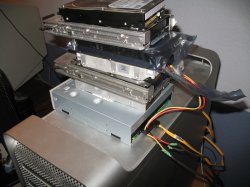
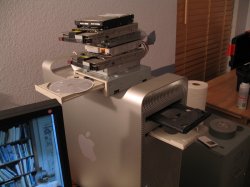
You may note below that I'm keeping the drive outside the case. Those cables feed back and into the onboard SATA ports. This is because I want access to the two SATA ports from outside the case, should I need them (as you can see, I'm testing a hard drive right now in the static bag).
No word yet on whether or not this is bootable--again, I'm busy now or I'd try it. I reinstalled OS X a few hours ago. Apparently OS X doesn't like to be 'cloned' more than 3 times. Go figure.
Anyways, thanks for reading, I've only had it installed for 20 minutes but so far this is a great drive!
I'm in the middle of some hard drive juggling and am looking at some 3-hour progress bars so I decided to post how it's going.
The thing is really damn fast, first of all. It's also really quiet, no vibration, just a subtle hiss when it does something at high speed, keep in mind I have it running outside the case.
I usually write lengthy reviews but I really installed this thing half-assed today for a lot of reasons.
I will, however, teach you all, once and for all, how to take off the front plate to an optical drive so it will work in the mac pro.
As anyone who has tried to use a 3rd party drive in a mac pro will tell you, it will not eject out of the box.
There is a plate on the front of the tray that prevents this from happening.
How does apple get around this? they buy the drives, snap off the plate, and GLUE a piece of plastic on it BY HAND (I've had a few that were crooked!!)
Anyways, you're going to need to know how to do this quickly, easily, and painlessly if you want to upgrade your mac pro's drive for under the cost of a replacement part from Apple (probably over a hundred dollars for a $15 drive).
First, take a paper clip and shove it in the tiny hole under the tray. This will unlock the tray and nudge it outside the drive. Grab the tray and slowly pull it out a couple inches.
Then, grab the thing like I am doing in the picture below--index fingers on the tray itself, and only the thumbs touching the plate.
Keep in mind, you will do NO DAMAGE to the plate and it should COME OFF EASILY.. just thought I should mention that...
Pull OUT, away from the drive using your THUMBS touching only the plate, you're pulling the plate towards you slightly. This will disengage the little grabby things. While doing so, push UP--towards your index fingers. Please note that UP is the only direction these things like to go.
I've had a lot of practice doing this. I had a job in PC salvage up until a few months ago and I really destroyed the hell out of a bunch of QA-failure drives in very creative ways.
You may note below that I'm keeping the drive outside the case. Those cables feed back and into the onboard SATA ports. This is because I want access to the two SATA ports from outside the case, should I need them (as you can see, I'm testing a hard drive right now in the static bag).
No word yet on whether or not this is bootable--again, I'm busy now or I'd try it. I reinstalled OS X a few hours ago. Apparently OS X doesn't like to be 'cloned' more than 3 times. Go figure.
Anyways, thanks for reading, I've only had it installed for 20 minutes but so far this is a great drive!
")