
Become a MacRumors Supporter for $50/year with no ads, ability to filter front page stories, and private forums.

netsrot39

macrumors 6502
Original poster
Hi everyone,

I’m considering rebuilding the battery pack of my PowerBook G4 (A1148) using Samsung INR18650-25R 2500mAh cells. Two of the original cells are badly degraded (corroded or battery acid), as you can see in the attached pictures. I very much reckon that the original cells are of another 18650 type, but the cells I have referred to in the beginning, are the ones I have on hand. The other original cells don’t look quite as bad, but given the age of the battery, I will of course be replacing all of them.

My main question is: is the original BMS/circuit board likely to still work after replacing the cells, or is there a significant chance that the BMS itself has failed or will cause problems due to having the cells replaced? Through some research online I understand that some Apple battery management systems can have issues after a cell replacement and may require reprogramming/resetting.

I recently successfully rebuilt a battery pack for a vacuum cleaner using the same Samsung 25R cells, so I’m comfortable with the basic process, meaning I have both a spot welder and a soldering iron available and know how to use it. However, I have zero experience with reprogramming or resetting a BMS/circuit board.

So, in your experience, is an A1148 battery with badly degraded cells generally worth rebuilding, or is the BMS likely to make this a pointless project? I'd rather use the time (and the fresh cells) for something else if this project has no realistic positive outcome from the get-go. This might be an important information: the battery was so flat that pressing the battery indicator did not show any light. Does this mean that the BMS has also failed though?

BTW opening the case of these batteries is no fun at all and IMO hardly possible without cosmetic damage. Apple clearly intended those batteries not to be opened.

Any advice from people who have rebuilt these PowerBook batteries or have more knowledge than me would be greatly appreciated. Thanks!
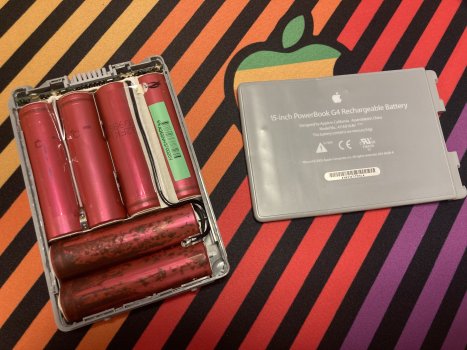
 

Attachments

  • battery1.jpg
    battery1.jpg
    2 MB · Views: 75
  • battery2.jpeg
    battery2.jpeg
    2.1 MB · Views: 62
I will quote my DM to @milliectl since I still haven't done a proper writeup.

Basically, I had two 15" DSLD batteries (model A1148), both completely dead and would not charge but the first one had very little cycles. (got a third one since, not looked at that one yet).

I took apart that first one and measured the voltage of the cells. They were over-discharged. I did some research online and learned that it is possible to revive over-discharged lithium cells in some cases, for example with a "dumb" USB charger like a tp4056 one which I happened to have laying around. It will charge them very slowly, until they reach a "safe" voltage, and then charge them with the normal curve.

So that's exactly what I did. One by one I charged the parallel pairs of Lithium cells in the pack.This can be dangerous. So I carefully monitored the cells, making sure they did not get hot and did not leave them unsupervised. I also tried my best to make sure the voltages of the parallel pairs were as close to each other as possible, so that the battery pack is balanced properly. But I could have done better on that front. I am not responsible for any damage.

View attachment 2600719

So I ended up with a fully charged pack, now what? I measured the voltage coming out of it, nothing. The capacity LED's didn't work either. So I plugged the battery into my PowerBook G4 and the capacity LED's started working but the laptop still would not run off the battery, it was still not outputting any power.
What does this mean? The BMS has locked the battery because of it being overdischarged from sitting on a shelf for decades probably. So I have a fully charged battery that I am not allowed to use by this pesky BMS.

I did days of research on the internet and almost cried in despair. These BMS chips are black boxes. Software to manipulate them costs hundreds if not thousands of dollars. I tried some tricks on YouTube videos, such as very briefly short circuiting the battery pack, as well as shorting the output of the battery pack to the output of the batttery itself in the hope of the BMS resetting and allowing current to flow to the external connector but no dice.

But I decided to look up the BMS chip(s) itself and this is where we got very lucky. You see, the DLSD PowerBooks batteries, while physically identical to their predecessors, are completely different on the insides. The Apple service manual even mention this, and that they have a different calibration procedure.

As luck would have it, the main BMS IC is the Texas Instruments BQ20Z80. This is exactly the same one as present in early Intel MacBooks and has been extensively reverse engineered and documented. I found some technincal papers and documents which weren't really that meaningful to me but then I stumbled upon this: https://squidgeefish.com/projects/a1175-battery-hacking/

This article is the holy grail. It contains pretty much all information you need. Funny enough the author mentions PowerBooks but he does not seem aware of the DSLDs. This might be more relevant to you as well due to the prismatic cells. But most importantly it contains complete Arduino code to unseal the BMS and get it working again. So I wired my Arduino to the battery and..... SUCCESS!

View attachment 2600727
View attachment 2600733
View attachment 2600732
View attachment 2600728

So I revived my battery! And it is still in decent condition because it was not used much (only 94 cycles) and not over-discharged that bad. I also revived my second battery this way but it performs far worse due to having 224 cycles and also being over-discharged even more. This second one is candidate for a recell. I salvalged dozens of good cells from a dead e-bike battery pack.

I think I have a picture of the battery pinout somewhere but I could not find it right now. And yours might be different. I think you need D+, D- and Gnd to communicate with the Arduino or something along those lines.

Sorry, this was very long winded and I definitely need to condense this a bit if I want to post it publically. Let me know your thoughts, questions, anything!

Regards,
Matias

EDIT: I found my picture of the battery pinout. You need P- (ground), D (data) and C (clock). But again this might be slighly different on yout 17" battery.
View attachment 2600748
 

Attachments

  • 20251012_151041.jpg
    20251012_151041.jpg
    340.2 KB · Views: 68
  • 20251022_201014.jpg
    20251022_201014.jpg
    386.1 KB · Views: 65
  • 1769905406495.png
    1769905406495.png
    13.5 KB · Views: 64
  • 20251014_224158.jpg
    20251014_224158.jpg
    399.4 KB · Views: 62
  • 20251014_225134.jpg
    20251014_225134.jpg
    468.1 KB · Views: 61
  • 20251105_105408.jpg
    20251105_105408.jpg
    231.3 KB · Views: 63
Last edited:
Those 6 cell batteries are really easy to rebuild, all you need to do is get a cheap laptop battery from amazon and gut it then solder it to the BMS in the powerbook pack. The 8 cell batteries in the iBook G4 14" though, they are NIGHTMARES
 
  • Like
Reactions: netsrot39
will quote my DM to @milliectl since I still haven't done a proper writeup.

Thanks! I had a quick read-through and your message contains a lot of important details, especially the BMS chip inside of those batteries, namely the BQ20Z80. Hopefully, the same one is present in my A1148 battery but I don't see why it wouldn't. In your post you've mentioned Arduino. Honestly, I'm pretty new to this Arduino stuff but from what I've seen online after a short research, it does not seem too intimidating. However, I'd like to ask you if you can recommend me a specific Arduino model for flashing the BMS chip or will any do?

Edit 1: Since I can't view your image attachments of your DM, could you please attach pictures showing how you connected your Arduino to the PowerBook battery?


Those 6 cell batteries are really easy to rebuild, all you need to do is get a cheap laptop battery from amazon and gut it then solder it to the BMS in the powerbook pack. The 8 cell batteries in the iBook G4 14" though, they are NIGHTMARES

That is good to hear and also funny that you have mentioned the iBook G4 14" battery, because that one is actually the second dead battery that I want to rebuild, since I do have many Samsung INR18650-25R 2500mAh cells lying around (leftovers from the vacuum battery rebuild). A couple of years ago I never ever fancied replacing cells in batteries and I actually threw away 2 PowerBook G4 batteries (dead but probably somewhat fixable), which I kind of regret now.

To be frank, I'm in no hurry when it comes to rebuilding those batteries, since my PowerBook G4(s) and iBook are nowhere near being daily drivers again. I'd love it though to be able to breathe in new life into them and not have them connected to a power outlet all the time. Also, I want to make use of my leftover 18650 cells and I'd like to put my new soldering iron and spot welder to good use.

Thanks for your input @Matias_ and @featherwhisker ! I'll post my progress, which hopefully will be successful and I'm looking forward to this very new-to-me project.
 
Last edited:
Edit 1: Since I can't view your image attachments of your DM, could you please attach pictures showing how you connected your Arduino to the PowerBook battery?
Clicking the links doesn't work? Anyway I should probably come up with a clear diagram of some sort and attach the code here in case that blog post from squidgeefish disappears.

However, I'd like to ask you if you can recommend me a specific Arduino model for flashing the BMS chip or will any do?
Any will do. I used an Arduino Uno myself as it's easy to handle and connect.
 
Clicking the links doesn't work?

Unfortunately not, clicking the links gives me this message:
You do not have permission to view this page or perform this action.

Any will do.

Thanks! I ordered an Arduino UNO R4 WiFi and have various jumper wires lying around. Before I connect everything, I need to check the pinout of the PowerBook battery, but as far as I can remember, the pinout is described on the BMS circuit board. I assume there will be a bit of learning curve with the Arduino, but with the help of AI and the resource you have mentioned, it should be fairly straightforward.
 
These projects are interesting! Of course, I've also looked into... half-heartedly... just figuring out an adapter from an iBook's power cable to use a modern USB battery pack. Then just remove the old and outdated battery pack... maybe figure out some way to store the USB battery pack in the battery compartment of the iBook. Would such a thing even work? I don't know.
 
These projects are interesting! Of course, I've also looked into... half-heartedly... just figuring out an adapter from an iBook's power cable to use a modern USB battery pack. Then just remove the old and outdated battery pack... maybe figure out some way to store the USB battery pack in the battery compartment of the iBook. Would such a thing even work? I don't know.
I think it would be a very cool project. Something like powerbank>triggerboard>boost converter>Donor cable.
 
  • Like
Reactions: skinniezinho
So, after taking care of some other things, I'm finally able to dedicate time to this project again. Before I actually weld the pack together, I have two questions that I'd like to clarify:
  • Can I kill the BMS chip if I disconnect the original cells entirely? (I heard this is the case with some other BMS chips!)
  • @Matias_ If I read your post right, you revived one pack by carefully charging the old cells and you rebuilt a second pack. Do you recommend charging the new cells (my case) or in your case pretty new cells to full capacity or did you leave this to the BMS? Of course I'd check if all the cells have very similar voltages and internal resistances.
I'm kind of scared of trying to recharge those now two-decade-old cells, where one pair of cells does in fact look horrendous visually, that is why I just want to get rid of them and put in new cells without seeing if I can still get a sign of life with those original cells.

Thanks!
 
Can I kill the BMS chip if I disconnect the original cells entirely? (I heard this is the case with some other BMS chips!)
I don't think you can, as Squidgeefish did the same in his article which I linked (albeit with a Macbook battery but with the same BMS chip). I am not 100% sure though.

@Matias_ If I read your post right, you revived one pack by carefully charging the old cells and you rebuilt a second pack. Do you recommend charging the new cells (my case) or in your case pretty new cells to full capacity or did you leave this to the BMS? Of course I'd check if all the cells have very similar voltages and internal resistances.
I haven't rebuild the second pack yet (or the third one....). I intend to but I haven't gotten to it yet. I don't think it's required to charge them fully but the voltages should be close to each other yeah. Since the BMS can charge the cells no problem but I am not sure if it can balance them. Have to admit I'm not a lithium battery expert though.

I'm kind of scared of trying to recharge those now two-decade-old cells, where one pair of cells does in fact look horrendous visually, that is why I just want to get rid of them and put in new cells without seeing if I can still get a sign of life with those original cells.
Yeah I would very much advice against this indeed. I only did it because my cells looked fine and weren't totally discharged. I monitored them continually and didn't leave them unattended.

Hope that helps.
 
Last edited:
Thanks @Matias_ for your answer. So, yesterday I attempted to rebuild the PowerBook battery, and at first, all seemed to be going according to plan. While swapping out the cells, I noticed that I didn't even have to solder anything because there was enough space near the soldering points where I could simply weld another nickel strip onto them and connect everything that way.

Approximately 1.5 hours into the process, I noticed a strong odor and a slight amount of smoke coming from one cell, but since more cells were connected, I couldn't really tell which one I had apparently short-circuited. Honestly, I had a bad feeling, but the smoke literally lasted only for like 1–2 seconds, and I was positive that not all was lost. Around 10 minutes later, I was greeted again by the harsh chemical smell, and even more smoke came out of the pack. Luckily, the pack didn't catch on fire or go into thermal runaway.

Frankly, I do not know how I managed to short-circuit the pack so easily, but yeah, I had the nickel strip lying around along with some metal tools, and in hindsight, I paid too little attention to those things. In the end, I opted for cutting my losses and throwing everything into my recycling bin, where I will properly dispose of the old PowerBook battery (and unfortunately also six new 18650 cells that I no longer consider trustworthy).

2 hours and 30€ down the drain, but what can you do? Kind of ridiculous that I didn't even make it to the end, and now I have the Arduino for nothing, but I learnt my lesson here. I won't mess with batteries anymore, or if I do, I have to proceed differently and really pay attention to my workspace.

After so many successful projects, I was really confident that I'd be able to pull this one off easily, but when it comes to batteries, I'm still evidently lacking the necessary knowledge. The battery of my vacuum cleaner was way easier because I only replaced one cell and didn't have to more or less build it from scratch.

As proof, I'm attaching some pictures of the failed project. Long story short, this project failed, and I admit that this one was way over my head.
 

Attachments

  • IMG_3824.jpeg
    IMG_3824.jpeg
    150.4 KB · Views: 28
  • IMG_3825.jpeg
    IMG_3825.jpeg
    202.2 KB · Views: 29
  • IMG_3818.jpeg
    IMG_3818.jpeg
    213.1 KB · Views: 30
  • Sad
Reactions: Matias_
Register on MacRumors! This sidebar will go away, and you'll see fewer ads.