Got a tip for us?
Let us know
Become a MacRumors Supporter for $50/year with no ads, ability to filter front page stories, and private forums.
Macbook power adapter cord bitten by dog. No longer working. Fixable?
- Thread starter Airforce
- Start date
- Sort by reaction score
You are using an out of date browser. It may not display this or other websites correctly.
You should upgrade or use an alternative browser.
You should upgrade or use an alternative browser.
Just get a new power adapter. It's not worth the hazard to try to repair it.
+1. Or, really, the hazard that an imperferct repair will subject your macbook to odd voltage fluctuations that will make matters worse.
Macbook power adapter cord was chewed on by one of my dogs (just a small bite) and now no longer working. Anyone know if this can be fixed? Do I just need to get whatever wires are no longer touching back together or is it done for?
Fixing power cords used to be something that a person 'just did'. I can remember repairing numerous cables and never having a problem with them. These days however, considering the fact that replacement costs are quite low, it really is much safer if you buy a new one.
Sopranino
don't forget to make the dog know its a bad idea to do it again...what if he gets electrocuted...not nice for him!
Where's the best place to get a replacement for the "Mag Safe Power Adapter"? Apple has 'em for $80! Is there anywhere cheaper?
Repair is actually quite simple, if unbelievably ugly, and uncommonly annoying. Then again, my eyes ain't what they used to be. I could run to the Apple Store/Fry's and get a new one in the time it took to repair the cable nicely. It's really not worth the effort. I'd suggest biting the bullet on this one.
Thanks for the quick reply... Looks like both Amazon and PowerMax are $80, and I have an Apple Store nearby, so I'll just head over there.
What was damaged? If it is in the middle of the wire, repair is easy and perfectly safe if you are careful. Not sure what the first couple replies are on about, maybe they assume a bad job. If you are good with soldering iron and heatshrink, you could almost make the fix invisible, too, wouldn't have to be ugly.
My wife just had this happen, but it was so close to the brick I didn't have enough wire left to do a good job. She bought a new one today.
My wife just had this happen, but it was so close to the brick I didn't have enough wire left to do a good job. She bought a new one today.
At first I thought why not just get a replacement cord... but then i realized you were talking about the part that doesn't attach/detach from the power brick. I would hit ebay, or the genius bar, maybe they'll have a refurb/return/display/something unit
I personally would try to fix it, to save on the cost of a new adapter, and not waste a working one. Repairing cords really isn't too difficult, but you should know what you're doing.
As someone said above, a little heatshrink would do the trick nicely. It'd just be a case of cut, strip, match and connect the wires. Just be careful, don't want to be shorting and starting fires!
As someone said above, a little heatshrink would do the trick nicely. It'd just be a case of cut, strip, match and connect the wires. Just be careful, don't want to be shorting and starting fires!
After getting a new one, crack open the old one for the sake of science, i am curious about how it's put together without screws (i believe it's some kind of clips) 
SOLUTION! Flex cable Fixed!
Peopleeeeeeeeeee!!! I just got it! In despite mega brands engineering and trickering, I just fixed my macbook f@#$$@# flex cord!
As I'm a girl, you can't expect much of imagination fixing a cable right?
well... here are some tips for everybody:
Even when One1 explanations are really nice, there are some little details probably missing due his nite method, which I will love to try, but.... what about the ones we don't have a solder?
Well here it is:
It's very important to know that this cable works pretty much as a coaxial cable ( like the ones that goes on the tv from you cable company). This means that there a - and a + component, in two different layers of the cable. So we have to peel off 2 layers.
1. You will want to do a clean cut to the cable first.
2. Gently cut the outer cable, which is the first barrier to the silver threads you will find. This cut should be at least 1 inch away from the first clean cut, so you will have a clean access to the inner silver threads.
3. Undo the twisted silver threads on both sides of the cable. Later on we will twist those gray threads with the ones on the other side of the cable.
Now: Notice that there's another light gray cable shield, which holds the + threads. Don't panic.
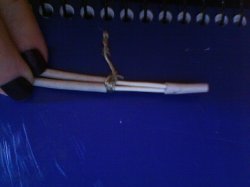
4.Cut very, very gently this second skin to reveal the inner threads.
( See pic 1)
5.Un-twist them, as seen on the picture.
IMPORTANT:
When you cut the cable on that first clean cut, you will notice that the internal part, underneath the inner hard shield looks like copper. But once you reveal those threads, they are silver! so the copper part is inside... Don't get nuts!!!
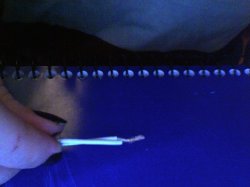
6. Just scratch those threads.. very gently, with a scalp or with whatever you used to cut the cable in first place.
( See pic 2)
After a while you are scratching the damns, you will notice that the silver is fading away and the real copper is showing off. That's is what we want. Otherwise, if you put together just the silvers of the inner layer, it wont transmit any power, so the entire work will be a waste of time.
Just keep scratching until those threads looks like copper threads. (this might take a while basically because these are very fragile threads, and you don't want to use to much force scratching, or they will cut off. So set some music and be patient!!! keep scratching..)
7. Ok.You must do this on both sides of the cable.
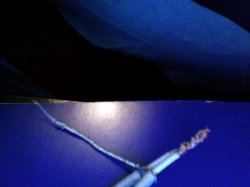
8. Once the copper is on sight on both sides, twist them together very gently, so the power can go through.
(See pic 3)
9. Now twist the first layer of silver threads you've found (this is the -).
So the entire work will look like on Pic 4.
10. Plug the adapter to the outlet, and.. VOILA!
To finish the task, put some outer cable, or tape (for electrical matters) over the unions.
I've notice that my battery takes a little bit longer to charge. But that's it.
I can leave my mac longer to charge, It doesn't matter. As long I don't have to Buy a new adapter, which here costs usd 200 !!!
I hope this helps and please be more careful about the cable from now on!
- I'll keep my rabbit 300 miles away!
At the end... my pic.. tired but successful!
Let me know how this works for you !
Love to everyone!!!

Peopleeeeeeeeeee!!! I just got it! In despite mega brands engineering and trickering, I just fixed my macbook f@#$$@# flex cord!
As I'm a girl, you can't expect much of imagination fixing a cable right?
well... here are some tips for everybody:
Even when One1 explanations are really nice, there are some little details probably missing due his nite method, which I will love to try, but.... what about the ones we don't have a solder?
Well here it is:
It's very important to know that this cable works pretty much as a coaxial cable ( like the ones that goes on the tv from you cable company). This means that there a - and a + component, in two different layers of the cable. So we have to peel off 2 layers.
1. You will want to do a clean cut to the cable first.
2. Gently cut the outer cable, which is the first barrier to the silver threads you will find. This cut should be at least 1 inch away from the first clean cut, so you will have a clean access to the inner silver threads.
3. Undo the twisted silver threads on both sides of the cable. Later on we will twist those gray threads with the ones on the other side of the cable.
Now: Notice that there's another light gray cable shield, which holds the + threads. Don't panic.
4.Cut very, very gently this second skin to reveal the inner threads.
( See pic 1)
5.Un-twist them, as seen on the picture.
IMPORTANT:
When you cut the cable on that first clean cut, you will notice that the internal part, underneath the inner hard shield looks like copper. But once you reveal those threads, they are silver! so the copper part is inside... Don't get nuts!!!
6. Just scratch those threads.. very gently, with a scalp or with whatever you used to cut the cable in first place.
( See pic 2)
After a while you are scratching the damns, you will notice that the silver is fading away and the real copper is showing off. That's is what we want. Otherwise, if you put together just the silvers of the inner layer, it wont transmit any power, so the entire work will be a waste of time.
Just keep scratching until those threads looks like copper threads. (this might take a while basically because these are very fragile threads, and you don't want to use to much force scratching, or they will cut off. So set some music and be patient!!! keep scratching..)
7. Ok.You must do this on both sides of the cable.
8. Once the copper is on sight on both sides, twist them together very gently, so the power can go through.
(See pic 3)
9. Now twist the first layer of silver threads you've found (this is the -).
So the entire work will look like on Pic 4.
10. Plug the adapter to the outlet, and.. VOILA!
To finish the task, put some outer cable, or tape (for electrical matters) over the unions.
I've notice that my battery takes a little bit longer to charge. But that's it.
I can leave my mac longer to charge, It doesn't matter. As long I don't have to Buy a new adapter, which here costs usd 200 !!!
I hope this helps and please be more careful about the cable from now on!
- I'll keep my rabbit 300 miles away!
At the end... my pic.. tired but successful!
Let me know how this works for you !
Love to everyone!!!
Attachments


Definately Fixable
I know this is a late post, but if you are looking for info like I was it is possible to fix the power cord. I was using my macbook and suddenly the green power light went out. I had noticed before I could see the wire going to the connector but just twisted it back up to cover it. Turns out, after some investigation, that was the trouble spot. When I twisted the outer shielding back I noticed the ground wire was completely broken off right at the plug. I immediately ordered a new power cable, but that won't be in for at least a week. After some thought, I cut the sleeve back to reveal a small lip where I was able to solder the wire back. I couldn't find any electrical tape so I used a hot glue gun to insulate everything and make it rigid. It's not ideal, but it will work for a week as long as I don't move it around a lot. So charge at desk and use the battery.
For those thinking they will blow up their laptop, that won't happen. Worst case scenario is you mess up the power brick by shorting it out. Fixing cables is usually ugly unless you have the right tools and take the time, but for the ten minutes it takes to fix it, at least temporarily in my case, is definitely worth it.
Attachments

Ran across this thread and had to ask...
Is the dog still alive?
Revenge!
Thank you!
Thank you romindstorm, for the detailed descriptions and the pictures. I couldn't find this information anywhere else on the net, and would never have figured out on my own to scrape the inner metal strands until they turned copper.
My bunny chewed the Magsafe wire. I tried to fix it first without scraping the inner wiresno luck. Then I found your instructions, took it apart and scraped the wires, breaking some in the process. The wires looked only a little coppery. Plugged it in and tried itit didn't work. Scraped a little more, with a butter knifenot sharp. Taped it all up again. It works!
You're a hero!
Register on MacRumors! This sidebar will go away, and you'll see fewer ads.