MRs Guide: Space Engineers Part 1 of 2

*click to enlarge images
Generally Speaking This Guide May Include Outdated Info- Nov 2016
*click to enlarge images
Generally Speaking This Guide May Include Outdated Info- Nov 2016
Updates
*10Nov16- The Cargo Bay Door building Instructions in this guide may be out of date with changes in the game. Have not verified.
*14 Oct- Added Settings List, Advanced Settings list, how to turn off Autosave, and how to invite a friend, under Getting Started. Added Getting Guns to Fire Properly under Hot Topics.
*11Oct- Split Guide in two parts due to post size limits in forum.
*11Oct- Updated section on installing Skyboxes and added a Hot Topic Section- something I want to mention, but needs more work to be included in this guide.
*16Aug- Updated and clarified verbiage in the door building section.
*13Aug- Images added to door building tutorial.
*12AUG- Guide updated with door building instructions. More images will be added to this guide.
*5Aug2014- Guide Created.
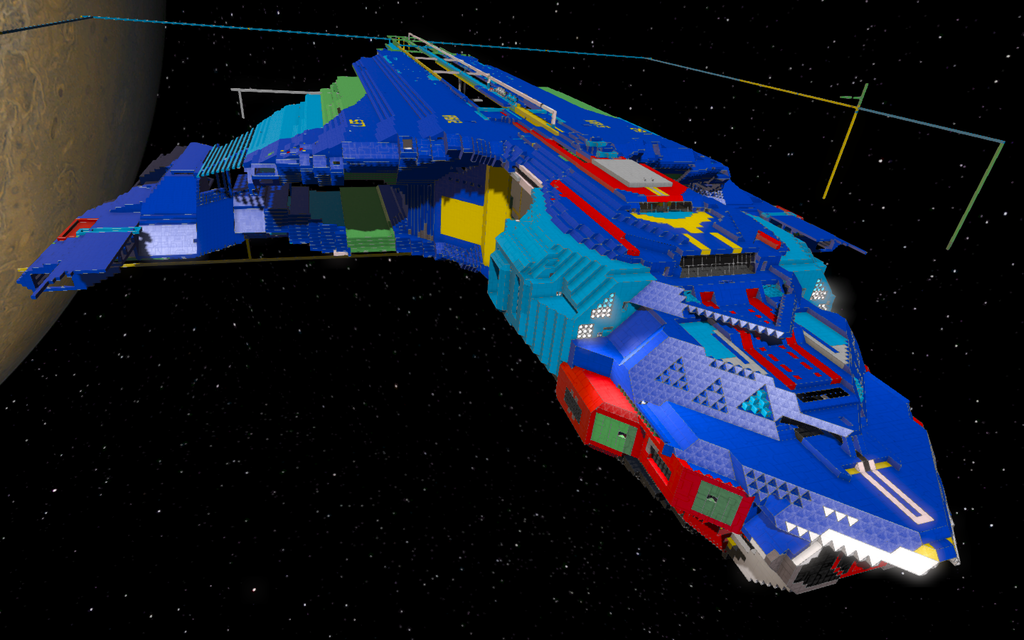
Introduction
This Guide is a work in progress for a PC Game available for purchase as pre-release (beta) on Steam currently at $20 (Aug 2014). Please report errors, broken links, or if you find this guide generally confusing. Reply to this post or send me, Huntn, a Private Message.
What is Space Engineers?
*Space Engineers is a sandbox style space building game (ships and stations) that allows you to choose both a survival mode and a creative mode. Some players have called it Minecraft In Space. As of Aug 2014, the game is still under development. Its not yet finished, and works well for what is currently offered. There are no missions. There is physics. Ships can be crashed. If equipment is improperly designed, it can tear itself apart.
Links
*Space Engineers
*Space Engineers Wiki
*Components and Tools
*Building Link
*Building in Symmetry Mode- a huge time saver, although sucky video, because it was hard for me to figure out.
")
*Oranj.io Voxel Shape Generator for reference when building curves.
*Space Engineers Sky Box Library
Hot Topics
*Gravity Drives- Will add more how-to info to this guide in the future. In the mean time check out these videos. As of Oct 2014 it appears to me that Grav Drives are a must for the top performance of any ship in this game. They put thrusters to shame. They seem especially important for large, really large ships (1000 or longer). However, its another question if this game can adequately handle large ships as anything other than virtual static displays. A question to be answered later. Im currently working on a ship approximately 4000 long.
In the mean time Check out these videos:
* Space Engineers : Warp Drive/Mega Drive Concept Ship Part1
*Space Engineers : Warp Drive/Mega Drive Concept Ship Part2
* Space Engineers : Warp Drive/Mega Drive Concept Ship Part3.
*Getting Guns to fire Properly- Working on this issue. Will post more once Ive verified solution.
Pluses and Minuses
*Your own stand alone server, along with dedicated servers. I have not checked out online servers.
*Coop with Steam Friends via an online connection. (Not sure if coop can be accomplished offline on a local network.)
*Developer is Mod Friendly.
*No Map- dont get lost.
Survival or Creative?
If you want a challenge, such as always have to watch your O2 and energy levels, and spend time mining for everything you build choose Survival. Some players take great pride in surviving. As for myself, I enjoy creating and view the survival aspect of the game, (the same as with Minecraft) as being a huge time sink as it is. Why do I want to spend 10s or 100s of hours mining? Creation is what attracts me to both games. Unfortunately I have zero experience with this game in Survival mode so there has to be a lot Im over looking.
--------------------------
Keyboard Commands
Visuals
*Alt- Free View
*F4- Screen Shot (located C Drive/User/AppData/Roaming/SpacEngineers/Screenshots)
*Middle Mouse Button- Will apply the color of a block being held to a block being highlighted. If MMB is held down, large areas can be painted while moving the mouse.
*P- Paint Interface.
*Tab- Hud toggle.
*V- 1st/3rd Person.
*Zoom- Scroll view.
*[/b][ ][/b]- Cycle through colors for a held block.
Building Commands
*Left Mouse Button- Add block.
* Right Mouse Button- Remove block.
* Control + LMB/or RMB- allows the addition or subtraction a row of blocks.
* Control + Shift and LMB/or RMB- allows an entire plane of blocks to be added or subtracted.
* Copy and Paste- Look at an object you have created and hit Control-C to copy it. Control-X to delete it, and Control-V to paste it. Available in Creative Mode.
* Rotating Blocks Prior To Placement: Blocks can be rotated in the XYZ Axis. It can seem confusing at first. Please check out this images:
For my description you are always facing the X Axis if you are placing a block on something in front of you.
*Note: These can be mapped to other keys.
*Page Down or Delete: Rotates horizontally around the Z Axis. The block will appear to rotate horizontally around the Z Axis.
*End or Home: Rotates the block around the Y Axis. From your perspective, a block will appear to tumble end over end.
*Page Up: Rotates the block around the X Axis. The front of the block will rotate in a circle.
*Need Help with plotting curves? See the url=http://oranj.io/blog/VoxelSphereGenerator]Oranj.io Voxel Shape Generator[/url] for reference.
Controls
*W/S- Forward Back
*C- Down
*F- Up
*Q- Roll Left
*E- Roll Right
*K- When interacting with a Control Panel/Keypad accesses The Terminal (K), then select the Control Panel Tab to see a list of equipment youve installed on a ship/station, set parameters and control equipment like doors.
*L- Headlights toggle
*G- Toolbox Configure (Includes command to start building a new ship or station).
*M- Set Symmetry Mode Axis (See Getting Started Section)
*N- Toggle Symmetry Mode ON/Off.
*P- Park- With Landing Gear Magnetically attaches ship to metal surface it is sitting on.
*T- Interact/Open (used with door keypad)
*X- Jet Pack toggle
*Y- Activate Ship
*Z- Inertial Dampers toggle (With Inertial Dampers, when movement is stopped, thrusters stop you. Without Inertial Dampers, youll keep going when thrust is stopped.)
*Warning!- There is no Map Reference (as of Aug2014). You can get seriously lost!
Getting Started
*Turn off Autosave- Before loading world, select the world you want to play, click on Settings, uncheck Autosave. Autosave happens every 5 minutes or so. It can burn you, be wary.
*Settings
-Access settings before launching world.
-Creative or Survival.
-Guns Unlimited Ammo.
-Online Mode- Offline, Private, Friends, Public.
-Autosave
-Mods
-Advanced.
*Advanced Settings
-Access settings before launching world.
-Game Mode
-Inventory Size
-Assembler efficiency
-Refinery speed
-Welding speed
-Grinding speed
-Max Objects
-World Size
-Respawn Ship cooldown
-Autoheal
-Copy Paste
-Weapons enable
-Trash auto-remove- removes loose building parts floating around, I believe on quit.
-Delete Respawn Ship ?
-Show Player names
-Thruster Damage- I believe removes damage from getting to close to thrusters.
-Cargo Ship?
-Enable Spectator
-Reset Ownership
-Permanent Death?
*Invite a (Steam) Friend to your World
- Create a Friend in Steam. Use the Steam Interface to ID and create a friend.
- Launch The Game. Create a world.
- Back out of the world, back to the Space Engineers start page.
- Select the world, highlighting it.
- Click on Settings for Online Mode select Private, Friends, or Public. Note: These settings may work before you create a new world and Im only familiar with a Friends Game. Even with a Friends game, you have to issue an invite to the friend (I believe).
- Go to the Steam Friends interface. While on the SE start page, hold Shift-Tab to return to the Steam interface, go to Friends List, right click on your friend and select Invite to Game. They should hear a tone and in the Steam interface, they should see a message, that they have been invited to your game. If they click on the message, your world should load for them.
*Blast Door Blocks, What Makes Them Different? In the good ole alpha testing days before pistons were created, moving doors were made with regular blocks using rotors and arms, kind of a Rube Goldberg setup. Rotors are designed so that a door built upon them with regular armor blocks are raised a hair so normal blocks could slide by each other without rubbing excessively. Watch Piston Tutorial Part 1 for a primer on rotors and arms.
Then came Pistons and Blast Doors. Pistons are far superior to rotors and arms, but dont have the separation that rotors give a door when using regular sized blocks. So for Pistons, a narrower width block was required. The Blast Door Block was created so that a piston built door could slide adjacent to regular blocks and not scrape.
*Whats That Bangy-Clangy Noise? When something is broken, like a door, youll hear a banging as it operates and sometimes when its not, like when a large door becomes unhooked and is leaning against the side of the ship.
*Copy and Paste- In Creative Mode copies of your ship can be copy and pasted. From the outside look at it and select Control-C to copy, then Control-V to Paste, move the new ship to a location and click your Left Mouse Button to Place it. This is a way to save your ship in multiple stages of completion. Ships can also be deleted with Control-X.
*Auto Saving- Space Engineers employs auto saves every 5 min or so. What this means is that if you alter a ship, the original version will soon be saved over. If experimenting with a new design and in Creative Mode, consider Copy and Paste.
*Save Strategy- Multiple copies of a World can be saved by using the Save As feature on the World Load Page. However after spending hundreds of hours building a space ship, the Save File should be backed up. Find it at C Drive>User>AppData>Roaming>Space Engineers> Saves.
*Survival Mode, offers a starting Inventory.
*When attaching a new block to an existing block, a red highlight will indicate which block is being attached to.
*Need Help with curves? See the Oranj.io Voxel Shape Generator for reference.
The Terminal (K)
*Can be accessed from any machine such as a Reactor or assembler via its control panel(K). When approached, the control panel will illuminate. Then hit K.
* Multiple items can be grouped and controlled at the same time. For example a door that uses several pistons.
Gotchas
*When building, if a middle block is deleted, if other blocks are not connected to the structure in any manner, they will start to float away. They cant be reconnected to the structure. They must be deleted and new blocks created.
*Do not place banks of missiles immediately side by side, leave a space or two between them. If side by side, they have a tendency to collide with one another and blow up in close proximity to your ship.
______________________________
Building
*Doors and Pistons- As of 8Aug2014 Pistons have been introduced to be used in conjunction with Blast Door blocks. However there are issues when utilizing more than one piston per door and the connection of blocks, how blocks connect to one another. This may not be easy to understand but blocks connect to one another based on ownership. So a ship essentially owns all the blocks that it is composed of. However, if a section of blocks is disconnected from the ship, they cant (currently) be reconnected. They must be deleted and reconstructed, because the ship no longer owns them.
Something similar happens when using pistons. Although a piston is physically connected to the ship, the head of the piston is separate from the ship. Blocks can be attached to the piston, but they dont belong to the ship, but to the piston. A problem arises when multiple pistons are used on a single door. Blocks connected to piston are owned by that piston so when there are multiple pistons there are door integrity issues. Doors can be constructed, but with multiple pistons, there will be visible cracks, based on which piston a block is connected to.
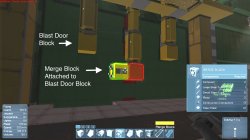
The workaround solution is to utilize a Merge Block. A Merge Block can be used to manually connect blocks shared by several pistons. The end result is that with multiple pistons, door blocks will connect to one another properly. In essence the pistons now share the blocks that the door is composed of. For reference, watch this Pistons and Doors Steam Guide

A Finished 6 Piston Door Stacked 2 Deep
Building Doors With Multiple Pistons
* Note: Effective Aug 2014, subject to change. Pistons came out recently. Rotors and arms are no longer cool.
*Build a Test Door (Optional)- A door test platform can easily be built starting a new ship (G) and then select build a large ship. (Big doors are usually on big ships.) Build a platform, power it (reactor), stabilize it (gyro) and then build a test door.
*Plan your door
A 10 block wide door should probably have 3 pistons. Maybe 2 will work, experimentation may be required. During planning allow for the space that the door will occupy when retracted. I know from experience that 6 pistons (stacked 2 deep) can handle a 10 wide by 8 high door. For the door illustrated above, because of piston throw (4 blocks) to get the necessary movement of a 8 block high door, two pistons had to be stacked. The door can be planned with a one block deep space in the floor so it can descend into the floor. It its a single door, during construction, you can leave this space (under the door) open, so if your measurements are off it wont crunch against the floor. It can also be planned with landing pads on its sides and at the bottom to support the door. For a large ship, landing pads are 2 blocks deep.
*Piston Size-
When fully retracted, pistons are two blocks tall in their respective grids. Therefore small pistons are 1m tall and large pistons are 5m tall. Fully extended, the piston is just at 6 blocks (3m/15m) tall, so they extend 4 blocks. Take this in consideration when planning a door. Experimentation may be needed. Pistons can be stacked on top of each other for taller doors.

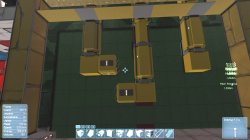
Placed Pistons
*Place pistons
Place onto adjacent blocks. It is recommended that pistons are only created and placed for one door at a time so you can more easily manage those pistons in the Terminals (K), Control Panel list. For large doors, more than 4 or 5 blocks high, double pistons will be required. They can be stacked. Is there a limit for stacking? I dont know.

Terminal
*Label The Pistons
Find a Control Panel/KeyPad, the little numbered keypad on all equipment and including doors. Move close so it lights up, then pull up the Terminal (K) and select Control Panel Tab. A list of all equipment currently installed on the active ship or station will appear.
It may not be apparent which piston is which in the list. These pistons can be tested by selecting one, change the velocity (+ extends, - retracts), then escape to get out of the Terminal and observe which pistons moves. With this info, an appropriate name can be applied to the piston in the Control Panel list. Youll find equipment with different colors. Some of the pistons IDs will be labeled white or have another color. I currently see no rhyme or reason for the coloring.
*Read the previous Doors and Pistons section above-
Because of the issue with and for lack of a better name block ownership, when multiple pistons are used, blocks connected to each piston are owned by that piston. From a building standpoint, this is not sound because all of the blocks that make up the door will not be connected to each other properly and the integrity of the door will be an issue.
So the work around is to use Merge Blocks so that all of the door blocks will be connected to each piston and all be connected to one another.
*Recap to this point- So, up to this point, the pistons have been placed and labeled. Now we will start to construct the door blocks attached to the pistons and use Merge Blocks to connect all of the blocks together. If you dont want to read a lot of verbage, watch this
Pistons and Doors Steam Guide.
_____________Continued_____________
Attachments
Last edited: