Beta 3 still has capital B:The beta 2 has capital B in "Beta" so the command for beta 2 is
sudo /Applications/Install\ macOS\ Sequoia\ Beta.app/Contents/Resources/createinstallmedia --volume /Volumes/Untitled
They don't normally have the capital B so we'll have to see if the B stays in future betas or if it goes back to b.
Got a tip for us?
Let us know
Become a MacRumors Supporter for $50/year with no ads, ability to filter front page stories, and private forums.
Sequoia bootable USB installer
- Thread starter tywebb13
- Start date
- Sort by reaction score
You are using an out of date browser. It may not display this or other websites correctly.
You should upgrade or use an alternative browser.
You should upgrade or use an alternative browser.

Edgecrusherr
macrumors 6502a
So, I've got a Studio M1 Max system. I'd prefer not to wipe my existing Sonoma (14.5) main drive or any of the 4 data drives in the external drive casing. I got the Beta installer loaded to a 32 gig Verbatum thumb drive just fine, and I wiped a 500GB (5400rpm) small drive on a USB adapter for the install.
So, whats the likelihood of installing Sequoia Beta to that 500GB drive to try it out, without disturbing my Sonoma system?View attachment 2388842
This photo sums up life on a Mac Studio. I''m feeling your pain, I'm coming from a 2010 Mac Pro. I wish the Mac Pros were more affordable.
VisitEveryCountry
macrumors newbie
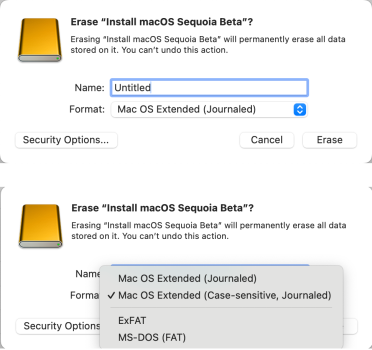
Hi gang... apologies for not being onboard with this... I just want to create a bootable Sequoia drive. I downloaded the InstallAssistant.pkg and it is sitting in my downloads folder. I am missing the step on what to do with it. I see the Terminal prompt and tried to follow the command line, but then got lost in it.You can make a Sequoia bootable USB installer by first formatting a 32GB or 64GB usb as Mac OS Extended (Journaled) and naming it Untitled.
After downloading the Sequoia Beta 1 installer (which so far is nameless, even though we now know it has the name Sequoia) you can run this in Terminal to make the bootable USB:
sudo /Applications/Install\ macOS\ 15\ beta.app/Contents/Resources/createinstallmedia --volume /Volumes/Untitled
The command for future betas will probably change to
sudo /Applications/Install\ macOS\ Sequoia\ beta.app/Contents/Resources/createinstallmedia --volume /Volumes/Untitled
and then with public release (or even release candidates) to
sudo /Applications/Install\ macOS\ Sequoia.app/Contents/Resources/createinstallmedia --volume /Volumes/Untitled
To get the full installer for beta 1 you can search the sucatalogs for InstallAssistant.pkg and look for ProductID 052-49060 to get the link.
To verify the link you can change the g at the end of it to m and download the pkm file, open in textedit and you will see
….version="24.0.5264.14”….
How to read this is that the second number 0,1,2, … etc stands for A,B,C, etc and the fourth number 1,2,3, etc stands for a,b,c, etc.
They will drop the fourth number for release candidates and public releases. Such numbers are only for the betas.
So the second number 0 is A and the fourth number 14 is n and hence the build number is 24A5264n
Just be aware that future betas will have different Product IDs.
The beta 1 installer icon looks like this:
View attachment 2387209
EDIT: I originally said 16GB or 32 GB usb but some have said the 16 won't work
EDIT 2: The beta 2 has capital B in "Beta" so the command for beta 2 is
sudo /Applications/Install\ macOS\ Sequoia\ Beta.app/Contents/Resources/createinstallmedia --volume /Volumes/Untitled
Am I supposed to run the InstallAssistant.pkg file and then run the Terminal command? I don't want to install it on my current hard drive (too many apps I'm not sure will work on it). Thank you
Yes. That's the way. Running in the install pkg will create the install app in /Applications. Then run the create command. You can then delete the .pkg and the .app, if you want.Am I supposed to run the InstallAssistant.pkg file and then run the Terminal command?
VisitEveryCountry
macrumors newbie
You all are SO helpful, thank you. I formatted my USB Thumb (Kingston) as above, and installed the boot drive (and, it boots to my thumb drive!). But when it goes to install, I get a "GUID Format" error. From what I've read, the GUID Format error is random based on the USB manufacturer and no one can say which thumb drive will work. I'll try a few others. Again, many thanks!Yes. That's the way. Running in the install pkg will create the install app in /Applications. Then run the create command. You can then delete the .pkg and the .app, if you want.
chrfr
macrumors G5
Did you format the USB disk as "MacOS Extended (Journaled)" and set the Scheme to "GUID Partition Map"? I have not encountered a USB flash drive that can't be used to create a macOS installer, and I do this fairly often.You all are SO helpful, thank you. I formatted my USB Thumb (Kingston) as above, and installed the boot drive (and, it boots to my thumb drive!). But when it goes to install, I get a "GUID Format" error. From what I've read, the GUID Format error is random based on the USB manufacturer and no one can say which thumb drive will work. I'll try a few others. Again, many thanks!
VisitEveryCountry
macrumors newbie
There is no option to set the Scheme, Just Name (Untitled) and Format (MacOS Extended (Journaled). I saw the "Scheme" option on some PC screen shots. I am using a new Kingston 256GB thumb (it's high speed and all I have avail).
Attachments

chrfr
macrumors G5
You need to set Disk Utility to "Show all Devices" from the view menu (or type command-2) and then erase the top level of the USB disk itself. This will allow you to change the scheme.There is no option to set the Scheme, Just Name (Untitled) and Format (MacOS Extended (Journaled). I saw the "Scheme" option on some PC screen shots. I am using a new Kingston 256GB thumb (it's high speed and all I have avail).
VisitEveryCountry
macrumors newbie
That did it. Super grateful again. JimYou need to set Disk Utility to "Show all Devices" from the view menu (or type command-2) and then erase the top level of the USB disk itself. This will allow you to change the scheme.
VisitEveryCountry
macrumors newbie
So, next debacle is that when I go to install the new OS on my thumb drive, I receive the error that the disk is not formatted for APFS. I read about MAC file formats. Did I go down the wrong path?That did it. Super grateful again. Jim
Disk Utility on Mac supports several file system formats:
- Apple File System (APFS): The file system used by macOS 10.13 or later.
- Mac OS Extended: The file system used by macOS 10.12 or earlier.
- MS-DOS (FAT) and ExFAT: File systems that are compatible with Windows.
DeltaMac
macrumors G5
The installer should change the drive format to APFS automatically during the install of the system. That's assuming that you used the GUID partition map as the "Scheme", and Format could be either Mac OS Extended (journaled), or APFS. Installing the system will automatically convert Mac OS Extended (journaled) to APFS. However, you can stay one step ahead by changing to APFS yourself, using your Disk Utility.
BUt... I suggest that you might have a better result if you have a faster media. The typical thumb drive will give you disappionting performance. Great for making a bootable installer, but (IMHO) not acceptable for use as a boot system.
External USB SSD is a good choice, in my experience. I have about 15 USB enclosures for m.2 / PCIe cards. Those work great for boot drives.
VisitEveryCountry
macrumors newbie
Thank you. That's a great suggestion. I have a couple of USB SSD drives that I'll convert one of them to.The installer should change the drive format to APFS automatically during the install of the system. That's assuming that you used the GUID partition map as the "Scheme", and Format could be either Mac OS Extended (journaled), or APFS. Installing the system will automatically convert Mac OS Extended (journaled) to APFS. However, you can stay one step ahead by changing to APFS yourself, using your Disk Utility.
But... I suggest that you might have a better result if you have a faster media. The typical thumb drive will give you a disappointing performance. Great for making a bootable installer, but (IMHO) not acceptable for use as a boot system.
External USB SSD is a good choice, in my experience. I have about 15 USB enclosures for m.2 / PCIe cards. Those work great for boot drives.
Register on MacRumors! This sidebar will go away, and you'll see fewer ads.