The solution for me was to remove all subfolders (and the content within) from: /Library/Displays/Contents/Resources/Overrides then reboot the machine.
htomi what you have done is
delete all the display configuration files for all manufacturers and products.
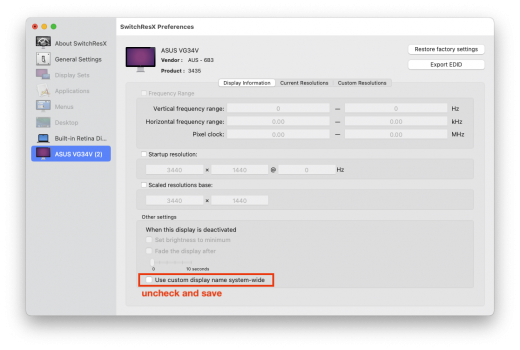
To get proper resolutions SwitchResX had to modify the config file for your monitor - and just changed the display name so you knew it was a modified config. It wasn't causing a problem.
But don't worry, these config files will probably be replaced next time there's a macOS update. I'm not sure how Macs handle the situation of a non-existent monitor config file but I guess there'll be some default method.
FWIW I’ve managed to track down the cause of the fuzzy text problem and the solution for poor text rendering on non-Retina and non-UHD monitors.
After much searching, encountering much nonsense (e.g. Apple renders fonts so perfectly they only look good on Retina screens etc etc) I finally found the solution - kudos to the serious Geek who figured out how to solve it.
Each individual monitor has a configuration file.
They are organised by manufacturer (folders) and model (plist files without plist extension) located here:
Macintosh HD ▸ System ▸ Library ▸ Displays ▸ Contents ▸ Resources ▸ Overrides
I don’t know if these are generated by Apple or the display manufacturers.
For various reasons these no longer play well from Mojave onwards.
To get clean text the display must be in Apple’s “HiDPI” mode for the selected resolution.
And there are gotchas: to get a nice 1920 x 1080 resolution, it needs to be configured as double that, 3840 x 2160.
So to fix that you need to customise the configuration file for you monitor.
Thankfully a wonderful geek has made a tool so you can generate a new config file.
But as well, the display resolutions that you see listed under System Prefs | Displays do not show all the available resolutions. You can often see more by holding down <Option> while clicking <Scaled> but even then many may be missing.
So to fix that, you need a free tool called RDM which pops a button in the menu bar that shows all possible resolutions and also identifies those that are HiDPI and will and give the best possible text rendering.
The process once you’ve done it is actually straightforward. There are a few tricks to identify the file you need to modify and then to replace it you have to run commands in Recovery Mode, including disabling then re-enabling System Integrity Protection.
The guy who figured it out (very clear explanation):
Force HiDPI Resolutions for Dell U2515H Monitor
Display configuration file generator tool he created:
PropertyList Parser and Generator
RDM app (just save it in Applications folder):
RDM
Hope that solves the mystery and helps someone ~ it's been a nightmare tracking this issue down!

")