Become a MacRumors Supporter for $50/year with no ads, ability to filter front page stories, and private forums.
Status
The first post of this thread is a WikiPost and can be edited by anyone with the appropiate permissions. Your edits will be public.

Arashnik

macrumors newbie
Nov 23, 2021
28
5
Another successful update - a 27" Late 2013 with a Samsung 980 NVMe SSD:

Device: Late 2013 - 14.2 (3.5Ghz i7-4771, FusionDrive)
Blade upgrade: 128 GB Apple -> 1TB Samsung 980 M.2 NVMe SSD
HDD upgrade: 1TB SATA HDD -> none
Speed test: Blade: ca 760 MB/s read & write
OS: Catalina 10.15.7
Temperature sensor: none
Location: AT, Europe
Adapter: Sintech ST-NGFF2013-C (long), newest version
SSD Heatsink: AXAGON CLR-M2L3 M.2 ALU Heatsink (3mm thick)
Issues after fresh OS install: none, no sleep/hibernation issues!


The success neatly shows how much Apple has done in terms of firmware update over the years. I tried a very similar upgrade just 2 years ago with High Sierra ( #22 ) and failed with sleep & hibernation issues and lack of SMART data reporting. Now, with Catalina, it was a breeze (I updated macOS to Catalina still on the original Apple SSD, then performed the upgrade).

Further, I noticed that Sintech has also upgraded their SSD adapter: not only are the connectors covered with tape, they include now a foam cushion to support the SSD at the tail end, and finally included a longer screw with a larger screw head. Well done!

View attachment 1923409 View attachment 1923408 View attachment 1923410

All the best,
Magnus
Great!

Which Adhesive did you use last time and this time? I hear if you dont use original apple adhesive first of all your screen can fall off and if you want to open it again is much more difficult to open! How was it with your computer?
Did you check temperature on your m2?
By the way I think if you remove your old HHD drive or replace it with SSD your speed gonna be 3 times faster!
 

mbosse

macrumors 6502a
Apr 29, 2015
628
196
Vienna, Austria
Great!

Which Adhesive did you use last time and this time? I hear if you dont use original apple adhesive first of all your screen can fall off and if you want to open it again is much more difficult to open! How was it with your computer?
Did you check temperature on your m2?
By the way I think if you remove your old HHD drive or replace it with SSD your speed gonna be 3 times faster!

I always use the same adhesive I buy from eBay - never had an issue with screens falling off. And I took out the HDD entirely as it was mechanically defective (which was the motivation for the upgrade in the first place).

I’ll check temperature in a few days.
 
  • Like
Reactions: Arashnik

Arashnik

macrumors newbie
Nov 23, 2021
28
5
I always use the same adhesive I buy from eBay - never had an issue with screens falling off. And I took out the HDD entirely as it was mechanically defective (which was the motivation for the upgrade in the first place).

I’ll check temperature in a few days.
Ok! Then did you use Apple OEM Adhesive from seller who says they sell only original Apple OEM Adhesive?(from US)
Which for me would be costly to send to Europe or they dont deliver to Europe! :|
I have everything ready only my concern is this Adhesive!
By the way how come you get such a speed? Dont you think is very low or with your computer hardware is what you can get!
 
  • Like
Reactions: mbosse

mbosse

macrumors 6502a
Apr 29, 2015
628
196
Vienna, Austria
Ok! Then did you use Apple OEM Adhesive from seller who says they sell only original Apple OEM Adhesive?(from US)
Which for me would be costly to send to Europe or they dont deliver to Europe! :|
I have everything ready only my concern is this Adhesive!
By the way how come you get such a speed? Dont you think is very low or with your computer hardware is what you can get!

The latter - it’s the limit of the 2013‘s PCIe port.
 

kirkster501

macrumors regular
Aug 20, 2011
114
72
Nottingham, UK
IF you upgrade the NVMe and then take out the HDD entirely and do not replace it with anything (not even a SSD), how can the system take the temperature? Is a disk or something else needed on the [now vacant] HDD cable?
 

mbosse

macrumors 6502a
Apr 29, 2015
628
196
Vienna, Austria
IF you upgrade the NVMe and then take out the HDD entirely and do not replace it with anything (not even a SSD), how can the system take the temperature? Is a disk or something else needed on the [now vacant] HDD cable?

Not needed - no HDD, no HDD temperature measurement necessary!
 

kirkster501

macrumors regular
Aug 20, 2011
114
72
Nottingham, UK
Not needed - no HDD, no HDD temperature measurement necessary!
Thanks,
Ok so just cable tie the old HDD's power and SATA cables out of the way and that's it?
Exactly which Samsung 980 did you use? Not really needed to have so fast a NVMe really, any cheapo one would work on the older 2013 since it does not have so many PCIe lanes. I am thinking of re-purposing a 2TB Intel one from my PC.
I am going to do this procedure to my late 2013 i7 27" MAC over the holidays. I may after all put in a SSD too but would be nice to have the option not to.
 

mbosse

macrumors 6502a
Apr 29, 2015
628
196
Vienna, Austria
Thanks,
Ok so just cable tie the old HDD's power and SATA cables out of the way and that's it?
Exactly which Samsung 980 did you use? Not really needed to have so fast a NVMe really, any cheapo one would work on the older 2013 since it does not have so many PCIe lanes. I am thinking of re-purposing a 2TB Intel one from my PC.
I am going to do this procedure to my late 2013 i7 27" MAC over the holidays. I may after all put in a SSD too but would be nice to have the option not to.
Yes, just take the cable out. You won't need it as long as you don't plan to install another SATA HDD/SSD.

There's a 980 and a 980 Pro. As you said, already the standard 980 exceeds the speed limits of the 2013 iMac.
 
Last edited:
  • Like
Reactions: kirkster501

pbedrosi

macrumors newbie
Mar 10, 2015
25
0
Nashville
Late 2012 iMac 27" custom config i7 1TB Fusion - Blade SSD. AirPort Card Upgrade, 2nd 2.5"SSD

Device: Late 2012 27inch - (3.4Ghz i7, 1TB Fusion, 16GB RAM)
GPU: NVIDIA GeForce GTX 680MX 2GB
HDD upgrade: 1 TB SATA HDD -> 128GB Crucial (don't need 2nd drive but thought it would be good PS scratch disk)
Blade upgrade: 128GB Samsung -> 1TB WD Blue M2 2280 WDS20082B0B (I'm limited to SATA III)
AirPort Card: Upgaded to 2013+ BCM94360CD
Speed test: ~450 MB/s read, 400 MB/s write (wasn't the point of the upgrade)
OS: Internet Recovery install of Catalina
Location: Nashville, TN
Temperature sensor: None used - none available for 2012??
Issues after fresh OS install: Fan speed going crazy

Late 2012's limit the HDD speed but I wanted something simple and thought about removing the 2nd mechanical drive altogether to keep things simple, this is not a workhouse I just want it to run smooth. During the upgrade I also installed WiFi/BT card from 2013+ iMac to get AC wifi....it works great!!

WD Blue M2 2280 SSD with M.2 NGFF B Key SSD adapter from eBay worked great. Adapter + SSD fit perfectly.

I added a 128GB Crucial SSD drive laying around with advice of others to put one in as a Photoshop scratch disk. I Used Corsair SSD Mounting Bracket 3.5" CSSD-BRKT2...does take same time to make it work but it was cheap.

I did not read anyone with 2012+ iMacs having fan speed issues but I have it. I've used temp software and I don't see any temperature issues (Screenshot at end). I also can't find any hardware solutions to this. I'm trying to figure out if shorting the SATA cable temp leads I've heard about would work. Otherwise I'm going to try and swap the crucial SSD with Kindston SSDNow 300, then I may just remove the 2nd drive and SATA cable completely. Any insight??

Also, I used Amazon seller for the adhesive strips - not on just yet, screen being held by take until I fix the fan issue. brand was "LeFix". I have not had any issues with adhesives in the past (first time using LeFix), I think you just need good prep with adhesive remover and rubbing alcohol. This actually took a while to get the surface very clean, if you don't inspect it closely you will see hints of adhesive residue left behind.

Some Pics

SSD Drive
IMG_4016.jpeg


SSD Adapter - M.2 NGFF B Key SSD adapter

IMG_4018.jpeg


Old 128GB Blade SSD
IMG_4024.jpeg


New WD Blade M2 DATA SSD Installed

IMG_4025.jpeg


2.5" SSD Bracket - Corsair

IMG_4015.jpeg


New AirPort Card

IMG_4017.jpeg

IMG_4022.jpeg


Previous Airport Card

IMG_4023.jpeg


Dust inside the iMac - one of the other reasons why I wanted to open it up....this along with new Thermal paste


IMG_4021.jpeg


As I said, you need to get the old Adhesive removed, all of it. This was not so easy to see.

IMG_4020.jpeg


Thermal paste....etc...
IMG_4019.jpeg


Temp ReadingsTD Pro + Intel Gadget Tools
Screen Shot 2021-12-06 at 8.03.39 PM.png
 

mbosse

macrumors 6502a
Apr 29, 2015
628
196
Vienna, Austria
Great!

Which Adhesive did you use last time and this time? I hear if you dont use original apple adhesive first of all your screen can fall off and if you want to open it again is much more difficult to open! How was it with your computer?
Did you check temperature on your m2?
By the way I think if you remove your old HHD drive or replace it with SSD your speed gonna be 3 times faster!
Temperatures: 34°C sensor 1, 42 °C sensor 2, after 30min YouTube - and I did not yet mount the heatsink, this will be done tomorrow.
 
Last edited:

Arashnik

macrumors newbie
Nov 23, 2021
28
5
Device: iMac 27" 5k late 2015 2TB Fusion drive, 4GHz i7 , RAM 48gb OWC 1867MHz(2x16gb-2x8gb).
Blade upgrade : 128gb to 2TB samsung 970 evo plus(old version)with Sintech st-ngff2013-c and GRAUGEAR g-m2hs02 heatsink.
HDD upgrade : 2Tb Crucial MX500 with OWC sensor and AdaptaDrive 2.5" to 3.5" Drive Converter Bracket.
OS : Monterey 12.0.1 .
Location:Europe

As you can see speed tests are in the photos! After NVMe ssd cash gets full speed drops to around 1500(after 10min speed test).Temperature stays max at 62c! Room temperature 20c! NVMe ssd Temperature without doing any task 49c in a Kind of cool room.Is interesting that stays at 49c(I thought should be around 35c normally)! Maybe I added much Thermal pads! If is normal plz let me know!

Crusial ssd drops speed to around 340MB/s write after 15min speed test and max temperature 33c! I dont hear the computer fan much.

Well I did not put the Adhesive yet! Waiting for Apple OEM adhesive. I will do some real test like working with lightroom cc and photoshop and Final cut pro 4k exporting and see how it is!

My most concern is NVMe temperature and Adhesive! If in real work tests and heavy load temperature stays around 62c then I think is healthy number for NVMe ssd!
 

Attachments

  • Photo 07-12-2021, 16 12 30.jpg
    Photo 07-12-2021, 16 12 30.jpg
    414.8 KB · Views: 126
  • Photo 07-12-2021, 16 04 32.jpg
    Photo 07-12-2021, 16 04 32.jpg
    395.3 KB · Views: 125
  • Photo 07-12-2021, 15 16 02.jpg
    Photo 07-12-2021, 15 16 02.jpg
    445.7 KB · Views: 122
  • Photo 07-12-2021, 15 11 33.jpg
    Photo 07-12-2021, 15 11 33.jpg
    453.9 KB · Views: 131
  • Photo 07-12-2021, 12 52 23.jpg
    Photo 07-12-2021, 12 52 23.jpg
    567.8 KB · Views: 137
  • Photo 07-12-2021, 11 01 59.jpg
    Photo 07-12-2021, 11 01 59.jpg
    420.9 KB · Views: 137
  • Photo 07-12-2021, 11 01 52.jpg
    Photo 07-12-2021, 11 01 52.jpg
    460.4 KB · Views: 143
  • Photo 07-12-2021, 11 01 46.jpg
    Photo 07-12-2021, 11 01 46.jpg
    708.7 KB · Views: 112
  • Photo 07-12-2021, 11 01 43.jpg
    Photo 07-12-2021, 11 01 43.jpg
    333.3 KB · Views: 122

Jefke Peeters

macrumors member
Jun 9, 2020
51
15
Belgium
In a few days, I will also upgrade my 2019 27" iMac 2TB Fusion
I will just upgrade the blade to a 1TB Samsung 970 EVO PLUS and keep the original HDD of 2TB for storage.
iMac is now running BigSur 11.6.2.

I like to start with a fresh install, with a bootable Monterey USB.

Does someone know if this is possible? I've read many horror stories of non genuine Apple SSD's which prevents an installation of Monterey.
 
  • Like
Reactions: Arashnik

Arashnik

macrumors newbie
Nov 23, 2021
28
5
In a few days, I will also upgrade my 2019 27" iMac 2TB Fusion
I will just upgrade the blade to a 1TB Samsung 970 EVO PLUS and keep the original HDD of 2TB for storage.
iMac is now running BigSur 11.6.2.

I like to start with a fresh install, with a bootable Monterey USB.

Does someone know if this is possible? I've read many horror stories of non genuine Apple SSD's which prevents an installation of Monterey.
Well last week I did the upgrade with a bootable Monterey 12.0.1 usb and last night update to 12.1 no problem!
You can keep your HDD but it will slow you down! At least try to make them 2 complete separate drive and your os and applications only on fast drive! First format Samsung with bootable usb install your os and then later format you hdd for back up data and things!
 
  • Like
Reactions: mbosse

mbosse

macrumors 6502a
Apr 29, 2015
628
196
Vienna, Austria
Well last week I did the upgrade with a bootable Monterey 12.0.1 usb and last night update to 12.1 no problem!
You can keep your HDD but it will slow you down! At least try to make them 2 complete separate drive and your os and applications only on fast drive! First format Samsung with bootable usb install your os and then later format you hdd for back up data and things!

So you could update with no original Apple SSD inside, just the third party one you installed?

Thanks,
Magnus
 

Arashnik

macrumors newbie
Nov 23, 2021
28
5
So you could update with no original Apple SSD inside, just the third party one you installed?

Thanks,
Magnus
Yes with samsung 970 evo plus 2tb and replaced HDD with also third party SSD! Study very good what you need and how you have to do it! Is not a easy job and is not really hard if you are good with computers, cables and so...

https://mrmacintosh.com/how-to-create-a-bootable-macos-12-beta-usb-drive-in-5-min/

 
  • Like
Reactions: mbosse

arkieboy72472

macrumors regular
May 4, 2017
128
29
Device: Late 2015 27"
HDD upgrade: 2 TB SATA HDD -> 1TB Crucial MX500 SSD (I have also had success with BX models, I like Crucial SSDs.)
SSD upgrade: 128 Apple SSD -> Crucial P2 1TB SSD + Sintech short adapter
CPU upgrade: i5-6500 -> i7-6700k
Speed test:
OS: Monterey 12.1
Location: Arkansas
Temperature sensor: none
Issues after fresh OS install: The CPU fans will go full speed sometimes for what seems like no reason. When the CPU gets hot, it gets in the 90s quickly, but then after a while it cools back down. It maybe certain programs like Keka, idk It may be some sort of user error or OS issue with programs.

Obviously, the i7 runs hotter than the i5 ever did, but it is much faster also. I tried the OWC sensor and I could not make it fit. It got in the way of the screen reinstallation. It put to much tension on the SSD SATA connector. The new blade ssd doesn't have a heat sink either. If I had it to do again, I would use a longer adapter because I feel the short one isn't built as well. I would also try a heat sink.

I accidentally bent the CPU (I blame Apples heatsink bracket), both the original and the upgrade, numerous times. After the third rebuild, I hand straightened it then used pliers (I read this somewhere in this thread) to take some of the bend out of the heatsink bracket. So yea, I had to manually flatten out the heat sink bracket some to release the tension it was causing. Only after doing this did I have success.

Even though I ordered the OWC adhesive, TOO many horror stories led me to use an eBay seller named Technik-Lee and buy a couple sets of OEM adhesive.

If anyone who is kinda new is reading this and wants to swap things out in their iMac, you can, but think long and hard about a processor upgrade. Here is my 2 cents:

1) If you are just swapping out the HDD, don't bother with the retaining bracket or anything. Just slide the speaker over, but be careful of the cable for the turn on button. it is dainty. It should be unplugged just in case.

2) If you remove the board to replace the blade as well, the adhesive that goes over where that bracket is needs to be the last strips to go on. That bracket needs to be the last part you install, obviously.

3) Use USB thumb drives and such to line up the holes in the back. Don't skip this part unless you wanna go back and redo it all.

4) Take your time, take breaks, and set aside enough time to do this without distractions. If you get stuck, watch videos and take a breather.

5) Don't afraid of using painters tape on the whole iMac bottom pert of screen, sides, and corners and have it on for like a week or two or three. There is nothing wrong with erring on the side of caution. It won't be in the way and it is your machine. It will help reinforce the screen until the adhesive sets. It doesn't leave residue.

6) It is super easy to not only accidentally break that short blade ssd adapter. It is also easy to not seat it or the ssd all the way properly.

7) Remember that game "The floor is lava?" Well the side of the power supply facing you is lava. Don't touch it.

8) When doing a full blown overhaul and swap of all hard drives and processor, you may be temped to take short cuts or to leave in parts you think you can work around. Don't.

9) If you replace the processor and it bends some, the machine won't boot. You may get 1 light even 2 lights, but no boot. This isn't your fault exactly, as that bracket puts so much tension on the heat sink. Slightly unbend the processor by hand until it is straight, make sure no thermal paste is on the underside, and then get a couple of sets of pliers and take some of the bend out of that bracket. Obviously you can't bend it flat, but when I started to feel it give , that is when I stopped. It was noticeable upon reinstall. If you can manage without doing this, you are the man!

If you have issues or need help, just ask. do your homework and planning ahead of time.
 

arkieboy72472

macrumors regular
May 4, 2017
128
29
Device: Early 2019 - 19.1 - MRR12LL/A (3.0Ghz i5-8500, 1TB Fusion HDD+32GB blade)
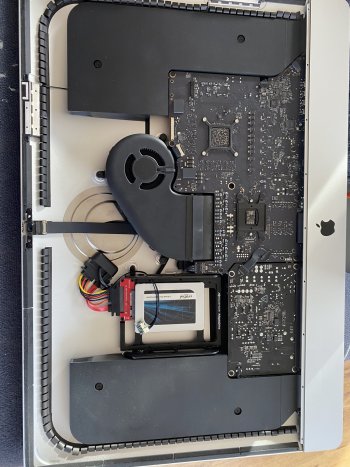
Blade upgrade: 32GB -> 1TB Samsung 970 Evo Plus with Easycargo M.2 3mm Copper Heatsink
HDD upgrade: 1TB -> 2TB Samsung 870 QVO
CPU upgrade: i5-8500 -> i9-9900K
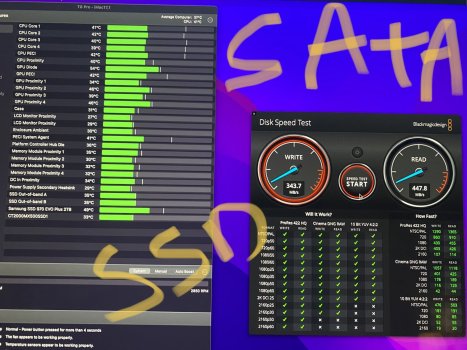
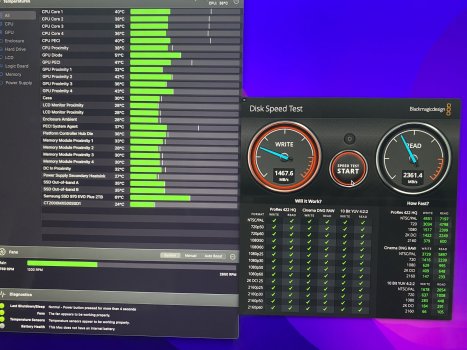
Blade Speed test: ≈3000 MB/s read, 3100 MB/s write
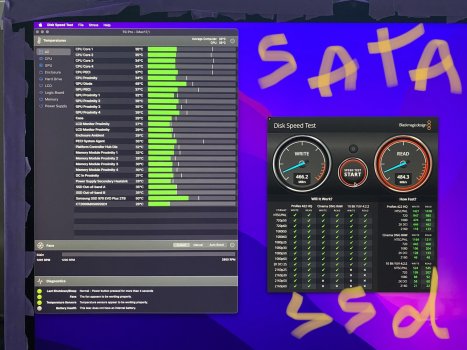
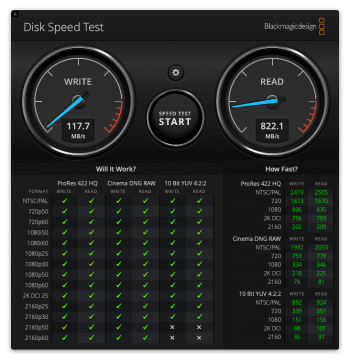
SATA SSD Speed test: 481 MB/s read, 521 MB/s write
OS: Big Sur 11.6
Location: Utah, USA
Adapter: Sintech ST-NGFF2013-c (full length one)
Heat sensor: none
Issues after fresh OS install:none. Camera works, mic works (maybe a bit low volume - still investigating), sleep works, fan speed goes up with CPU utilization and then down once it drops, Boot Camp install required unplugging the 2nd internal drive until setup.

Look, from a 30,000 ft view, this went swimmingly. True, I still need to put the screen adhesive on (OEM from eBay), but I'm going to give it another week or two with just masking tape. After I get into the details you'll probably see why.

Ordered all the parts, got them layed out, did one final backup of the system (two actually - Time Machine and CCC just for good measure) and went to town on it.

I'd read every (literally - been planning this for a while) post in this thread at least once - up to the point I started 3 weeks ago. Removing the screen and adhesive was... uneventful. I was really prepared for it to be much worse somehow. I bought two suction cups but honestly would have been fine without them (I'd do it again though as they were only a couple of bucks and they did make things easier. I could say the same about the foam wedge, but again, especially after all I went through, money well spent.)

Speakers, HDD, fan, PSU removal all went fine. Blew out a bunch of dust/lint/junk in the lower vents and fan.

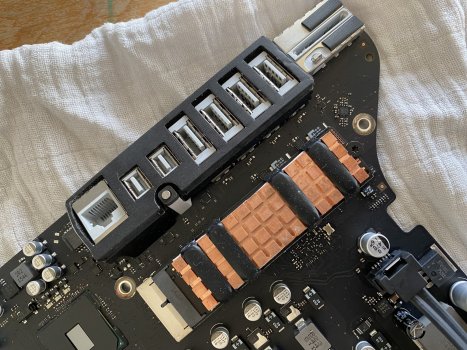
My lone issue removing the logic/mother board was that there was a small square rubber piece that fell off and it took me a LONG time to find where it came from in someone's video/pics (it goes just to the side of the ethernet port over the "stuff" there.)

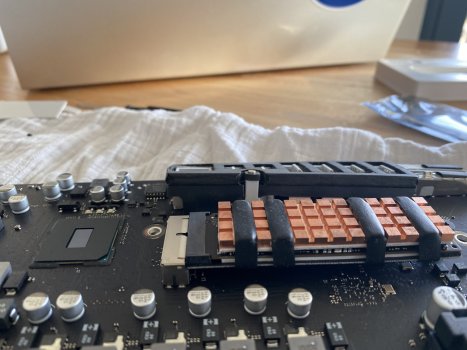
I assembled the NVMe blade/adaptor/heatsync without issue (reading a few times here that you have to have it fully inserted so the pins aren't visible probably helped.)

Removing the CPU/GPU heatsync was also uneventful. The thermal paste is... thermal paste. Could have been easier, could have been worse. A scraper followed by a bunch of q-tips and rubbing alcohol and boom, all done.

I used Arctic Silver 5 because, well, that's what I had laying around.

I followed the ifixit instructions in reverse and put it all back together and... nothing. The power button did absolutely nothing.

After hours of research I decided that it could be a bad blade (sintech) adapter. So I swapped the old drives back in.

Same result. Left everything strewn out on our dining room table and went on a 3 day business trip.

Came back, put the 970 Evo back in (but REALLY inserted well this time - or at least triple-checked) and still nothing. I was getting good at disassembling/reassembling the pieces.

I pulled the battery (br1632a) for a minute on the off chance it was PRAM related.

Finally I decided that maybe it was CPU related. So I decided to go back to 100% stock (Fusion drive and CPU).

Still... nothing. I was getting confused and desperate. I wondered how much the local Mac repair shop would charge to diagnose and repair it (or if they even would). I started looking at logic board prices online (thinking maybe I was going to be doing a GPU upgrade as well...)

I then decided to take the original i5 out and swap it with the i9 thinking I'd put all the new pieces in in preparation to punt and take it somewhere to ask about just paying them money to fix it. (My fam was getting antsy not having the primary computer available in the home for 2 weeks.)

I then keyed in on the mobo LEDs. The LEDs seemingly had moved from earlier models (apparently they used to be pretty close to the PSU. On mine they're right next to the antenna connectors. I was getting a solid green light, but according to old posts, I should have been seeing more than one - and the first one should have been lit somehow (it seemed it was the 2nd that was solid green.)

When I removed the i5 CPU, I actually took a long look at it and realized that it was bent. Like, the corner of the base (green) was bent slightly upwards.

And then it finally dawned on me (I'm used to PC CPU motherboards that have a retention lever to the side of the socket) that as careful as I'd been putting the heat sync back on, it wasn't careful enough. I'd apparently twisted it and then tightened the screws down. Turns out, the i9 was also bent, but not nearly as pronounced. As much as I was mad at myself for somehow messing them up, it was a huge relief to at least know what the problem was.

(I also removed the RAM "basket" - 3x t5's AND adhesive - to do my best to look at the socket to make sure no bent pins. I couldn't see any but I didn't exactly bust out the microscope either.)

I bent the i9 corners back (again, ever so slightly), took EXTREME care (getting my son to help for the extra set of hands) to not move the heat sync before getting it locked down with two opposing screws, and then tightened down the rest of them.

I literally did not need the reassembly instructions simply because I've basically developed muscle memory from having done it so many times. I actually plugged it in before attaching the screen and this time I had the solid green LED in addition to a slowly blinking one. That difference alone completely boosted my spirits.

I attached the screen with tape, plugged it in to power, and before I even hit the power button, it chimed and gave me the Apple logo on screen. I don't think I've ever been THAT excited to see the Apple logo. Reinstalled from USB, restored from Time Machine, added passwords back in and all seemed right with the world.

My only other issue was that I'd hoped to use a partition on the SATA SSD for Boot Camp/Windows, but it wasn't that simple to do. (I think I have it working by installing Boot Camp on the primary boot drive - NVMe - then plugging the SATA SSD back in, creating a DOS partition on it, then running dd to copy the contents over. I now have two Boot Camp startup disks available so it would seem to be working. Once I confirm that, I'll remove the NVMe NTFS partition and give it back to Mac OS.)

Suffice to say, I had no problems that didn't originate with me pointing a proverbial gun at my foot and pulling the trigger. Moral of the story: I know this thread is about SSD replacement, but several have done CPU upgrades as well. If you choose to do that, just be REALLY careful (maybe get a 2nd set of hands to help) putting the heat sync back on.

Dude, THIS was the post that saved my ass. I owe my working iMac to you. especially this part:

"When I removed the i5 CPU, I actually took a long look at it and realized that it was bent. Like, the corner of the base (green) was bent slightly upwards.

And then it finally dawned on me (I'm used to PC CPU motherboards that have a retention lever to the side of the socket) that as careful as I'd been putting the heat sync back on, it wasn't careful enough. I'd apparently twisted it and then tightened the screws down. Turns out, the i9 was also bent, but not nearly as pronounced. As much as I was mad at myself for somehow messing them up, it was a huge relief to at least know what the problem was."

I took it a step further and took some of the bend out of the bracket as I had no help and I kept rebounding my processor.

Thank you so much.
 

arkieboy72472

macrumors regular
May 4, 2017
128
29
Late-2015 27” retina 5K iMac SSD upgrades

I performed the SSD upgrades of both blade and SATA drives this past May. I followed the iFixit guide and also found some videos on the OWC website that were helpful. I found the OWC videos helpful not only with upgrading the drives, but for removing and reattaching the display.

Prior to this upgrade I had already moved on with a new M1 Mac Mini and an LG 4K monitor (see story in my next post). The Mini is a great new machine, but the 4K display is no match for that on this 5-6 year old 27" retina 5K iMac. New similar quality 5K displays are still quite expensive. For this reason alone, upgrading the 2015 27" iMac is worth it. I now like this older iMac more than the new Mini!


Blade + HDD upgrade

Device:
Retina 5K, Late 2015 - iMac17,1 - A1419 - EMC 2834 (4 GHz Quad-Core Intel Core i7 w/ 3TB Fusion; 16 GB 1867 MHz DDR3 RAM)
Blade upgrade: 128GB -> 1 TB OWC Aura Pro X2 SSD (see my next post about failure of my original SSD)
HDD upgrade: 3 TB HDD drive -> 2 TB Samsung 870 EVO 2.5" SATA SSD. I used the OWC SSD upgrade kit which included the In-line digital thermal sensor, and a NewerTech AdaptaDdrive 2.5" to 3.5" converter bracket. The thermal sensor made it more expensive and was probably unnecessary, but I didn't want to deal with any fan issues and have to reopen. OWC has other combinations of upgrade kits depending on your needs for tools, etc.
CPU upgrade: none
Speed test: 2800 MB/s read, 900 - 1300 MB/s write on Aura blade; 520 MB /s read, 480 MB/s write on 2.5" SATA SSD. (Used Blackmagic Disk Speed Test). These speed tests are from now, and I believe the blade write test was initially higher.
OS: Big Sur 11.5.2
Location: New York City
Adapter: none needed with Aura Pro X2
Heat sink: GLOTRENDS Universal M.2 Heatsink NVME Heatsink SSD Heatsink for 2280 M.2 SSD with Silicone Thermal Pad
Battery: While it was open and accessible, I decided to replace the PRAM battery with a new Panasonic BR2032 3V. Not so easy to find; had to go to Amazon and pay a little more than for similar ones more readily available. Would the very similar and much easier to find CR2032 3V battery have worked? Don't know and didn't want to have to reopen and disassemble the machine again. Easy to do while logic board is already off; much harder to replace later.
Issues after fresh OS install: none. No sleep/wake problems.

I used the OWC Aura Pro X2 SSD for the blade and the Samsung 870 EVO 2.5" SSD for the SATA drive. OWC states that the Aura Pro X2 is not compatible with my particular model of Mac (17,1), but this turned out not to be the case. Seems that you must have updated firmware on your machine BEFORE starting and later formatting and reinstalling the OS on the new blade drive. You can do this by upgrading to Big Sur (or at least one of the more recent OS's) on your old drive before you start doing anything. See discussion on iFixit here: IFixit: Why OWC Aura Pro X2 NOT COMPATIBLE iMac17,1? You can check your current firmware in "Apple icon -> About this Mac -> System Report -> Hardware" and look for "System Firmware Version".

After upgrading both drives and putting in a new PRAM battery, I reattached screen with only blue painters tape around the outside for about two months to make sure everything worked well before reapplying adhesive. I have had no issues since the upgrade and am *very* pleased. It feels practically like a new Mac and I expect to get several more years use out of it.

I did not preinstall the OS prior to installing the drives. I followed Apple's instructions to create a USB bootable installer prior to starting this project. After closing up the machine, I booted from this USB and then installed Big Sur onto the new blade drive. I then formatted the SATA SSD and use it for data only.

Many ask about whether to recreate the fusion drive. I followed the general advice to NOT do this. I use the 1 TB blade for the boot drive with most files except for photos and movies. I use the 2 TB SSD for pretty much just photos and movies.

Word of warning: Handle the display with *extreme* care! Take your time removing it and be very careful to not torque or twist the screen when lifting it out of or replacing it on to the machine. While making my final reattachment with adhesives, I allowed it to twist ever so slightly and I felt a small but distinct crack. OH NO! :oops:AFTER ALL THAT TIME AND WORK! ? I continued mounting it, figuring it will either work, or the entire effort is bust. Upon first startup, I held my breath and lo and behold, the display worked just fine. ? There is an approximately 3 inch visible hairline crack near one side that can only be seen when the computer is off. I was probably only a degree or two from twisting the screen enough to make the entire display unusable. Very close call!

Below are some photos of the upgrade process:

OWC Aura X2 Pro blade drive with Glotrends heat sink:
View attachment 1827175

View attachment 1827176

New Samsung 870 EVO SATA SSD in the NewerTech adaptor with thermal sensor:
View attachment 1827177


Replaced PRAM battery on logic board:
View attachment 1827178

Realign display, logic board and I/O ports with case prior to closing:
View attachment 1827322

Closed with painters tape for a month or two; this is the first boot after using USB boot drive to install OS Big Sur onto new blade drive:
View attachment 1827179

View attachment 1827180

View attachment 1827183

Components used:
View attachment 1827323

I will put another post shortly discussing the failure of my original blade drive which motivated me to try this whole project in the first place.
Thanks to you, also. I used the painters tape hack just for a piece of mind. It worked!
 
  • Like
Reactions: tah18

Arashnik

macrumors newbie
Nov 23, 2021
28
5
Device: Late 2015 27"
HDD upgrade: 2 TB SATA HDD -> 1TB Crucial MX500 SSD (I have also had success with BX models, I like Crucial SSDs.)
SSD upgrade: 128 Apple SSD -> Crucial P2 1TB SSD + Sintech short adapter
CPU upgrade: i5-6500 -> i7-6700k
Speed test:
OS: Monterey 12.1
Location: Arkansas
Temperature sensor: none
Issues after fresh OS install: The CPU fans will go full speed sometimes for what seems like no reason. When the CPU gets hot, it gets in the 90s quickly, but then after a while it cools back down. It maybe certain programs like Keka, idk It may be some sort of user error or OS issue with programs.

Obviously, the i7 runs hotter than the i5 ever did, but it is much faster also. I tried the OWC sensor and I could not make it fit. It got in the way of the screen reinstallation. It put to much tension on the SSD SATA connector. The new blade ssd doesn't have a heat sink either. If I had it to do again, I would use a longer adapter because I feel the short one isn't built as well. I would also try a heat sink.

I accidentally bent the CPU (I blame Apples heatsink bracket), both the original and the upgrade, numerous times. After the third rebuild, I hand straightened it then used pliers (I read this somewhere in this thread) to take some of the bend out of the heatsink bracket. So yea, I had to manually flatten out the heat sink bracket some to release the tension it was causing. Only after doing this did I have success.

Even though I ordered the OWC adhesive, TOO many horror stories led me to use an eBay seller named Technik-Lee and buy a couple sets of OEM adhesive.

If anyone who is kinda new is reading this and wants to swap things out in their iMac, you can, but think long and hard about a processor upgrade. Here is my 2 cents:

1) If you are just swapping out the HDD, don't bother with the retaining bracket or anything. Just slide the speaker over, but be careful of the cable for the turn on button. it is dainty. It should be unplugged just in case.

2) If you remove the board to replace the blade as well, the adhesive that goes over where that bracket is needs to be the last strips to go on. That bracket needs to be the last part you install, obviously.

3) Use USB thumb drives and such to line up the holes in the back. Don't skip this part unless you wanna go back and redo it all.

4) Take your time, take breaks, and set aside enough time to do this without distractions. If you get stuck, watch videos and take a breather.

5) Don't afraid of using painters tape on the whole iMac bottom pert of screen, sides, and corners and have it on for like a week or two or three. There is nothing wrong with erring on the side of caution. It won't be in the way and it is your machine. It will help reinforce the screen until the adhesive sets. It doesn't leave residue.

6) It is super easy to not only accidentally break that short blade ssd adapter. It is also easy to not seat it or the ssd all the way properly.

7) Remember that game "The floor is lava?" Well the side of the power supply facing you is lava. Don't touch it.

8) When doing a full blown overhaul and swap of all hard drives and processor, you may be temped to take short cuts or to leave in parts you think you can work around. Don't.

9) If you replace the processor and it bends some, the machine won't boot. You may get 1 light even 2 lights, but no boot. This isn't your fault exactly, as that bracket puts so much tension on the heat sink. Slightly unbend the processor by hand until it is straight, make sure no thermal paste is on the underside, and then get a couple of sets of pliers and take some of the bend out of that bracket. Obviously you can't bend it flat, but when I started to feel it give , that is when I stopped. It was noticeable upon reinstall. If you can manage without doing this, you are the man!

If you have issues or need help, just ask. do your homework and planning ahead of time.
Well I have late 2015 i7 and my cpu gets very hot easily and then goes back to normal! In my case exporting photos via lightroom classic cc is my cpu enemy! I thought maybe have to replace thermal paste but if you installed new and have the same problem then I think I leave it as it is!
By the way try to install TG pro and in the options you have to enable something that shows your NVMe ssd temperature! I used kind of heatsink and is between 40c to 65c max!(room Temp 20c)
By the way you did not mention what speed did you get from your NVMe! I use samsung 970 evo plus 2tb with long adapter and I get about 2850 write and 2960 read speed with Blackmagic speed test!( with 48gb owc 1876MHz ram)
 

arkieboy72472

macrumors regular
May 4, 2017
128
29
Well I have late 2015 i7 and my cpu gets very hot easily and then goes back to normal! In my case exporting photos via lightroom classic cc is my cpu enemy! I thought maybe have to replace thermal paste but if you installed new and have the same problem then I think I leave it as it is!
By the way try to install TG pro and in the options you have to enable something that shows your NVMe ssd temperature! I used kind of heatsink and is between 40c to 65c max!(room Temp 20c)
By the way you did not mention what speed did you get from your NVMe! I use samsung 970 evo plus 2tb with long adapter and I get about 2850 write and 2960 read speed with Blackmagic speed test!( with 48gb owc 1876MHz ram)
What software can I use and I will run tests on both. One ssd is Mac and one is windows. I will get back to you.
 

mbosse

macrumors 6502a
Apr 29, 2015
628
196
Vienna, Austria
Yes with samsung 970 evo plus 2tb and replaced HDD with also third party SSD! Study very good what you need and how you have to do it! Is not a easy job and is not really hard if you are good with computers, cables and so...

https://mrmacintosh.com/how-to-create-a-bootable-macos-12-beta-usb-drive-in-5-min/

Thanks, but could you simply upgrade to Monterey without the USB stick using Apple's Software Update tool?
 

mbosse

macrumors 6502a
Apr 29, 2015
628
196
Vienna, Austria
Device: Late 2015 27"
HDD upgrade: 2 TB SATA HDD -> 1TB Crucial MX500 SSD (I have also had success with BX models, I like Crucial SSDs.)
SSD upgrade: 128 Apple SSD -> Crucial P2 1TB SSD + Sintech short adapter
CPU upgrade: i5-6500 -> i7-6700k
Speed test:
OS: Monterey 12.1
Location: Arkansas
Temperature sensor: none
Issues after fresh OS install: The CPU fans will go full speed sometimes for what seems like no reason. When the CPU gets hot, it gets in the 90s quickly, but then after a while it cools back down. It maybe certain programs like Keka, idk It may be some sort of user error or OS issue with programs.

Obviously, the i7 runs hotter than the i5 ever did, but it is much faster also. I tried the OWC sensor and I could not make it fit. It got in the way of the screen reinstallation. It put to much tension on the SSD SATA connector. The new blade ssd doesn't have a heat sink either. If I had it to do again, I would use a longer adapter because I feel the short one isn't built as well. I would also try a heat sink.

I accidentally bent the CPU (I blame Apples heatsink bracket), both the original and the upgrade, numerous times. After the third rebuild, I hand straightened it then used pliers (I read this somewhere in this thread) to take some of the bend out of the heatsink bracket. So yea, I had to manually flatten out the heat sink bracket some to release the tension it was causing. Only after doing this did I have success.

Even though I ordered the OWC adhesive, TOO many horror stories led me to use an eBay seller named Technik-Lee and buy a couple sets of OEM adhesive.

If anyone who is kinda new is reading this and wants to swap things out in their iMac, you can, but think long and hard about a processor upgrade. Here is my 2 cents:

1) If you are just swapping out the HDD, don't bother with the retaining bracket or anything. Just slide the speaker over, but be careful of the cable for the turn on button. it is dainty. It should be unplugged just in case.

2) If you remove the board to replace the blade as well, the adhesive that goes over where that bracket is needs to be the last strips to go on. That bracket needs to be the last part you install, obviously.

3) Use USB thumb drives and such to line up the holes in the back. Don't skip this part unless you wanna go back and redo it all.

4) Take your time, take breaks, and set aside enough time to do this without distractions. If you get stuck, watch videos and take a breather.

5) Don't afraid of using painters tape on the whole iMac bottom pert of screen, sides, and corners and have it on for like a week or two or three. There is nothing wrong with erring on the side of caution. It won't be in the way and it is your machine. It will help reinforce the screen until the adhesive sets. It doesn't leave residue.

6) It is super easy to not only accidentally break that short blade ssd adapter. It is also easy to not seat it or the ssd all the way properly.

7) Remember that game "The floor is lava?" Well the side of the power supply facing you is lava. Don't touch it.

8) When doing a full blown overhaul and swap of all hard drives and processor, you may be temped to take short cuts or to leave in parts you think you can work around. Don't.

9) If you replace the processor and it bends some, the machine won't boot. You may get 1 light even 2 lights, but no boot. This isn't your fault exactly, as that bracket puts so much tension on the heat sink. Slightly unbend the processor by hand until it is straight, make sure no thermal paste is on the underside, and then get a couple of sets of pliers and take some of the bend out of that bracket. Obviously you can't bend it flat, but when I started to feel it give , that is when I stopped. It was noticeable upon reinstall. If you can manage without doing this, you are the man!

If you have issues or need help, just ask. do your homework and planning ahead of time.
Thanks for this post, very helpful particularly with the CPU. I just have troubles to understand (2) - which brackets are you talking about?
 

mbosse

macrumors 6502a
Apr 29, 2015
628
196
Vienna, Austria
Not sure which numbers I should look at:
Seems to be the Crucial blade SSD. Unfortunately the P2 not the best SSD you can get, in fact quite the opposite. For a little $ more you could have gotten 3x the read speed and about 18x the write speed. The P2 is one of the slowest NVME SSDs on the market and on top one with rather low endurance. It performs way under the potential of your Mac.

Still, 800-ish really are below the potential of even this SSD. You might want to check seating of the SSD in the short Sintech adapter and then again the adapter in the Apple blade port - this might account for some the of low performance.

Good luck!
Magnus
 
Register on MacRumors! This sidebar will go away, and you'll see fewer ads.