Got a tip for us?
Let us know
Become a MacRumors Supporter for $50/year with no ads, ability to filter front page stories, and private forums.
Bootable Samsung Performance Restoration Software (USB image and instructions inside)
- Thread starter snaky69
- Start date
- Sort by reaction score
You are using an out of date browser. It may not display this or other websites correctly.
You should upgrade or use an alternative browser.
You should upgrade or use an alternative browser.
Update, just added instructions to get the latest firmware onto your 840 EVO on the first page.
Proof below.
cool mate, thanks!

Note to anyone struggling to paste new ISO image in to Cdr file - make sure you have deleted the trash for the drive first
Good catch. If you don't, you'll get the "not enough free space" message.
Johnny Jackhammer
macrumors regular
I have the late 2012 Mac Mini also. First time I got the black screen without cursor and nothing happened for minutes. I just rebooted (power button) and it worked the second time. Not sure why though.EFI runs well but then ...
I prepared my USB Stick as it was told. When I choose "Boot Legacy OS from SYSLINUX partition" I get a black screen without blinking cursor, nothing happens.
What can I do to update the firmware of the SSD?
Thanks to the OP. I couldn't have done it without your instructions.
ron1004
macrumors 6502
This is a very well written and presented tutorial, well done.
I have two MBP's and burnt the latest firmware to DVD and took care of my 2011, but the optical drive is dead on the 2009 MBP and this looked like the most promising to get a bootable USB working, but it gives the same "no operating system" on both MBP's.
I'll keep searching.
I have two MBP's and burnt the latest firmware to DVD and took care of my 2011, but the optical drive is dead on the 2009 MBP and this looked like the most promising to get a bootable USB working, but it gives the same "no operating system" on both MBP's.
I'll keep searching.
godada
macrumors newbie
Thanks a lot man, I've been looking for a working solution to this for a while. I'm currently running a 840 EVO as a main drive on a macbook 13" and at first I kept getting a weird error and I thought I wasn't following correctly the instructions to make a working bootable usb. I came across your thread and after putting the USB with your instructions I'm also getting the same error.I try to help when I can.

I wonder if any of the guys trying to run the usb have run into the same error before, honestly I don't know how to fix it or what to do from here.
pt-tiagosantos
macrumors newbie
thanks for this tutorial. I also had the message "No bootable device. Press Any Key to Continue".
I having some issues with hanged boots and some graphic glitches.
I don't know if I've already the latest firmware for this SSD.

I've had the bad idea of installing "el Capitan" public beat after a kernel panic from which i've had all this issues.
I've spent the last days backing up my data and restoring my preferences and applications. I've them all now on a TimeMachine for a quicker restore.
Last hanged up boot time on verbose mode it was held at "promiscuous mode".
I having some issues with hanged boots and some graphic glitches.
I don't know if I've already the latest firmware for this SSD.
I've had the bad idea of installing "el Capitan" public beat after a kernel panic from which i've had all this issues.
I've spent the last days backing up my data and restoring my preferences and applications. I've them all now on a TimeMachine for a quicker restore.
Last hanged up boot time on verbose mode it was held at "promiscuous mode".
Last edited:
Charles50
macrumors member
OMG thank you for the instructions on creating the bootable thumb drive. I have a Mac mini mid-2011 with no DVD drive and this is the only way to do it.
BUT.. I ran the updater, using the new EXT0DB6Q firmware. It successfully installed, and then nothing happened. There was no performance optimization. I have a 500GB drive and about 160GB free, that should have taken a while to optimize. Or is this step no longer done with the new firmware? I reran the installer and it gives no options, it just says the firmware was already installed and it quits.
Do I need to do optimization, or is it now taken care of during regular use?
Autistic Behaviour
macrumors member
the same thing happens to me...did you find a way to make it work?Thanks a lot man, I've been looking for a working solution to this for a while. I'm currently running a 840 EVO as a main drive on a macbook 13" and at first I kept getting a weird error and I thought I wasn't following correctly the instructions to make a working bootable usb. I came across your thread and after putting the USB with your instructions I'm also getting the same error.
I wonder if any of the guys trying to run the usb have run into the same error before, honestly I don't know how to fix it or what to do from here.
godada
macrumors newbie
the same thing happens to me...did you find a way to make it work?
better late than never. No I just stopped trying after a while. My SSD wasn't doing anything weird at the time so I just gave up and thought I would give it a go later on with hope that perhaps someone did found an easier fail-proof way to do it on all macbooks.
I checked my SSD a few days ago and I noticed a drop in write speeds and random write speeds, so I'm researching again to try to upgrade the SSD. I just don't want to take apart the macbook to take the drive to place it in a Windows machine to do it, but so far it seems I'll have to, because this appears to be the best solution so far someone has come up to.
Autistic Behaviour
macrumors member
Indeed, its what I wound up doing. Nothing else worked for me. Furthermore, the pc laptop would not recognise the ssd when I put in external usb box....had to put it in directly. It did work, and without affecting data ( although, of course, back up would be crucial, just as in most circumstances...)
Autistic Behaviour
macrumors member
I found an alternate method for updating my Samsung 840 PRO on my MacBook Pro 2012 (El Capitan 10.11) with a USB thumb drive:
- Download firmware ISO image for SSD (choose appropriately: EVO, PRO, etc):
http://www.samsung.com/semiconductor/minisite/ssd/download/tools.html
- In Windows, download Rufus: https://rufus.akeo.ie/
Note: Disk Utility in El Capitan would not restore the ISO to my USB - there may be an alternate Mac option that will restore the ISO to a USB drive.
- In Rufus,
a) Drive: select your USB drive.
b) Partition scheme and target system type: MBR partition scheme for BIOS or UEFI.
c) Hit the CD icon next to create bootable disk using, and select the downloaded ISO image.
d) Leave everything else, hit Start
- Boot up your Mac and hold option.
- The USB drive appears as ‘Windows’. Select it, follow the prompts and the Firmware update will run...
- A Power Cycle option may appear, up to you to run it (more details here).
- Restart and run firmware again to check the version number (see attached screenshot):
I found an alternate method for updating my Samsung 840 PRO on my MacBook Pro 2012 (El Capitan 10.11) with a USB thumb drive:
Signed up to the forums just to say thank you very much, nothing else worked for me except Rufus. It's a shame you need Windows because there's no native tool on Mac to do this.
I have the same machine and same SSD to confirm it works, it doesn't really matter which OS you have installed either.
PatrickBK
macrumors newbie
Great manual and Apple crapped up disk utility so much in el capitan that your manual doesn't work anymore.
Any idea how I get the 840 EVO update on my DVD less Mac Mini server? I have 2 840EVO's in there needing the update.
Sincerely,
Patrick
Any idea how I get the 840 EVO update on my DVD less Mac Mini server? I have 2 840EVO's in there needing the update.
Sincerely,
Patrick
UPDATE MAY 3RD 2015: You can use the instructions posted below with the new firmware released in April '15. Simply replace the file called BTDSK.IMG from the .cdr image provided below with the one from the .iso file downloaded from Samsung's website.
EDIT: Remember to empty trash once the old BTDSK.IMG is deleted or you will get the "Not enough free space" message.
840 EVO: http://ssd.samsungsemi.com/ecomobile/ssd/update3.do?fname=/Samsung_SSD_840_EVO_EXT0DB6Q.iso
After unsuccessfully attempting all morning to make a bootable USB thumb drive to update my firmware and run the Performance restoration software on my 840 I was about to give up. That is, until I found instructions on how to go about it on a French website (source here, for those who care: http://forum.mac4ever.com/tutoriel-cle-usb-bootable-firmware-ssd-samsung-840-evo-t102027.html ). This tutorial is especially useful to those of us(like me) running an Opti-Bay. If you have a DVD drive, you don't(shouldn't) need this tutorial.
Back to the subject matter at hand. Since I'm French Canadian, the instructions were no problem for me, but I figured that since the majority of people don't speak French on here, I might as well share my findings. I've already made a disk image ready to be used (download link in the instructions below). If you follow these steps carefully, you should be up and running pretty quickly. The restoration software itself takes a while, so make sure you don't have anything time critical to do on your Mac before you attempt this.
1. Make sure you have some time where you won’t need your computer, as once your thumb drive has been made, the firmware flash and performance restoration can easily take over an hour.
2. Make a proper backup of your OS X install should anything go wrong. I will not be held liable for any data loss. I provide these instructions as a guideline. Proceed at your own risk.
3. Find a USB thumb drive.
4. Back it up somewhere if you have any valuable data on it. If you don’t, all data on your thumb drive WILL BE LOST.
5. Download the bootable image I made here: https://dl.dropboxusercontent.com/u/35748812/Bootable Samsung.cdr
6. Put the downloaded file somewhere it is easily found, such as the desktop.
7. Open up disk utility.
8. Find your thumb drive in the left hand pane and click on it.
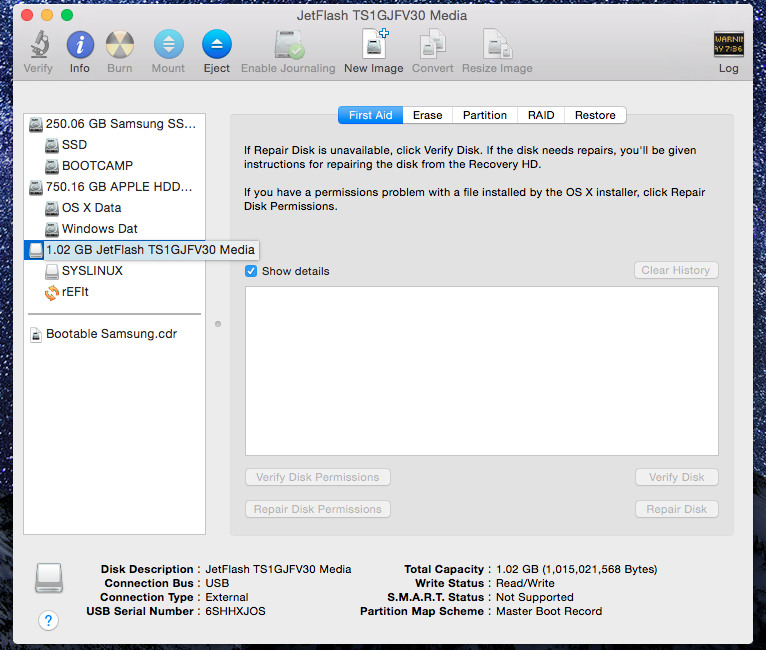
9. Go to the erase tab and format it to MS-DOS (FAT) by clicking Erase. Wait for it to finish.
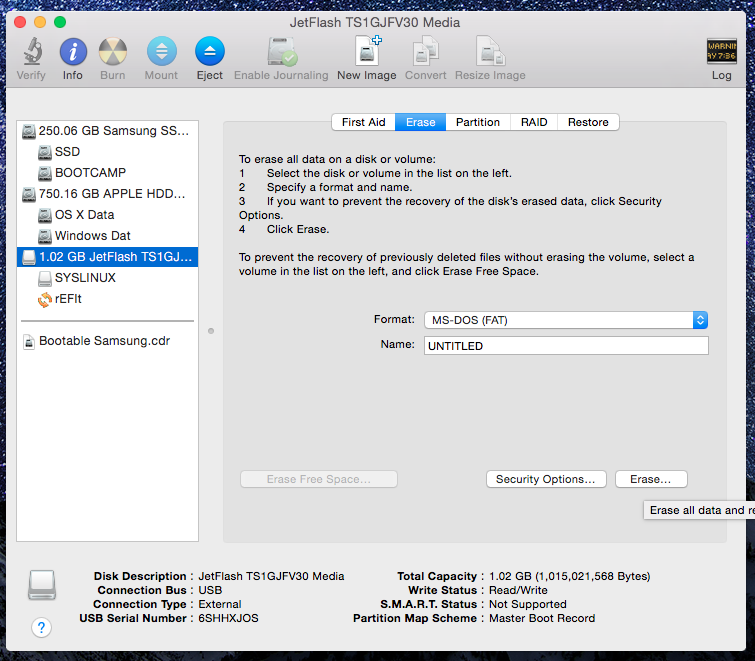
10. In the partition tab, selection 2 partition scheme. (I left mine at default, half and half, size doesn't matter at all, leave it that way.) Make sure to click the options and ensure you are using an MS DOS format, not GUID.

11. Partition 1 should remain MS-DOS (FAT), partition 2 should be Mac OS Extended (Journaled). Choose the proper format for each.
12. Click apply.
13. When the popup asks if really want to do this, click Partition.
14. Still in disk utility, go to the first aid tab.

15. Choose your first partition, and run repair disk. Very important, not doing so will prevent it from being bootable).
16. Choose your second partition and run repair disk.
17. Now, in the finder, double click on the Samsung Bootable.cdr, the image will mount.
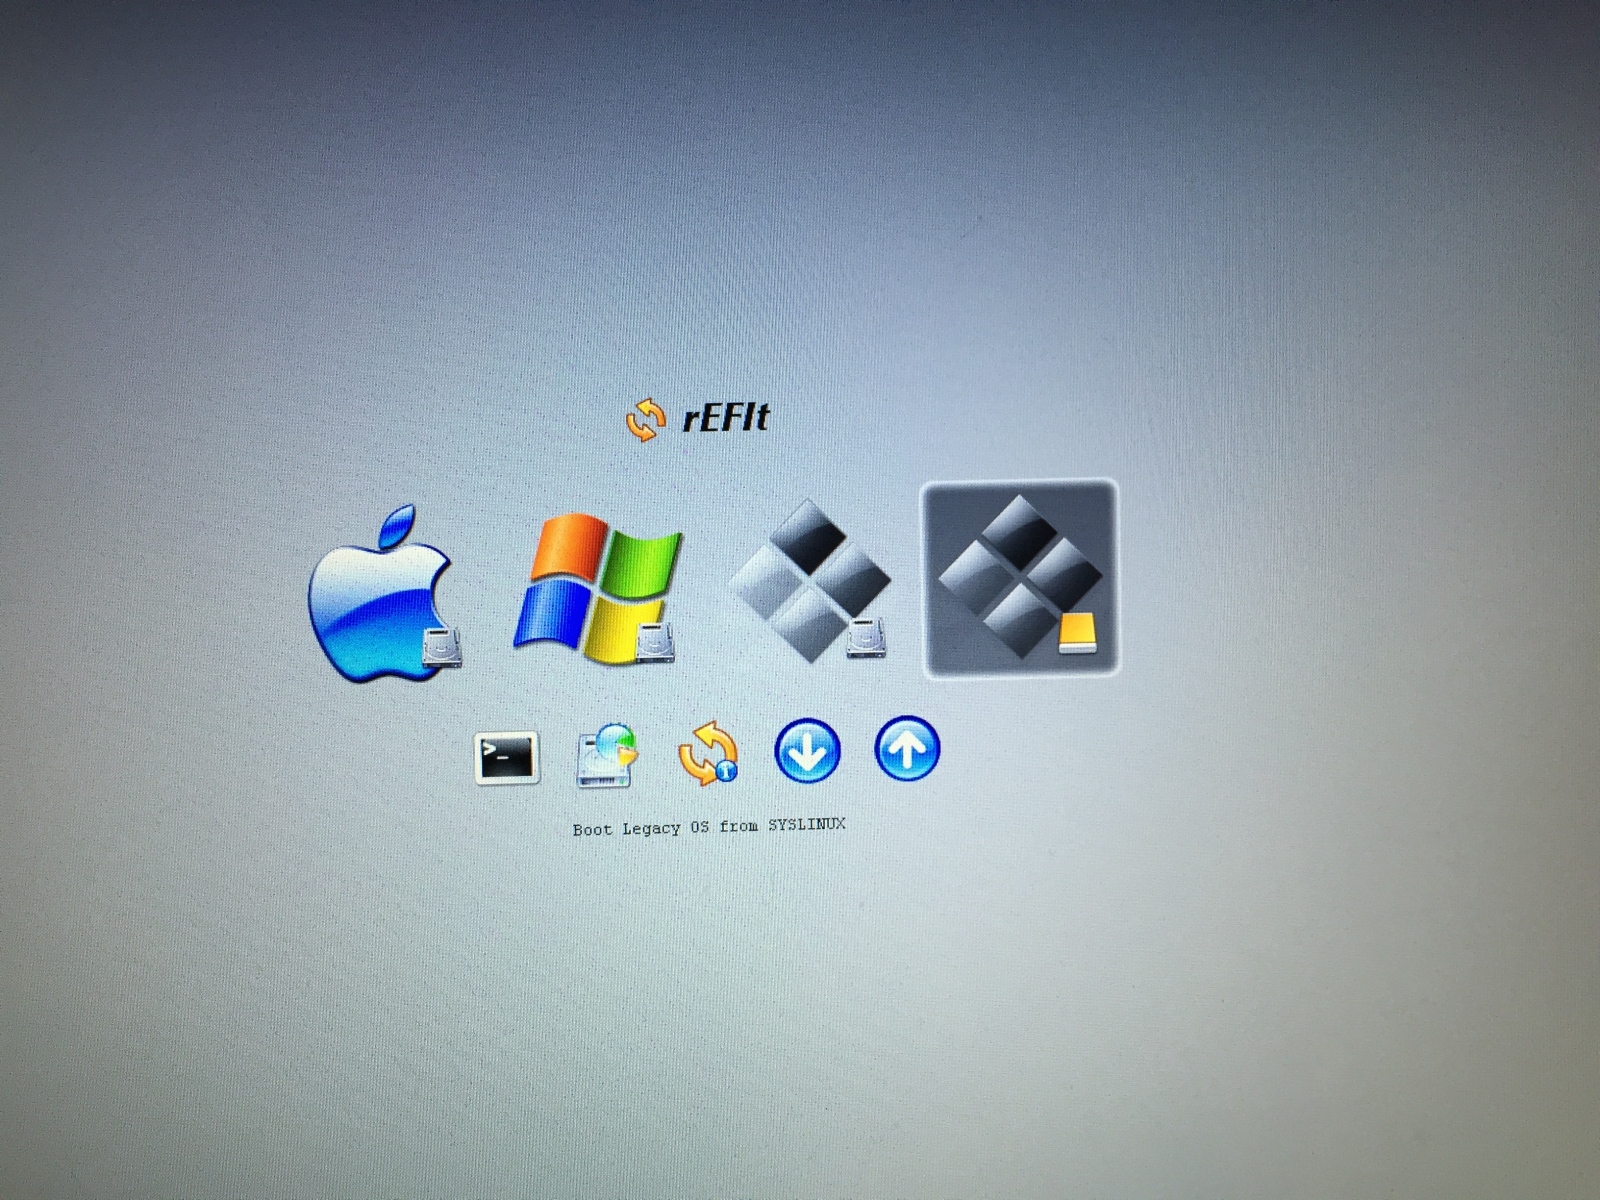
18. The image should contain two partitions in disk utility: SYSLINUX and rEFIt. Click on SYSLINUX.

19. Click on the SYSLINUX partition under the Bootable Samsung.cdr. Go to the restore tab, verify that the Source: is SYSLINUX, if it is not, drag and drop it there from the left pane.
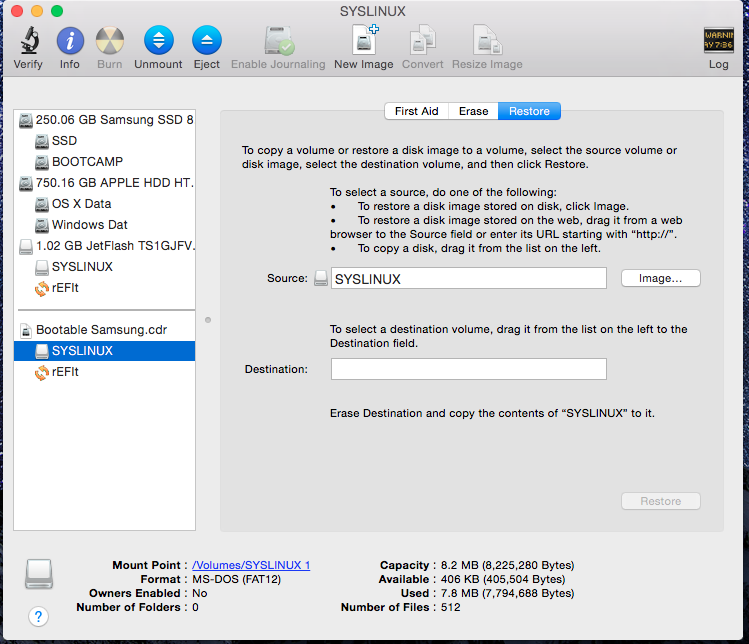
20. The destination should be your MS-DOS (FAT) partition. Drag and drop it there.
21. Click Restore, enter your password.
22. Repeat the process with the second partition (Mac OS Journaled) and rEFIt.
23. Click Restore, enter your password.
24. As an extra precaution, rerun repair disk on both partitions on your thumb drive.
25. Reboot your machine holding the option key. As a boot option you should see a USB disk icon with the name WINDOWS. This is what you want to boot from.

(Picture lifted from maciverse to show the look of the icon).
26. If that does not show up, choose rEFIt.

(picture lifted from an unknown source)
27. From that boot menu, choose “Boot Legacy OS from SYSLINUX partition”. Read each description carefully, you’ll find it.
28. From there follow the on screen instructions, you may see quite a few BIOS error messages, ignore them, they are normal. It may take a bit of time (a minute or two) for the performance restoration software to load.
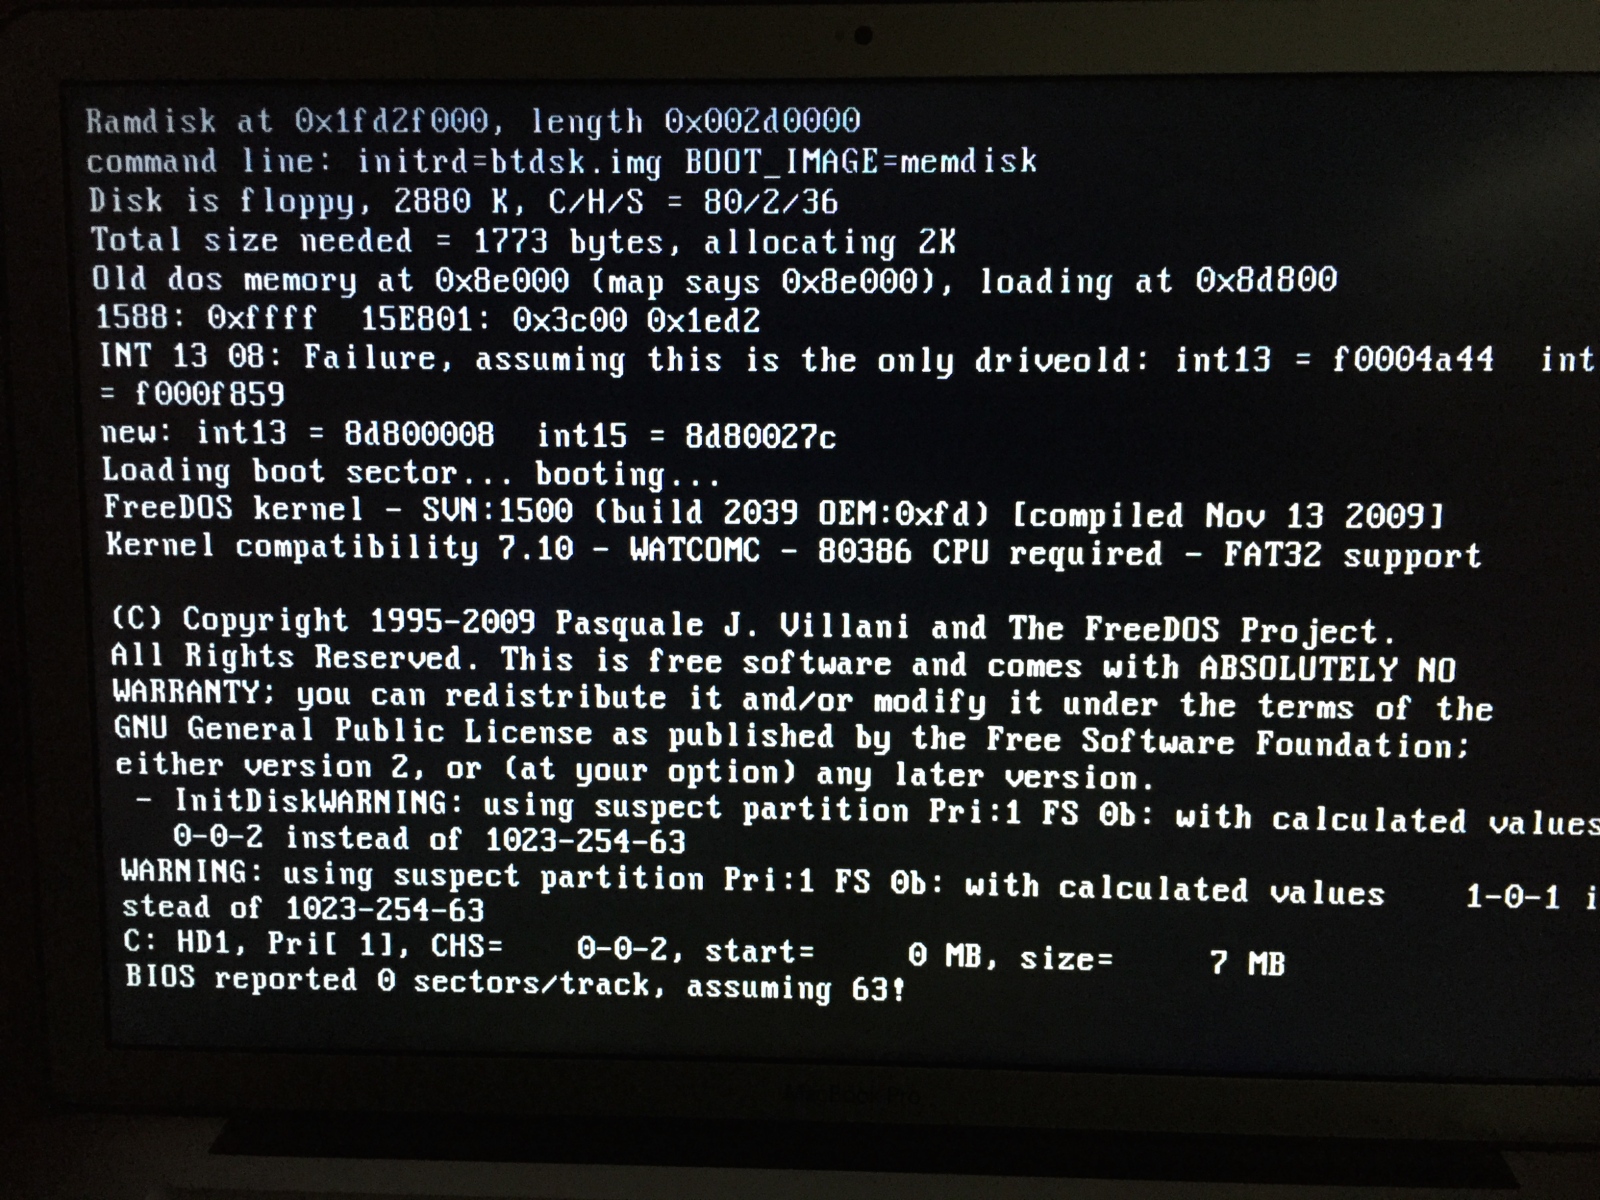
29. Once your are booted into MS DOS, simply follow the prompts.
30. Once the firmware update is done and the performance restoration complete, you’ll get a message saying so and you’ll be left with a blinking cursor at the bottom of the page following A:>/SYSLINUX/ or similar.
31. When you’re done, simply hold down the power button to shut the machine down, remove the thumb drive and boot the machine as your normally would.
32. You’re done.
I will again state: Please, keep a backup of your data. You should not run into any problems, but if you do, I will not be held liable for any data loss incurred following my instructions.
Hope this helps!
borgusio
macrumors 6502
Great manual and Apple crapped up disk utility so much in el capitan that your manual doesn't work anymore.
Any idea how I get the 840 EVO update on my DVD less Mac Mini server? I have 2 840EVO's in there needing the update.
Sincerely,
Patrick
same problem here... I tried with rufus on a mac mini 2012, it sees the USB stick at boot, but won't boot it unfortunately.
Thanks for the Rufus suggestion, it was the only thing that worked for me after messing around with a bunch of OS X based methods for flashing the USB drive. (Fortunately, I did have access to a Windows machine to use the Rufus application). I have a late 2012 Mac Mini with a 256GB Samsung 840 Pro SSD. If you're like me, you have a bunch of ISOs sitting around that you have tried downloading from the Samsung site. Use the exact one mentioned in these instructions (for me, it was Samsung_SSD_840_PRO_Series_DXM06B0Q_Win_Mac.iso) within Rufus. If you get an error about the format not being supported, it's probably the wrong one.