Become a MacRumors Supporter for $50/year with no ads, ability to filter front page stories, and private forums.
Status
The first post of this thread is a WikiPost and can be edited by anyone with the appropiate permissions. Your edits will be public.
I am in waiting mode.
However does anyone know the number/serie of the fan connector (iMac 2017) female male?

I have found the currency connector : molex 43645-300. but there are x male's: 43640-03001 till 03xx I think 0308 is okay
 
@paulpijnenborg
The mains power connector is a 3pin Molex Micro-Fit 3.0, which matches your searching.

For the fan connection see my earlier post:

There are also 1mm sockets which are slightly different.
The JST SH series has sockets that are slightly narrower, but the 4 pin fan plug will fit in a 6 pin socket if you bend the end pins out of the way.

There is also an AdaFruit system called STEMMA QT / Qwiic, which has JST SH 4 pin sockets that are the same fit, but may need a bit of adjustment to get the plug in.

Edited slightly.
 
Last edited:
Thank you Paul

I saw that post but as it was from nov 24 I hoped someone found it and I missed the (new) post..
tempImagerYiHgg.png

I put my phone microscope on the board and saw this marking on the connector
Mxj8c
However searching did not bring me any further. it is a molex but on their site it gives 0 results.

I gave up
 
  • Like
Reactions: PaulD-UK
I have used my display now for about a week and a half playing video games and movies. I have added an P3 color profile and I run it at 10bits HDR over an DP 1.4 cable from my Win 11 PC with an RTX 3080Ti. I am very happy I have the R1811 card with a full 24V power supply as I have no issues with background light or other display anomalies reported by some users.

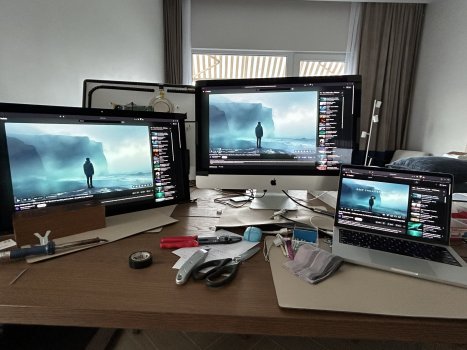
My setup is; original iMac 2017 speakers, original iMac 2017 PSU. I added a 12V to 24V step-up converter & 15A automatic fuse from Amazon and the cross-over filters that StoneTaskin provides. I also disregarded the "replacement" adhesive kit from Amazon and went for real Chinese made "3M" foam tape which very closely mimics the original Apple foam tape. See a full image of my setup just before I attached the display here: View attachment 2523640

I did re-use the built-in power button as well, cutting its wire just after it leaves the left speaker, then soldering on an extension cable that is then soldered onto the power button on the control board, effectively leaving me with two options for turning on and off the monitor (the original power button and the control board power button).
I also shorted the remaining power switch lead that is connected to the original PSU, effectively faking a continuously pressed power button for the PSU to detect. I wrapped the control board in shrink wrap to avoid any electrical contact and to make it slightly more usable. It hangs down beneath the monitor and is easily accessible where I sit. See a close-up of it here:
View attachment 2523638.

The extension cables for DP, HDMI, USB C and the control board are routed through a hole I dremeled in the ventilation grille. The hole is hidden by the VESA stand (see detail image here: View attachment 2523639)

I used these products:
https://www.amazon.se/dp/B088ZMK5SF Opening tool + completely useless adhesives which I did not use
https://www.amazon.se/dp/B08LBZ8KGL "3M" foam tape
https://www.amazon.se/dp/B0DJT18MGV USB C extension cable
https://www.amazon.se/dp/B0BG76RM65 12V to 24V step-up converter, I oversized it to "480 chinese Watts" because I understood they get very hot if you load them at full capacity, mine does not even heat up the display.
https://www.amazon.se/dp/B09248MY72 15A automatic circuit breaker
https://www.amazon.se/dp/B0D7GY7LZH HDMI 4K extension cable
https://www.amazon.se/dp/B0DMTKGJL5 DP 8K extension cable
various XT60 connectors to make simple the connections between step-up converter and original Apple PSU and the auto fuse.
https://www.amazon.de/dp/B0160BQA06 VESA Mount adapter (note require original monitor stand to be removed, see https://ohmypizza.com/2023/06/vesa-mounting-the-imac-5k-external-display for instructions how to fit this VESA adapter)

I would truly recommend the R1811 V4 card as it is silent and a clear winner in display quality using a P3 color profile. Also, the 24V input with a beefy enough PSU eliminates the need for a constant power driver board for the backlighting.

Hello, could you share how you did the splicing from the PSU to the step-up convertor? I have everything to convert a monitor, including a step-up convertor, I'm just hesitant about this step. You mention "various XT60 connectors to make simple the connections between step-up converter and original Apple PSU and the auto fuse", can you elaborate? Thanks
 
As an Amazon Associate, MacRumors earns a commission from qualifying purchases made through links in this post.
It appears that 10.14.6 don't have any HDR settings, so I installed 15.5 to test if HDR works with JRY-W9RQUHD-FA1 board, and here is what i got:
If set board to Auto Detect HDR, it reacts to "Enable HDR" in macOS settings, but seems system outputs something partially incorrect. Board automatically adjusts display to high brightness, but same time all UI elements became oversaturated, like if they used wrong ICC profile.
In this mode all color settings in board menu became inactive.
YouTube HDR videos in Safari seems not shown as HDR because there is no any HDR icon in player.
IINA player seems like ignore all these settings and output HDR content as tone mapped as SDR.

So curerntly, looking at the other discussions about HDR on macOS, seems like HDR just don't works correctly on non Apple displays.
Guess i need to test it on Windows to understand if it is a macOS problem, or bug in board firmware.
 
  • Like
Reactions: Pabo49
I need help and sorry for bordering.
I have a 3 wire PWM board laying here and following internet guides I could put a 4 wire fan to work with it.
connected ground and 12v. and the Tact to the PWM cable.... as guides say. (tried both PWM to PWM and TACT to PWM)
BUT the iMac fan just runs for 1 sec stops runs again etc.
Tried different setting but nothing gets it started

If this does not works I need a 4 wire PWM board. but now I get confused regarding the S/PG cable? where does that go?
 
@paulpijnenborg
No, you can't use a 3 wire controller with the iMac fan.
The iMac fan will work with a lower voltage connected to the +/– pins (1 and 2 counting from left), but it stalls at below 5V, and even at the slowest speed it will still be fairly fast and noisy.

You must have a 4 wire PWM controller to get quiet low speed running.
The PC standard for 4 wire PWM is (from the left) – + Speed PWM.
Apple's iMac fans are connected + – Speed PWM, so the power leads are the other way around.

This pic is from the underneath of the fan, yellow is +v, green is Speed, and blue is PWM.
 
Thanks Paul
suspected this. I have a good basic of home electrical wiring but PC is different

The PWM of my interest has:
4 pins to the fan-> understand how the connections go.
and 3 pins as "input": GND, 12v and a yellow cable marked as S/PG...... It is thisS/PG cable that I dont understand where it goes!

In your attached pic I also see a yellow cable as input......but how where is this one connected?
 
@paulpijnenborg The S/PG wire is for Speed/PulseGeneration detection, for the motherboard to read how fast the fan is spinning, and vary the power voltage to raise/lower the fan speed.

That doesn't work (well) with Apple's fans, and you need a PWM signal on a 4th wire to the fan to get it to run quietly at low speeds. The Noctua NA-FC1 one in the picture makes it easy, as it just needs 2 power lines in, and has a potentiometer so you can vary the fan speed as you want.

With your controller you can just leave the S/PG wire unconnected and insulated.

As to the fan connector socket, I've got two sockets marked MXJ5G and MXJ3C, so the last two numbers are possibly a date code.
There are only 3 different 1mm pitch systems in the Molex catalogue, and none of them match, but the Pico-Lock 1mm ones are the nearest.
But they are for PCB mounting, and so a socket (male) won't be available with wires attached.
 
Last edited:
  • Like
Reactions: paulpijnenborg
I have now setup both a JRY-W9RQUHD-FA1 and a JRY-W9CUHD-AA1 with 2017 27" iMacs.

Someone mentioned the picture on the AA1 was better than the FA1, but I really can't tell much difference between the picture quality even though the FA1 is 10 bit and the AA1 is 8 bit.

If I did it over again, I would only use the FA1 since the price difference at the Givifeni aliexpress store was only $10 or so. The AA1 chip gets much hotter than the FA1 (touch test). Also, the AA1 doesn't wake as consistently as I'd like. If I unplug my laptop, when I reconnect, I need to press the power button 2 or 3 times to get recognized again. It's annoying. Also, the firmware on the FA1 card seems newer.

I'm thinking about trying this project next on a 21.5" iMac and using the AA1 card for that one. Maybe it won't get as hot, but I'd have to find a crazy deal to even consider it.

Wishing everyone else luck. In the photo, the left monitor is using the FA1.
 

Attachments

  • IMG_9999.jpeg
    IMG_9999.jpeg
    520.8 KB · Views: 36
  • Like
Reactions: Pabo49 and PaulD-UK
Sorry I know I am asking a lot of (unnecessary) stuff.

The power supply; I went for the LRS 350 24v but I did not realized it was a manual voltage selector.
As we live in a country which has both 115 and 240v mixed, so, I have a "problem":
using the wrong settings will break the PSU as I read it.

Can I extend that switch with cables so I can place it in another more accessible place? If display is glued back it is unreachable.
or I can drill a hole in the iMac case BUT then I need to find a way to fix something to the switch (super glue) and make it possible to switch it from the outside.

Does one of you done this kind of thing?

PS
I dont have much choice regarding PSU here. Most are to high!
 
@paulpijnenborg "Can I extend that switch with cables so I can place it in another more accessible place?"

Looking at the diagram of the circuit, the switch is at full mains voltage, so nearly 350V for 230V mains.
So it would be very dangerous to extend the wiring unless you have high voltage wiring skills and equipment... 🥺
There is a warning only to use the same switch if replaced...

It would also be at quite a high mains current, up to 8A, which is why the switch wires are so thick..

It would be much safer to find an auto-switching PSU.
Unless you could mount the Meawell PSU so you can reach the switch through the RAM hatch door.

LRS-350-SWdiag.jpg

LRS-350-24SW1.jpg

LRS-350-24SW2.jpg

LRS-350-24SW3.jpg
 
Last edited:
I have now setup both a JRY-W9RQUHD-FA1 and a JRY-W9CUHD-AA1 with 2017 27" iMacs.

<snip>

I'm thinking about trying this project next on a 21.5" iMac and using the AA1 card for that one. Maybe it won't get as hot, but I'd have to find a crazy deal to even consider it.

<snip>
Does the AA1 card work with 4k 21.5"? I wasn't aware. I am still not complete with my conversion of a 21.5" with a R9153. It has proven to be much harder than the 27". Maybe talk to me before buying anything.
 
Does the AA1 card work with 4k 21.5"? I wasn't aware. I am still not complete with my conversion of a 21.5" with a R9153. It has proven to be much harder than the 27". Maybe talk to me before buying anything.
I assumed the AA1 would be fine to drive 4k since it is made for 5k. I plan to build the 21" only as a monitor, external power, no speakers/usb/camera/fan...

What kind of problems are you having? Maybe this isn't a great idea for me. I got confident after 2 successful 27" conversions and I'd really like a matching side monitor that I could use vertically. I also thought using the AA1 for 4k would be less taxing on the card - I'm using passive cooling
I would assume the AA1 won't work. It would need a specific firmware to work at 4K and the correct timings. Problems I have had with the R9153 board:
1. Neither DisplayPorts worked
2. EDID data was incorrect/incomplete so it would not present at a native resolution without the use of BetterDisplay.
3. Screen was very dim
4. Board is only 12v so one-cable use (i.e. display + charging) is problematic (this is knew beforehand and can be worked around).

I have sent my first board back and a new one is in transit. I am not hopeful it will work, but fingers crossed.

I've done three 27" conversions and all were easier than this 21.5" one!
 
  • Like
Reactions: razmanugget
All the JRY--AA1,FA1 and SA1 boards were originally sold in China with 4K firmware, and are available from AliEx in 4K versions.
Two pitfalls:
4K (UHD) means 3840 x 2160 pixels. Apple's 21.5" iMacs are 4096x2304 pixels, so there is a potential for a timing mismatch...

Also I don't know if any of the 4K board vendors are able to sell the cables necessary for connecting to an iMac 4K screen?
 
  • Like
Reactions: razmanugget
I just completed my iMac 27" 2015 convertion using AA1. Everything is working, but the board seems to struggle with audio. It came with a crossover that I connected to the iMac speakers. The audio is choppy / laggy, both when using the internal speakers and when connected to external ones via aux/jack.

I've attached a video below (mirror here)
"DP" is the display board.

What to do? I'm little annoyed, because everything went smooth 😕

 
hello to this very large group, ive been skimming through things and searching through post specific to my questions, trying not to ask similar repeated numerous times. there is just so much! and ive found a lot of new things and fun ideas, very cool!

im converting my 2019 5k iMac with the LM270QQ1 (SD)(E1) panel, i just got the stonetaskin JRY-SA1 board with speaker crossovers. i did a systems check a couple days ago and everything seems to be in working order, even quite amazed at how well the speakers sound, as a couple threads have been hit and miss with it static and poor volume? i think its overall pretty good sound, for what it is. i also am trying out the usb a webcam, which works, but has a catch...

i don't intend to get too crazy with this, i think the only real tricky work id like to do would be the rewiring of the original iMac power button. i was going to keep the power supply in the case for the "cleanness" of it all, but don't think i really want to deal with wiring up a fan for temp issues. this was the main part of my research, and then deciding how much i really care about having the power block in or out of the case. i ran into a couple posts saying that if you keep the block outside that will obviously decrease internal heat and wouldn't require a fan with just the panel and the converter board. could anyone kindly confirm wether or not this would be the correct decision?

question 1. if i keep the power block outside of the case i don't need to get involved with wiring up an internal fan?

my other not so serious issue, other than i just don't have a firm grasp on the cables, i will be using this as my main display with a second display attached from my m4 mac mini. i am running the main from a DP 2.1 cable and the secondary from hdmi. keeping as many of my usb C ports available on the mini, currently without any hubs. maybe one day. when the mac mini is connected to the SAI board from DP the webcam doesn't register as being an available camera source when plugged in from the board. if i plug the camera into the mac mini with a usb c-a adapter it recognizes the camera. if i switch DP to using usb C, then attach the camera to the usb-A from the SA1 board, the board will recognize the camera. im confused by this? anyone have thoughts?

question 2. webcam doesn't recognize when mac mini is connected to SA1 board with DP, but does with usb C?

Thanks, and looking forward to sealing this thing up finally!

IMG_3934.JPG
 
  • Like
Reactions: PaulD-UK
@Infundibulator
Glad you found this thread helpful. :)

Q1. The iMac case is quite good at keeping the new monitor electronics 'cool enough' if you aren't in a hot part of the world. Lots of people run their conversion without any fan, with the PSU inside the case..

But if you also charge a laptop from the board's USB-C cable that's another ~60 watts of heat inside the iMac case, and with an internal PSU, it will get much warmer.
In that case a fan helps.

Q2. The USB-A ports on the SA1 board only work (at USB 2) if you connect the Mac to the board using a USB-C video cable.
The board's USB-A ports will work at USB 3 rates if you connect one of your Mac's USB ports (using an adapter) to the USB-B input port on the SA1.

If you use the DP input port on the SA1 on it's own, then the board's USB-A ports don't work.
This is the same if you plug into the DP port with an adapter cable with USB-C to connect from the Mac.

The only way the USB webcam can work is:
1. with a USB connection to either the USB-C, with a video cable, or
2. with a data cable to the USB-B port on the board (and a separate video cable to one of the DP/HDMI inputs).

There are posts about wiring the power button earlier in the thread.
Hope this helps.
 
  • Like
Reactions: Pabo49
@said-and-done ”…the board seems to struggle with audio.”

I’m afraid that sounds like a faulty board. The same thing has happened with other board manufacturers, but no one has found a way of making it right.
You could try another cable or a different input to the board.
 
Ok, I think you guys have convinced me to not attempt a 21.5 conversion. I thought it would be the perfect side monitor because it isn't taller in portrait mode than my 27" in landscape mode... but I have an old 27" 4k I can use instead.

Thank you
 
Re: 21.5" 4k conversions, @kevinherring's issues with his board notwithstanding, is there a reason why the R9513 (which appeared to the recommended board for 21.5" conversions from reading this thread) is not listed in the Wiki post list on the first page (which calls out 4K conversions)?

I still haven't gotten around to buying a board for my conversion yet (I use my iMac daily so an excuse to not take the screen off and get my display model number needed when ordering is easy to find 😅), but if R9513 is not the recommended board after all, I'd be keen to know.

I don't care about internal speakers, USB-C, etc. A 'dumb' display is all I seek.

Related: does the R9513 do 4096x2304 or only "UHD"?
 
@d0od The R9513 isn't listed because the person who found the info for the other 4K boards (R9516 and T95MV) didn't provide info on the R9513.

If the vendor sells them for LM215UH1-SDA1 or SDB1 iMac 4K panels they should be the full 4096x2304.
But vendor support for firmware upgrades is very patchy, except for StoneTaskin.

Because this thread has primarily been for 27" 5K conversions, there is only sporadic info on DIY 4K projects.
As people do the research and report the results here it will be added to these pages for everyone else to benefit from. :)
 
  • Like
Reactions: d0od
Made some progress with EDID modification based on this manual

Using Hackintool extracted EDID-xxx-x.bin file. Also Hackintool automatically created required folder DisplayVendorID-x and plist file DisplayProductID-x.

Put DisplayVendorID-x folder into /System/Library/Displays/Contents/Resources/Overrides

Using AW EDID Editor edited EDID-xxx-x.bin file and saved it to desktop as DP_EDID.bin

Using Terminal converted bin to hex code:
xxd -ps ~/Desktop/DP_EDID.bin

Saved hex code to file DP_EDID.txt on Desktop

Using Terminal converted hex to base64 code:
cat ~/Desktop/DP_EDID.txt | xxd -r -p | base64

Opened DisplayProductID-x file in text editor and replaced base64 code there.

👉The results:
Currently in EDID file i only tried to change color matrix values based on values provided in datasheet for my panel and also changed serial number.
Color matrix values changed successfully and macOS now generates slightly wider profile. I guess default values in my JRY-W9RQUHD-FA1 board where from some older panel model.

Serial number changed in EDID remains invisible by the system. So i guess it should be changed in some different way.

Also i was able to change display name directly in DisplayProductID-x file. So instead of original "DP" now it use real name of the panel LM270WRASSA1.
Screen Shot 2025-07-23 at 11.22.50 PM.jpg
 
Last edited:
Register on MacRumors! This sidebar will go away, and you'll see fewer ads.