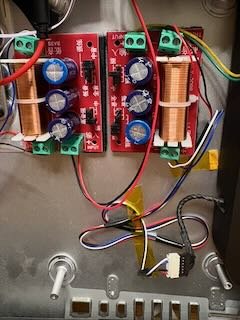
Become a MacRumors Supporter for $50/year with no ads, ability to filter front page stories, and private forums.
Status
The first post of this thread is a WikiPost and can be edited by anyone with the appropiate permissions. Your edits will be public.
I am in the process of converting a 2015 27" iMac and I am using a JRY-W9RQUHD-SA1 board and trying to use the original iMac speakers. I have connected the crossovers to the board and to the speakers but there is no sound coming from the speakers. I have included a couple of pictures of the board and the crossovers so you can see how they are connected.

Any suggestions on what I may have done wrong or how to fit the issue would be greatly appreciated.

Thanks
 

Attachments

  • IMG_0439.jpeg
    IMG_0439.jpeg
    4.6 MB · Views: 13
  • IMG_0440.jpeg
    IMG_0440.jpeg
    512.7 KB · Views: 15
I am in the process of converting a 2015 27" iMac and I am using a JRY-W9RQUHD-SA1 board and trying to use the original iMac speakers. I have connected the crossovers to the board and to the speakers but there is no sound coming from the speakers. I have included a couple of pictures of the board and the crossovers so you can see how they are connected.

Any suggestions on what I may have done wrong or how to fit the issue would be greatly appreciated.

Thanks.


I am getting machine sounds through the speakers but not music or website audio
Disregard, audio is now working
 
Last edited:
Long time lurker, first time builder. Kaeslin's logic and final build align very well with my own requirements and I have gathered all of the components required for a similar build. R9A18 board, OEM CPU, no added complications. I purchased the "basic" R9A18 kit (driver board, 3 wiring harnesses and remote) from Stonetaskin.

There isn't nearly as much media for R9A18 builds as the R1811. I have examined many still images and have frame captured parts of the Miani video to try to establish correct board to panel wiring connections. I post the following images of cable alignments with the hope that a reader can confirm they are correct.

First, the alignment of the Stonetaskin kit's backlit cable harness connectors to the R9A18 board:
R9A18 Backlit Harness to Board.jpg


Second, the Stonetaskin kit's backlit cable harness to the panel's harness - noting the 3 molded dots and the Red wire to Grey wire alignment on the right side:
R9A18 Backlit to Panel Connector.jpg


Third, the Stonetaskin kit's wire harness alignment to both the R9A18 board and to the panel's connector:
R9A18 Display Connector ends.jpg


If anyone can confirm these connections won't fry a board or set my house on fire then I will plug them and power up :)

thanks
 
  • Like
Reactions: Rip57 and PaulD-UK
@avkdm The sound from the JRY--AA1 board with these crossovers is usable.
See the previous post for details of settings.
 
Last edited:
Last edited:
@avkdm The reason 24V is specified is that less voltage than that doesn't work with USB-C PD laptop charging.
If you are not charging a laptop then it shouldn't hurt to try the board with 19.5V, I don't see why it wouldn't work.

To check what the actual frame rate is when using HDMI you could check with an online frame rate analyser:
So would 19.5v run the board cooler than the 12v? Sorry for all the questions. I am really happy with how bright the screen is.
 
@avkdm "So would 19.5v run the board cooler than the 12v?"
A bit cooler, especial the circuit around the voltage input barrel plug.

The problem with cheap audio amps is that without a ripple-free power supply they can sound bad.
I tried a similar one (without BT), but the result was not good enough to use.

"Have you ever thought about using this BT module/amp"
If the amp is good, then you could get OK results, especially if the BT input has a miniature antenna socket so you could use the existing iMac BT antenna cable and plug, the BT antenna is the one at the top, on the right.
 
My project is currently a work in progress, I am part way through converting two 5k iMacs (Left display is converted with an SA1 board, right is still an iMac while I wait for a second SA1 to arrive)

1. Would it be possible to use a USB 'splitter' or USB hub coming out of the back of the Mac mini to run two USB-A to USB-B cables (1 to each SA1) to power the USB 3 of the SA1?

2. Has anyone tried one of the iMac specific USB hubs? My plan was to use a USB-A to USB-C extension to plug them into the SA1, they were only £9 on Amazon so thought I'd take a punt and pop them on my xmas list 😆


Screenshot 2025-12-15 at 21.47.52.png


Screenshot 2025-12-15 at 21.39.25.png
Screenshot 2025-12-15 at 21.39.40.png
 
@Jon848 You should be able to connect cables to the USB B input ports on the SA1s from two different ports on the same USB 3.x hub connected to the Mac.
The bandwidth would be shared amongst everything connected, including additional hubs.

I don't know if that might cause a problem with using the SA1's USB-C input port(s) to send video to the monitor, as the USB 2 connection on the video cable also goes to the USB 3 hub on the SA1.
I think it should work OK, but I don't think anyone's tried it...

A splitter wouldn’t work.
 
Last edited:
@Jon848

I don't know if that might cause a problem with using the SA1's USB-C input port(s) to send video to the monitor, as the USB 2 connection on the video cable also goes to the USB 3 hub on the SA1.
I think it should work OK, but I don't think anyone's tried it...

A splitter wouldn’t work.
OK great, I'll have a play around with the various hubs and connections when everything arrives and report back the results, thanks for the info and quick reply 👍
 
@charliembp
were you able to find the problem?

I assembled a 12V power supply from a Mac PSU. The result is the same — only the backlight works. However, when I connect the laptop, I can see the second display detected and its parameters are shown in the system.
 

Attachments

  • Screenshot 2025-12-16 184707.png
    Screenshot 2025-12-16 184707.png
    12.5 KB · Views: 9
  • Screenshot 2025-12-16 184800.png
    Screenshot 2025-12-16 184800.png
    49.5 KB · Views: 13
  • photo_2025-12-16_19-05-42.jpg
    photo_2025-12-16_19-05-42.jpg
    142.8 KB · Views: 11
@charliembp
were you able to find the problem?

I assembled a 12V power supply from a Mac PSU. The result is the same — only the backlight works. However, when I connect the laptop, I can see the second display detected and its parameters are shown in the system.
no I returned the old r1811 board and bought a new one, I tested my panel on another board it was working fine, could you try on 24V, and are you sure the way you plug the backlight is correct? I am having the some issue like you, I am able to change the backlight level and see the secondary monitor but no picture
 
no I returned the old r1811 board and bought a new one, I tested my panel on another board it was working fine, could you try on 24V, and are you sure the way you plug the backlight is correct? I am having the some issue like you, I am able to change the backlight level and see the secondary monitor but no picture
With a 24V power supply, it didn’t work from the beginning.
 
Hello all together. I did my display conversion successfully. But I'm unhappy with the sound. Currently I'm using passive crossovers for the original speakers.
I was researching a bit and found this 4 Channels DSP with amplifiers on Ali Express which should do a much better job. Has anybody already tried something like that?
I was really disappointed with my crossovers as well.
I now have a BT Amp coming I am going to connect to some BOSE speakers. Will let you know how it sounds.
 
Last edited:
@avkdm @maikischa "but its so tinny..."

Is that with the speakers in the case, and the screen fitted?
If not, you won’t really hear the bass fully.

I'm not sure which crossovers you are using:
If you are using YLY-2088 original version (jumpers marked A,B,C,and D)
then connect all jumpers A,B,C and D.
If that is still ‘too tinny’ try disconnecting B, leaving A,B and D connected.
That will reduce the mid-upper frequencies.

If you are using the revised version of the YLY-2088 (two groups of jumper pins)
then try these settings:

YLY-2088iiMatchMk1.jpg

YLY-2088iiSettings.jpg


This older post has full details.
 
Last edited:
@avkdm @maikischa "but its so tinny..."

Is that with the speakers in the case, and the screen fitted?
If not, you won’t really hear the bass fully.

I'm not sure which crossovers you are using:
If you are using YLY-2088 original version (jumpers marked A,B,C,and D)
then connect all jumpers A,B,C and D.
If that is still ‘too tinny’ try disconnecting B, leaving A,B and D connected.
That will reduce the mid-upper frequencies.

If you are using the revised version of the YLY-2088 (two groups of jumper pins)
then try these settings:

View attachment 2588962
View attachment 2588963

This older post has full details.
Thanks for the reply - Yes this was connected outside the case for testing. I am not sure now whether its worth putting them back in the case to try I was so disappointed with the sound. Anyone one else on here happy with the sound with speakers internally attached?
 
Replying to joywolf and fhall1...

Here's a photo of all the required components. This shows:
1.Housing. The face shown is the one glued to the inside of the chin, the feet at either end rest on the grille's bars to ensure perfect horizontal alignment. 2. 4x Paddle Buttons these slot into the top of the housing once it's glued in place and the Control Strip is then positioned over these with its 4 buttons slotting into the paddle holes 3. Top Plate. I've just included this to give the Control Strip a bit more rigidity once it's sandwiched in between this and the housing with M3 screws (see pic 1 from my previous post). When that's all done, the strip just connects up to the SA1 driver board in the usual way.
Hi, I like your design and would like to try this. Could you please describe how you removed the metal grill? I'm struggling a bit to fit a chisel from above. Also did you use heat to losen the glue (if it's glued to the chassis, unclear to me).
 
  • Like
Reactions: joywolf
@avkdm @maikischa "but its so tinny..."

Is that with the speakers in the case, and the screen fitted?
If not, you won’t really hear the bass fully.

I'm not sure which crossovers you are using:
If you are using YLY-2088 original version (jumpers marked A,B,C,and D)
then connect all jumpers A,B,C and D.
If that is still ‘too tinny’ try disconnecting B, leaving A,B and D connected.
That will reduce the mid-upper frequencies.

If you are using the revised version of the YLY-2088 (two groups of jumper pins)
then try these settings:

View attachment 2588962
View attachment 2588963

This older post has full details.
Put speakers back in the case - setup as per your 2nd diagram - audio is still way too low and tinny even with equaliser. Guess I need an amp.
 
Register on MacRumors! This sidebar will go away, and you'll see fewer ads.