

I want to share my experience with a topic that seems very complicated for many people as I seen on the Internet.
The Story:
I own two 2013 Mac Pros (MacPro6,1)—one with D300s and the other with D500s. I love these machines, not just for their design but also for the utility they still offer. Until now, I had been using my D500-equipped model as a KVM hypervisor to deploy VMs, but with the rise of AI, I wanted to see if I could put it to use in that area.
While researching, I came across resources covering AI on this hardware, such as https://github.com/manu7irl/macpro-2013-ollama-gpu, https://devquasar.com/uncategorized/the-cheapest-way-to-host-a-local-llm-with-reasonable-speed/, https://kovasky.me/blogs/mac_pro_trashcan_ai/, and—most importantly for me—https://echalupa.com/blog/mac-pro-6-1-llama-cpp-firepro-d300-vulkan-ubuntu. After some configuration on Ubuntu Server to switch the D500s to the `amdgpu` driver, I was quickly able to start running a local LLM.
However, the combined 6 GB of VRAM on the D500s (using `llama.cpp`'s layer mode) soon proved limiting, so I began looking for an eGPU solution. Getting an eGPU working with a 2013 Mac Pro is "easy" on Windows and macOS (though it did require some research on my part back then). On Linux, however, it seemed like an uphill battle—many had tried, but few had succeeded—so I wanted to test it myself using a well-known OS: Ubuntu (Server edition).
After several attempts and reinstallations of Ubuntu Server, I finally succeeded!
Hardware:
- Mac Pro 2013 (12 core CPU + 128 GB RAM) with 2 D500 GPUs - 6GB VRAM
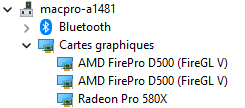
- Magma Thunderbolt 2 case with an AMD Radeon RX 570 (flashed from chinese AMD Radeon RX580 2048SP with "Sapphire Technology Limited Radeon RX 570 Pulse 4GB" firmware) - 8GB VRAM
Procedure:
(tested on Ubuntu Server 26.04 LTS)
1 - with a working SSH connection, run:
2 - modify GRUB_CMDLINE_LINUX_DEFAULT with this value:
3 - update grub and reboot:
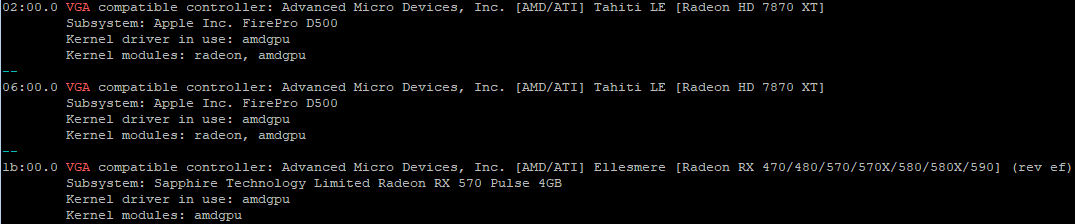
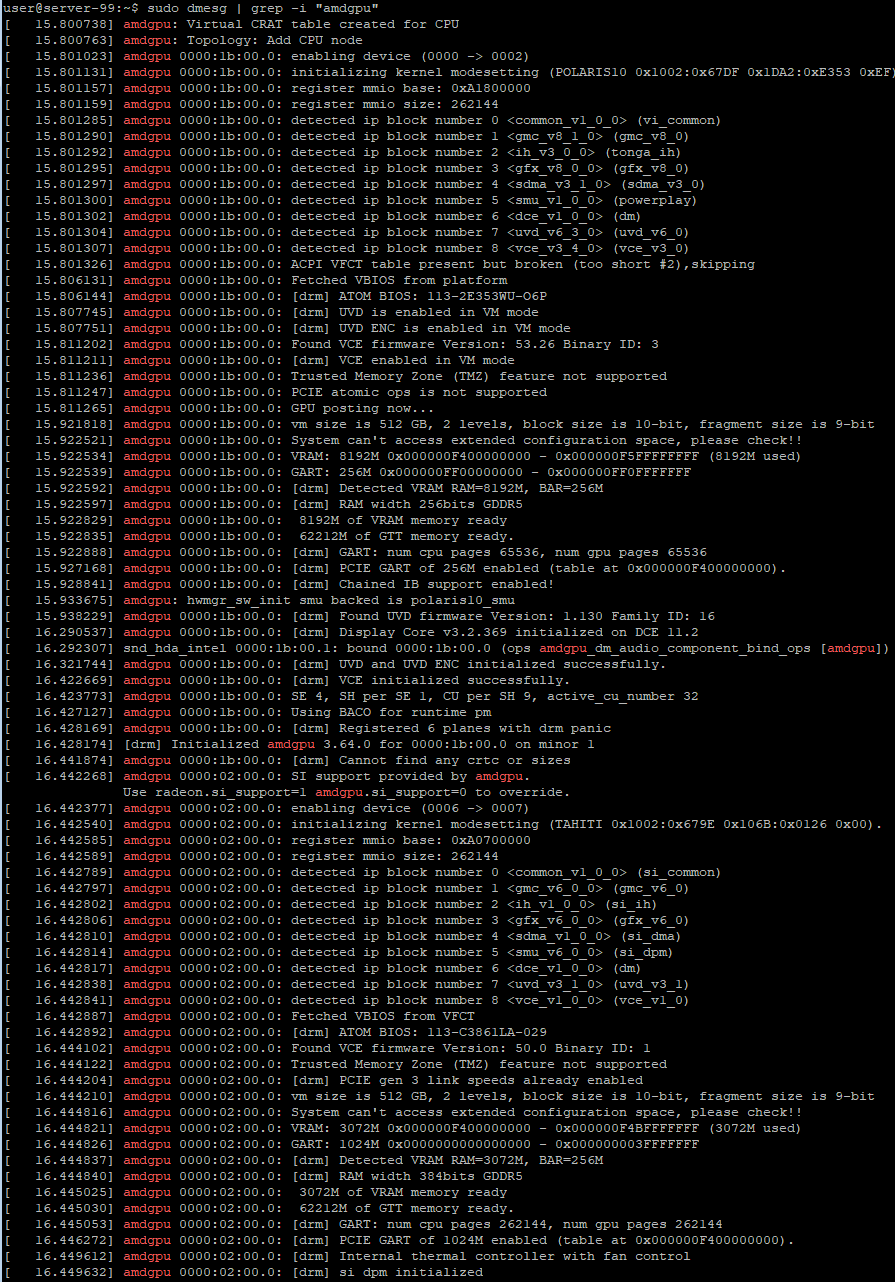
4 - after reboot, check your vga card

Notes:
On Linux, it's not easy to find infos about eGPU for Mac Pro 2013 under Linux, so, I've decided to share my finds.
I've worked hard before discovering a stupid issue: I've flashed my GPU with a firmware for 4Gb of VRAM, my card have 8Gb of VRAM............This grub config bypass (normally) this kind of issue.
For AI, Ollama or llama-cpp can be used in conjunction with Vulkan to have hardware acceleration. Il will provide my results in a few days with my different eGPU configurations, I have a Blackmagic RX 580 and a AMD Radeon RX 5700 XT to test.
On this hardware, during my tests, only one eGPU can be plugged with the internal gpus activated (due to the internal hardware limitations).
Bonus Windows 11:
1 - Right-click the Start button and select "Device Manager", or run devmgmt.msc from the Run dialog (Win+R).
2 - In the menu bar, go to View > Devices by connection. This lays out devices by their PCI bus/slot hierarchy instead of by category, which makes it much easier to locate a specific Bus/Device/Function.
3 - Expand the tree until you see entries labeled "PCI-to-PCI Bridge". There will likely be several; you'll identify the right ones by their location info in the next step.
4 - Right-click a "PCI-to-PCI Bridge" entry > Properties > Details tab. In the dropdown, select "Location information" (or "Bus number"/"Location paths" depending on Windows version).
This shows the PCI Bus, Device, and Function numbers so you can match them against the target list:
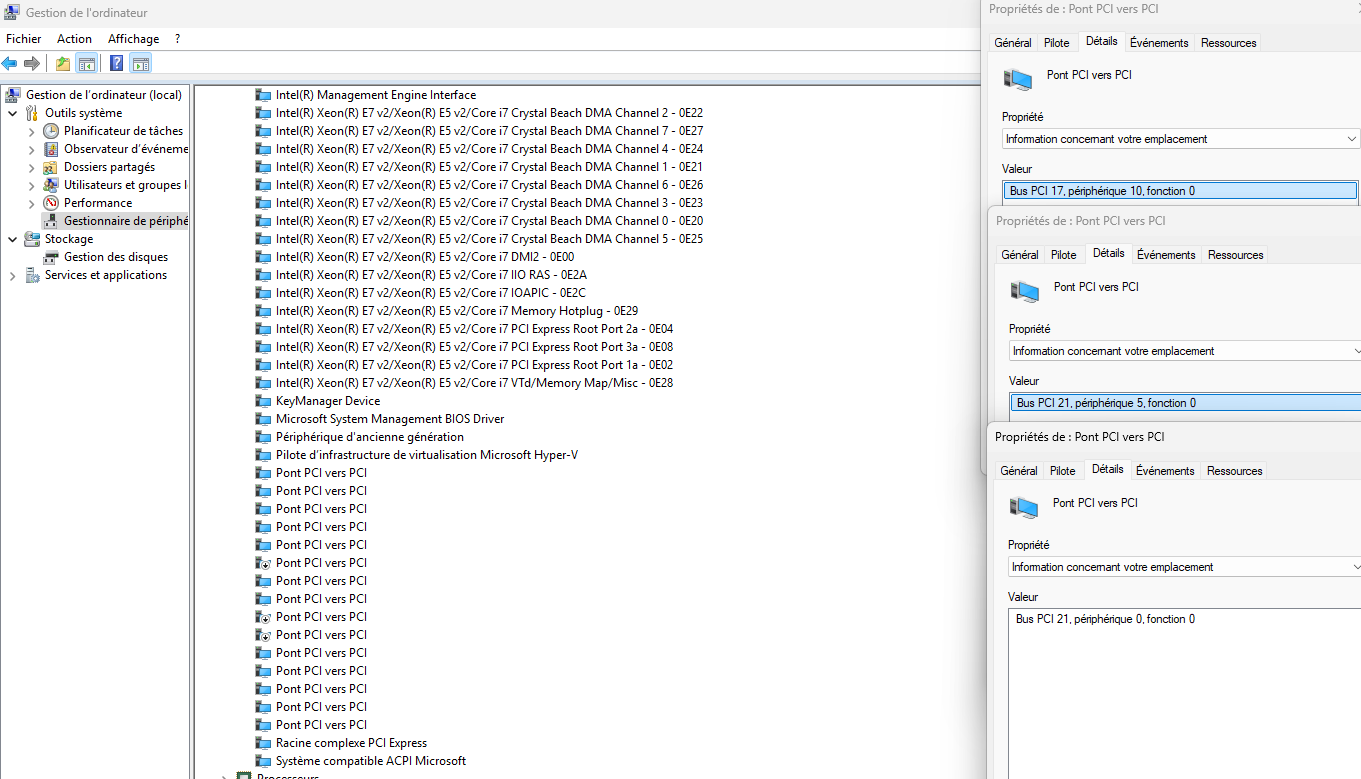
- Bus 17/Device 10/Function 0
- Bus 21/Device 5/Function 0
- Bus 21/Device 0/Function 0.
Once you've confirmed a match, right-click that device and select "Disable device".
Confirm the warning prompt.
Repeat for all three bridges listed above.
The PCI-to-PCI Brige to deactivate (sorry for the French screenshots 😉 ) :
5 - Windows may not require a restart for a simple device disable, but if you see instability or the change doesn't seem to take effect, reboot the machine to ensure the PCI bus re-enumerates with the bridges disabled.
The Story:
I own two 2013 Mac Pros (MacPro6,1)—one with D300s and the other with D500s. I love these machines, not just for their design but also for the utility they still offer. Until now, I had been using my D500-equipped model as a KVM hypervisor to deploy VMs, but with the rise of AI, I wanted to see if I could put it to use in that area.
While researching, I came across resources covering AI on this hardware, such as https://github.com/manu7irl/macpro-2013-ollama-gpu, https://devquasar.com/uncategorized/the-cheapest-way-to-host-a-local-llm-with-reasonable-speed/, https://kovasky.me/blogs/mac_pro_trashcan_ai/, and—most importantly for me—https://echalupa.com/blog/mac-pro-6-1-llama-cpp-firepro-d300-vulkan-ubuntu. After some configuration on Ubuntu Server to switch the D500s to the `amdgpu` driver, I was quickly able to start running a local LLM.
However, the combined 6 GB of VRAM on the D500s (using `llama.cpp`'s layer mode) soon proved limiting, so I began looking for an eGPU solution. Getting an eGPU working with a 2013 Mac Pro is "easy" on Windows and macOS (though it did require some research on my part back then). On Linux, however, it seemed like an uphill battle—many had tried, but few had succeeded—so I wanted to test it myself using a well-known OS: Ubuntu (Server edition).
After several attempts and reinstallations of Ubuntu Server, I finally succeeded!
Hardware:
- Mac Pro 2013 (12 core CPU + 128 GB RAM) with 2 D500 GPUs - 6GB VRAM
- Magma Thunderbolt 2 case with an AMD Radeon RX 570 (flashed from chinese AMD Radeon RX580 2048SP with "Sapphire Technology Limited Radeon RX 570 Pulse 4GB" firmware) - 8GB VRAM
Procedure:
(tested on Ubuntu Server 26.04 LTS)
1 - with a working SSH connection, run:
Code:
sudo nano /etc/default/grub2 - modify GRUB_CMDLINE_LINUX_DEFAULT with this value:
Code:
GRUB_CMDLINE_LINUX_DEFAULT="radeon.si_support=0 amdgpu.si_support=1 radeon.cik_support=0 amdgpu.cik_support=1 intel_iommu=on iommu=pt pci=nocrs pci=realloc pci=nommconf"3 - update grub and reboot:
Code:
sudo update-grub
sudo update-initramfs -u
sudo reboot
4 - after reboot, check your vga card
Code:
lspci -k | grep -EA3 'VGA|3D|Display'
Code:
ls -l /dev/dri/by-path/ | grep render
Code:
sudo dmesg | grep -i "amdgpu"Notes:
On Linux, it's not easy to find infos about eGPU for Mac Pro 2013 under Linux, so, I've decided to share my finds.
I've worked hard before discovering a stupid issue: I've flashed my GPU with a firmware for 4Gb of VRAM, my card have 8Gb of VRAM............This grub config bypass (normally) this kind of issue.
For AI, Ollama or llama-cpp can be used in conjunction with Vulkan to have hardware acceleration. Il will provide my results in a few days with my different eGPU configurations, I have a Blackmagic RX 580 and a AMD Radeon RX 5700 XT to test.
On this hardware, during my tests, only one eGPU can be plugged with the internal gpus activated (due to the internal hardware limitations).
Bonus Windows 11:
1 - Right-click the Start button and select "Device Manager", or run devmgmt.msc from the Run dialog (Win+R).
2 - In the menu bar, go to View > Devices by connection. This lays out devices by their PCI bus/slot hierarchy instead of by category, which makes it much easier to locate a specific Bus/Device/Function.
3 - Expand the tree until you see entries labeled "PCI-to-PCI Bridge". There will likely be several; you'll identify the right ones by their location info in the next step.
4 - Right-click a "PCI-to-PCI Bridge" entry > Properties > Details tab. In the dropdown, select "Location information" (or "Bus number"/"Location paths" depending on Windows version).
This shows the PCI Bus, Device, and Function numbers so you can match them against the target list:
- Bus 17/Device 10/Function 0
- Bus 21/Device 5/Function 0
- Bus 21/Device 0/Function 0.
Once you've confirmed a match, right-click that device and select "Disable device".
Confirm the warning prompt.
Repeat for all three bridges listed above.
The PCI-to-PCI Brige to deactivate (sorry for the French screenshots 😉 ) :
5 - Windows may not require a restart for a simple device disable, but if you see instability or the change doesn't seem to take effect, reboot the machine to ensure the PCI bus re-enumerates with the bridges disabled.
Last edited:
