Become a MacRumors Supporter for $50/year with no ads, ability to filter front page stories, and private forums.

jhawkin1

macrumors member
Original poster
Feb 20, 2010
82
2
Chicago, IL
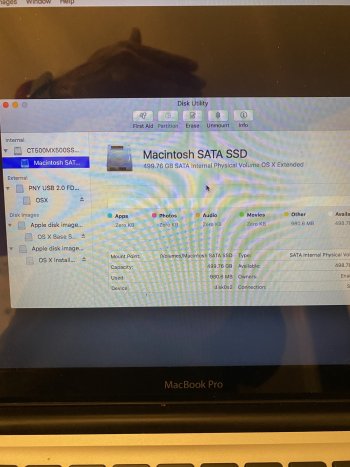
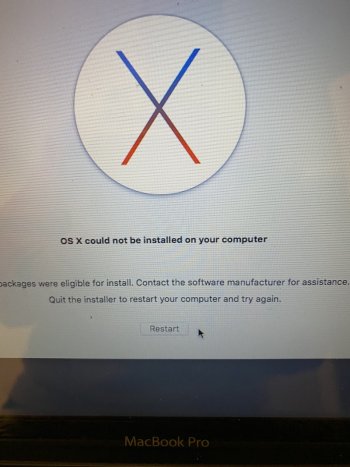
I just installed a new SSD Crucial MX500 to no avail. I am getting the same error message(s): the question mark flashing within a file. This happens with my old hard drive as well as with the new drive. I've tried a variety of different things: Hold the Alt= password and blank screen.

I'm at a loss and am getting ready to throw the thing out :). I've messed up every step of the way and it's far from running smoothly. Sucks to put $ at it and seemingly not know what I am doing :(.

Any simple help would be greatly appreciated.
 
As an Amazon Associate, MacRumors earns a commission from qualifying purchases made through links in this post.
Did you install macOS on the SSD before installing it? If not then there’s nothing to boot. Do you have a boot dvd or usb drive?
 
No cause to panic yet. Sounds like you skipped over initializing the drive.

Try Internet Recovery with Option-⌘-R. If Internet Recovery boots, go into Disk Utility and try Mounting the new drive. If that is successful, format (erase) the drive to Mac OS Extended Journaled. Then you're gold. Continue with installing El Capitan.

Screen Shot 2020-11-01 at 15.37.28.png


If booting into Internet Recovery is not successful, swap back to your previous drive, or boot into an external bootable drive, and follow the steps to initialize the Crucial drive. *edit since Internet Recovery is not available on 09 MBP
 
Last edited:
No cause to panic yet. Sounds like you skipped over initializing the drive.

Try Internet Recovery with Option-⌘-R. If Internet Recovery boots, go into Disk Utility and try Mounting the new drive. If that is successful, format (erase) the drive to Mac OS Extended Journaled. Then you're gold. Continue with installing El Capitan.

View attachment 977445

If booting into Internet Recovery is not successful, swap back to your previous drive, or boot into an external bootable drive, and follow the steps to initialize the Crucial drive.
I do have an OS X Snow Lion Install Disc but it keeps giving an error after installation begins about halfway through. It spits the Disc out and says it had an error?

I tried to do Internet Recovery: nothing pops up and it's a blank grey screen.
 
Last edited:
I do have an OS X Snow Lion Install Disc but it keeps giving an error after installation begins about halfway through. It spits the Disc out and says it had an error?
Right, but what about Internet Recovery, or, holding Option during restart to select your Install El Capitan thumb drive? If you can get into Disk Utility via either method you should be able to Mount and erase/Format the new internal drive to Mac OS Extended Journaled.

if not, take the drive out and initialize it inside an enclosure with another Mac. Either way you are not at a dead end
 
Last edited:
Right, but what about Internet Recovery, or, holding Option during restart to select your Install El Capitan thumb drive? If you can get into Disk Utility via either method you should be able to Mount and erase/Format the new internal drive to Mac OS Extended Journaled.

if not, take the drive out and initialize it inside an enclosure with another Mac. Either way you are not at a dead end
Thanks for the tips. I'll keep trying until I get it right.

Here are the error messages I get and what the drive current looks like
 

Attachments

  • 02B1A8FE-FC3A-4F65-B4C5-2D6416B9111F.jpeg
    02B1A8FE-FC3A-4F65-B4C5-2D6416B9111F.jpeg
    623.3 KB · Views: 285
  • E942D550-1C8D-4844-91A2-56CCF9C38E68.jpeg
    E942D550-1C8D-4844-91A2-56CCF9C38E68.jpeg
    674.9 KB · Views: 224
hmm... so the internal looks good to go, actually. However, clicking one layer higher onto the drive itself (”CT5” etc etc) and erase/formatting again, per the Crucial Initialize disk recommendation, might improve things.

But what’s more interesting is that you’ve entered recovery mode with two recovery disk images mounted at once. It might improve results to eject whichever disk image you are not booted into?

Somehow, you should be able to pull through.
 
Last edited:
hmm... so the internal looks good to go, actually. However, clicking one layer higher onto the drive itself (”CT5” etc etc) and erase/formatting again, per the Crucial Initialize disk recommendation, might improve things.

But what’s more interesting is that you’ve entered recovery mode with two recovery disk images mounted at once. It might improve results to eject whichever disk image you are not booted into?

Somehow, you should be able to pull through. I was in the same spot with my 2011 Mac Mini and Internet Recovery was able to recognize my drive after a few tries
Maybe the OS X drive is not recognizable and I need to download a new bootable Clone OS X?
 
Lets take this step by step.
Did your hard drive suddenly stop working and you got the question mark flashing within a file? If that is the case do you have an external USB enclosure you can put the hard drive in and try to boot from it? If it boots from the external enclosure my guess is that the internal SATA cable from the logic board to the hard drive is bad. It is a known issue with the 2009 - 2012 MacBooks Pros. I have replaced mine twice in a 2012 MacBook Pro 13. They run about $7.00 on ebay. Instructions on replacing SSD cable can be found at: https://www.ifixit.com/Guide/MacBook+Pro+13-Inch+Unibody+Mid+2009+Hard+Drive+Cable+Replacement/1340

If that is the cause and you replace the internal SATA cable, I would then install the SSD, boot from the external hard drive, download Carbon Copy Cloner, and clone the hard drive to the internal SSD.
 
If I remember rightly, there can be an issue if the internal prom battery has died.
Inside every computer there is a little coin sized battery which keeps the prom setting for things like the hard drive
It's probably a 2032 you can find at any store for almost nothing, but the thing would be to get in and see what it's got written on it. On an 11 year old machine it's very likely it's dead.
It also keeps the internal clock correct - but connecting to the internet these days that usually gets put right so you might not have noticed if that was slow or wrong but that's usually the first sign it's failing.
Anyway, when this battery dies, it loses all the settings the hard drive gets reset to 0 at boot up and it can't find it.
It also gives problems for installation of an OS for the same reason.
I think it's very likely to be that which is your problem.
You should test it too. It should be a bit over 3v at new so if it's really low or dead you know it's a problem.
Also when you're in there, follow the suggestion above about the cable. At least make sure it's well seated.

I don't think you've messed up by the way.

You may also have to run hardware diagnostics as well. Apple does have a really good program that will tell you if there's a hardware problem but I don't know where it is on your computer.
They are on the installation disks (full - that is the ones with pictures on not the upgrade disks that are grey). If you can run one of those they always have it but otherwise more recently it's on the HD in a hidden partition so would be on you old HD
Best
Ian
 
OP:

Try the little trick I describe below.
It will only take a few minutes, but please TRY IT.

Do this:
1. Get booted from the USB flash drive
2. TURN OFF your wifi connection (important!)
3. Now, go to the Mac utilities and open terminal
4. Next, enter this command into terminal
date 010112002019
(You will need to WRITE DOWN this command on paper. Get the numbers right and be sure to enter the "space" between "date" and the number
5. Now, reboot again (and be sure you ARE NOT connected to the net).
6. Finally, try running the installer again.

WHY I'm asking you to try this:
A while back, a number of the installers from Apple began failing due to an "expired certificate" or something like that.
However... this can be "worked around" by setting back the date and time on the Mac. But you need to be "off the net" so it doesn't get automatically re-adjusted.
 
1. Internet Recovery is not possible on a 2009 Mac. That feature did not appear until 2011. Some older Macs received firmware updates that allow internet recovery, but none older than 2010 models.

2. as Fishrrman noted, you have to change the system clock, which will then allow installaion of El Capitan (assuming that your USB bootable installer is created properly.)

3. Don't waste your time looking for a replaceable button battery. Macbook Pros have not used that technology since 2008. No 2009 and later Mac laptop has a replaceable backup battery. I don't think ANY Mac laptop has used a standard button battery. AFAIK, all use a simple battery pack of some kind, with a plug-in cable.
 
1. Internet Recovery is not possible on a 2009 Mac. That feature did not appear until 2011. Some older Macs received firmware updates that allow internet recovery, but none older than 2010 models.
Oops, I had invented a memory of some version of OS X finally removing the tack-on hardware requirement for Internet Recovery entirely
 
Oops, I had invented a memory of some version of OS X finally removing the tack-on hardware requirement for Internet Recovery entirely
Yeah, that's kind of the point of Internet Recovery. One can boot to that, regardless of local system that you might have installed (or no local boot at all!) That feature would need to be in firmware, eh?
 
OP:

Try the little trick I describe below.
It will only take a few minutes, but please TRY IT.

Do this:
1. Get booted from the USB flash drive
2. TURN OFF your wifi connection (important!)
3. Now, go to the Mac utilities and open terminal
4. Next, enter this command into terminal
date 010112002019
(You will need to WRITE DOWN this command on paper. Get the numbers right and be sure to enter the "space" between "date" and the number
5. Now, reboot again (and be sure you ARE NOT connected to the net).
6. Finally, try running the installer again.

WHY I'm asking you to try this:
A while back, a number of the installers from Apple began failing due to an "expired certificate" or something like that.
However... this can be "worked around" by setting back the date and time on the Mac. But you need to be "off the net" so it doesn't get automatically re-adjusted.
Trying it first with my old drive first...the HD original using the Sabrent
 
OP:

Try the little trick I describe below.
It will only take a few minutes, but please TRY IT.

Do this:
1. Get booted from the USB flash drive
2. TURN OFF your wifi connection (important!)
3. Now, go to the Mac utilities and open terminal
4. Next, enter this command into terminal
date 010112002019
(You will need to WRITE DOWN this command on paper. Get the numbers right and be sure to enter the "space" between "date" and the number
5. Now, reboot again (and be sure you ARE NOT connected to the net).
6. Finally, try running the installer again.

WHY I'm asking you to try this:
A while back, a number of the installers from Apple began failing due to an "expired certificate" or something like that.
However... this can be "worked around" by setting back the date and time on the Mac. But you need to be "off the net" so it doesn't get automatically re

hmm... so the internal looks good to go, actually. However, clicking one layer higher onto the drive itself (”CT5” etc etc) and erase/formatting again, per the Crucial Initialize disk recommendation, might improve things.

But what’s more interesting is that you’ve entered recovery mode with two recovery disk images mounted at once. It might improve results to eject whichever disk image you are not booted into?

Somehow, you should be able to pull through.
I'm going to start from scratch. Can I use my Macbook Air to create a bootable OS X El Capitan without doing anything to my macbook air?

USB bootable?

Which device then do I make the carbon copy cloner?
 
Your MBA can create a new installer for El Capitan. That's good to try if you think something is wrong or out of date with your current one. (I am just now noticing that the second image in 7 shows that your new internal drive is no longer the trouble, so my perception that the drive was successfully formatted was correct but I didn't connect the dots from there.)
 
Here's my latest fail... please tell me what I'm doing wrong. Do I need to partition my USB as well before I try terminal the OS X?


This is my Youtube haha sorry!
 
Looks like the terminal command can't locate your El Capitan installer.
You need to know that the El Capitan installer app is in the right location.
Your terminal command is looking for a file named "Install OS X El Capitan.app", and it is looking for it in your Applications folder.
Did you download the El Capitan installer, and is it actually in your Applications folder?

Copy and paste often will work OK, but other times it fails miserably.
By far, the best way to do this is to manually type that command in the terminal window.
 
Last edited:
Looks like the terminal command can't locate your El Capitan installer.
You need to know that the El Capitan is in the right location.
Your terminal command is looking for a file named "Install OS X El Capitan.app", and it is looking for it in your Applications folder.
Did you download the El Capitan installer, and is it actually in your Applications folder?

Copy and paste often will work OK, but other times it fails miserably.
By far, the best way to do this is to manually type that command in the terminal window.
I am attempting get get a bootable OS X on my USB drive so I can then install the OS X on my macbook pro mid 2009. Am I not doing things in order? I'm all sorts of turned upside down.

I am a visual learner :) as well as a step by step.

My macbook pro 2009 has a new drive but no OS X to run. I need to get one on a USB to install to my new drive. I am trying to do this using my Macbook Air 2019
 
The terminal command refers to the "Install OS X El Capitan" app that will be in your Applications folder only after you first download the disk image from the Apple link, and open it and run the package. The Apple bootable installer instructions are really unsurpassable for clarity IMO.

Other ppl can provide better cloner advice than I
I downloaded it and have it as a pkg. but the installer won't work because I'm on an air running a 10.15.7 Air. How do I get the pkg into the applications in order to move it to the USB?

When I try to run it, in order to get in into my applications, it says it's not compatible with my Mac Air. I need to get the pkg. into my applications- Can this be done without trying install since it's not compatible?

Thanks
 
Register on MacRumors! This sidebar will go away, and you'll see fewer ads.