
July 2026 - Just managed to purchase a 28 core Mac Pro 2019 (for rendering) for £1,500 GBP. The original price for the configuration was £13,300, and currently on ebay at around £5,500, but not selling at this price it would appear. Never thought I would be able to afford one and it feels like the nearest thing to Christmas as a kid since getting a Wife and a Mortgage !
The Mac Pro 2019 will natively run Catalina to Tahoe and is perfect for me as I have some old professional software that I need Catalina to run in. Here are my installation notes gathered from the web and from trial and error in the hope it may save someone some time and effort.
Boot the Mac Pro 2019 from the original Apple installed SSD pair, create an admin user & password as usual when starting up from a reset or new OSX installation.
Update Apple supplied SSD pair to the current version of Sequoia and disable the auto update traps which Apple use to try to get Tahoe installed. Apparently, some operations have been measured to be 60% slower with Tahoe than Sequoia on the Mac Pro 2019. This updates the T2 chip operating system and maybe firmware as well.
To run the Apple Diagnostics to check that nothing has been shaken loose in the post, if using an Aluminium USB keyboard from an older Mac, hold down the Alt/Option key + D to get into the hardware test. If just the D key is held down as in the online instructions, the Mac Pro will restart almost immediately into Recovery mode and likely give an error message “support.apple.com/startup -2005D” under a world icon with a warning triangle superimposed on top.
Restart holding Command + R to get into the Firmware setting to enable booting from external drives. This is needed to boot from the USB installer and NVMe drive on a card in the PCIe slots of the Mac Pro 2019, full info: https://support.apple.com/en-gb/102522
Install any older OSX versions on to NVMe blades on PCIe cards, not on a new APSF partition on the original Apple SSD pair to avoid T2 issues and unnecessary ware to the difficult and expensive to replace Apple SSDs. Catalina is the oldest version of OSX supported without virtualisation. The Sonnet 4 blade PCIe card is ideal but expensive and can be used with some NVMe slots empty. Most 2 blade PCIe cards need both slots filled to avoid lockups and they must support Bifurcation on non Bifurcation supporting logic boards.
If re using NVMe blades which previously contained an OpenCore Legacy Patcher Installation, say from a Mac Pro 2010, reformat the NVMe blades as a Windows drive using MSDOS and Master Boot Record prior to installing into the Mac Pro 2019. If you do not do this, it appears to be impossible to reformat the NVMe blade in Catalina as Disk Utility reports the NVMe blade to be in use even if all the partitions are ejected. I suspect something in the hidden EFI folder is causing this. Luckily, I had a copy of “iPartiton” by Coriolis Systems which has dire warnings about using it on APSF formatted disks and it allowed me to delete all the APFS partitions and reformat as a windows drive from within iPartition which Disk Utility was unable to do.
Coriolis Systems stopped trading after Apples adoption of APFS format. I still use iPartition and iDefrag on HFS+ spinning backup disks under Catalina (note the risks stated on the website) and they may be downloaded free from their online Museum here:
Please make a Paypal donation to them if you use their software.
Easiest way to download the OSX Catalina installer is to use DOSDUDEs “Catalina Patcher” software to download it direct from Apple’s servers. Do not create the bootable USB installer using the “Catalina Patcher” software as it is not needed on the Mac Pro 2019. Once download use “DiskMaker X 9 for macOS Catalina” on another Mac already running Catalina, or by any other method of your choice. There are some nice USB drives with 2 connections, old style USB3 and the newer USB C as well. Easier to make the installer on an older Mac to use on the Mac Pro 2019.
Hold down Alt/Option key at boot to select USB boot drive at startup.
When the Mac Pro 2019 is booted from the USB Catalina installer, Mac OS cannot use the Ethernet ports or it does not have Ethernet drivers for the Mac Pro 2019 7.1. Log into your WIFI Network before running the Catalina installer from the bootable USB drive otherwise you will get the message ”An internet connection is required to install Catalina 10.5.7” even with an Ethernet cable plugged in. Reformat the NVMe blade as APSF using the Disk utility, which is part of the installer, and install Catalina as normal. On the Mac Pro 5.1, DOSDUDE patched Catalina had to be installed onto a 2.5 inch SSD in a drive bay and then cloned onto the NVMe blade as the installer would not install directly onto a PCIe mounted SSD device. On the Mac Pro 2019, Catalina installed directly on to the NVMe blade as completely normal with restarts. When booted into Catalina on the NVMe and logged in the Ethernet ports work as normal. Monterey was the first Mac OSX installer that would install directly onto a PCIe mounted NVMe blade in a Mac Pro 5.1.
There is an issue with Apples 30 inch display whereby plugging in the USB cable from the display into the Macs USB port can result in a black screen. The USB connection can work as expected for many, many years and then one day it boots up to a black screen. If this happens shut down the attached Mac, unplug the Display power and Display USB, wait a few minutes for capacitors to discharge, reconnect the Display power only and reboot as normal. In my case, plugging in the USB cable again would instantly cause a black screen.
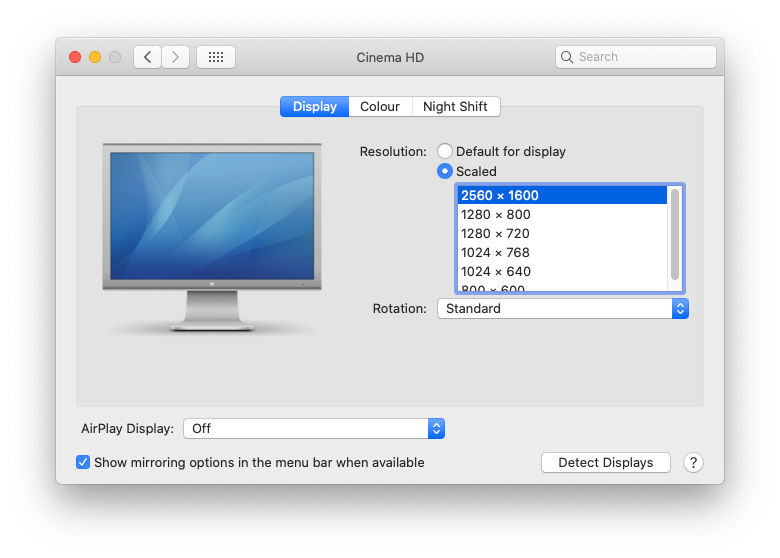
Using Club 3D CAC-1510-A USB‑C® to Dual Link DVI‑D Active Adapter with the Apple 30 inch display(HDCP off version for Apple displays) the resolution will initially be 1280 x 800 which is the maximum resolution showing in the display control panel. To get the native Apple 30 inch display resolution, open the Displays control panel, hold down “alt” key so the “Detect Displays” button shows bottom right of the Displays control panel then in the refreshed and longer listing “Scaled” menu select 2560 x 1600.
When the Displays control panel is closed or the Mac restarted, the native resolution is retained even though the scaled menu shows 1280x800 as the highest resolution without the Alt key being held down.
ArchiCAD 22 UK installation
1. Install UK ArchiCAD 22
2. Install UK ArchiCAD 22 Goodies
3. Install UK updaters for this two
4 Install all other updaters in numerical order.
Last updater will ask to give ArchiCAD 22 Application “Full Disk Access”
Restart
Install Codemeter drivers for Mojave to Monterey version Dec 2022 - CmRuntimeUser_7.40.4990.500, but first of all remove all Dongles, run the uninstaller that comes with this new installer to remove all the old software and drivers installed with the ArchiCAD software installation. Shutdown (not restart) wait a few moments then start up and install the new Codemeter software and drivers.
Make sure service is running in the Codemeter Control panel and check that the Kext is “Not installed”
Install Codemeter USB dongle and run ArchiCAD and see if you can save a file out to desktop.
There is an internal USB 3 port for Dongles adjacent to the PCIe locking switch. Makes it less likely to be damaged or misplaced.
The Mac Pro 2019 will natively run Catalina to Tahoe and is perfect for me as I have some old professional software that I need Catalina to run in. Here are my installation notes gathered from the web and from trial and error in the hope it may save someone some time and effort.
Boot the Mac Pro 2019 from the original Apple installed SSD pair, create an admin user & password as usual when starting up from a reset or new OSX installation.
Update Apple supplied SSD pair to the current version of Sequoia and disable the auto update traps which Apple use to try to get Tahoe installed. Apparently, some operations have been measured to be 60% slower with Tahoe than Sequoia on the Mac Pro 2019. This updates the T2 chip operating system and maybe firmware as well.
To run the Apple Diagnostics to check that nothing has been shaken loose in the post, if using an Aluminium USB keyboard from an older Mac, hold down the Alt/Option key + D to get into the hardware test. If just the D key is held down as in the online instructions, the Mac Pro will restart almost immediately into Recovery mode and likely give an error message “support.apple.com/startup -2005D” under a world icon with a warning triangle superimposed on top.
Restart holding Command + R to get into the Firmware setting to enable booting from external drives. This is needed to boot from the USB installer and NVMe drive on a card in the PCIe slots of the Mac Pro 2019, full info: https://support.apple.com/en-gb/102522
Install any older OSX versions on to NVMe blades on PCIe cards, not on a new APSF partition on the original Apple SSD pair to avoid T2 issues and unnecessary ware to the difficult and expensive to replace Apple SSDs. Catalina is the oldest version of OSX supported without virtualisation. The Sonnet 4 blade PCIe card is ideal but expensive and can be used with some NVMe slots empty. Most 2 blade PCIe cards need both slots filled to avoid lockups and they must support Bifurcation on non Bifurcation supporting logic boards.
If re using NVMe blades which previously contained an OpenCore Legacy Patcher Installation, say from a Mac Pro 2010, reformat the NVMe blades as a Windows drive using MSDOS and Master Boot Record prior to installing into the Mac Pro 2019. If you do not do this, it appears to be impossible to reformat the NVMe blade in Catalina as Disk Utility reports the NVMe blade to be in use even if all the partitions are ejected. I suspect something in the hidden EFI folder is causing this. Luckily, I had a copy of “iPartiton” by Coriolis Systems which has dire warnings about using it on APSF formatted disks and it allowed me to delete all the APFS partitions and reformat as a windows drive from within iPartition which Disk Utility was unable to do.
Coriolis Systems stopped trading after Apples adoption of APFS format. I still use iPartition and iDefrag on HFS+ spinning backup disks under Catalina (note the risks stated on the website) and they may be downloaded free from their online Museum here:
Please make a Paypal donation to them if you use their software.
Easiest way to download the OSX Catalina installer is to use DOSDUDEs “Catalina Patcher” software to download it direct from Apple’s servers. Do not create the bootable USB installer using the “Catalina Patcher” software as it is not needed on the Mac Pro 2019. Once download use “DiskMaker X 9 for macOS Catalina” on another Mac already running Catalina, or by any other method of your choice. There are some nice USB drives with 2 connections, old style USB3 and the newer USB C as well. Easier to make the installer on an older Mac to use on the Mac Pro 2019.
Hold down Alt/Option key at boot to select USB boot drive at startup.
When the Mac Pro 2019 is booted from the USB Catalina installer, Mac OS cannot use the Ethernet ports or it does not have Ethernet drivers for the Mac Pro 2019 7.1. Log into your WIFI Network before running the Catalina installer from the bootable USB drive otherwise you will get the message ”An internet connection is required to install Catalina 10.5.7” even with an Ethernet cable plugged in. Reformat the NVMe blade as APSF using the Disk utility, which is part of the installer, and install Catalina as normal. On the Mac Pro 5.1, DOSDUDE patched Catalina had to be installed onto a 2.5 inch SSD in a drive bay and then cloned onto the NVMe blade as the installer would not install directly onto a PCIe mounted SSD device. On the Mac Pro 2019, Catalina installed directly on to the NVMe blade as completely normal with restarts. When booted into Catalina on the NVMe and logged in the Ethernet ports work as normal. Monterey was the first Mac OSX installer that would install directly onto a PCIe mounted NVMe blade in a Mac Pro 5.1.
There is an issue with Apples 30 inch display whereby plugging in the USB cable from the display into the Macs USB port can result in a black screen. The USB connection can work as expected for many, many years and then one day it boots up to a black screen. If this happens shut down the attached Mac, unplug the Display power and Display USB, wait a few minutes for capacitors to discharge, reconnect the Display power only and reboot as normal. In my case, plugging in the USB cable again would instantly cause a black screen.
Using Club 3D CAC-1510-A USB‑C® to Dual Link DVI‑D Active Adapter with the Apple 30 inch display(HDCP off version for Apple displays) the resolution will initially be 1280 x 800 which is the maximum resolution showing in the display control panel. To get the native Apple 30 inch display resolution, open the Displays control panel, hold down “alt” key so the “Detect Displays” button shows bottom right of the Displays control panel then in the refreshed and longer listing “Scaled” menu select 2560 x 1600.
When the Displays control panel is closed or the Mac restarted, the native resolution is retained even though the scaled menu shows 1280x800 as the highest resolution without the Alt key being held down.
ArchiCAD 22 UK installation
1. Install UK ArchiCAD 22
2. Install UK ArchiCAD 22 Goodies
3. Install UK updaters for this two
4 Install all other updaters in numerical order.
Last updater will ask to give ArchiCAD 22 Application “Full Disk Access”
Restart
Install Codemeter drivers for Mojave to Monterey version Dec 2022 - CmRuntimeUser_7.40.4990.500, but first of all remove all Dongles, run the uninstaller that comes with this new installer to remove all the old software and drivers installed with the ArchiCAD software installation. Shutdown (not restart) wait a few moments then start up and install the new Codemeter software and drivers.
Make sure service is running in the Codemeter Control panel and check that the Kext is “Not installed”
Install Codemeter USB dongle and run ArchiCAD and see if you can save a file out to desktop.
There is an internal USB 3 port for Dongles adjacent to the PCIe locking switch. Makes it less likely to be damaged or misplaced.
Last edited: