Become a MacRumors Supporter for $50/year with no ads, ability to filter front page stories, and private forums.

macstatic

macrumors 68020
Original poster
Oct 21, 2005
2,057
175
Norway
My 1.67GHz 15" Powerbook G4 has been getting a dimmer display and I've read that this is a typical symptom of an aging backlight.
CCFL (Cold Cathode Fluorescent Lamp) type tubes are used for this and replacements cost around US$ 10-15 for laptops according to LCDparts.

Finding information on how to replace it in a Powerbook seems pretty impossible. The few posts I've read on the subject seem to be mostly guesses or estimates. Very few hard facts and no pictures.
Some people suggest that a completely new screen be bought (around US$ 200-300, or around US$1000 if bought directly from Apple) and replaced. There are a few DIY Powerbook screen replacement sites around. But since my LCD display works fine and doesn't even have a scratch I find this a complete waste of money.
Unlike what I read about a lot of Mac users buying a new laptop every 2 years I can't afford that luxery (neither do I see the need for it -we're supposed to think about the environment as well, aren't we).

Other posts indicate that the backlight is glued in some manner to the display and it's hard to remove/replace without damaging anything. Again, no photos or details, so I don't know if this is just an estimated guess or fact.

I'd like to hear if someone knows more about the subject.
Another thought that has come to mind: the current Macbook Pro machines have LED backlights, don't they? I know that the screen size is slightly different (1440x900 unlike the Powerbook G4's 1440x960), but maybe the backlight assembly could somehow be adapted for that display anyway?
 
One thing to add to the heartache

I was about to tell you the pains that are required to get to the screen of my 12" PB, but I'm editing my post since I see the disassembly of your computer that is required to get to your display is relatively easy. There are directions here:

http://www.ifixit.com/Guide/Mac/PowerBook-G4-Al-15-Inch-1-5-1-67-BT-2-0-LR/64/

They include pretty pictures of the process as well.

FYI, I worked on one display about 5 years ago, for a Toshiba though, and the backlight was attached to the LCD. I can't say for certain about the PB screens though, sorry.
 
Yup, I know about the iFixit site -very useful for this kind of stuff.

Although it's a lot of work I have no problem disassembling the machine myself. I'd rather take the time to do that than to fork out the cash for a new machine or pay $$$$$ for a tech to do it for me.

I can't imagine Apple using anything but standard laptop LCD displays and have picked up here and there that Samsung is a big supplier of these for Apple.
And since CCFL tubes are sold on their own it must mean that this kind of thing indeed is replaceable for laptops.

Has anyone here replaced their LCD displays? If so, perhaps they can have a look at the broken display and see how/where the backlight is mounted, then post some more info here. I'm sure a lot of other Powerbook users are wondering about the same thing, who won't/can't afford a new computer.

As far as replacing displays is concerned, here is a good thread:

https://forums.macrumors.com/threads/207751/

Also, I had the backlight go out on my PBG4, the cost of repair was ~$300; however, there was no cost to me. If you are worried about not affecting the environment when you get a new computer, just don't throw it out. You can give it to someone who doesn't have one or donate it...
 
Let's get to the point though

I think the question becomes: Do we replace the CCFL or the entire screen?

Right?

My experience with CCFL replacement is that it's tricky to pull the old bulb out and put the new one in and even then sometimes the light doesn't look right after you pry the screen apart and try to put it back together. With a difference of maybe $50 between a used screen and a replacement bulb, you can't spend too long with the project or your margin is used up.

I also haven't found a good walk through and would like to see one or help build one for replacing CCFLs. For a lot of LCD panels this could be a new life.
 
CCFL replacement manuals

How about this!

This seems to be an extensive set of walkthroughs for replacing CCFLs. It might not have everything, but it will have something damn similar to what you're working with. I'm excited to use it.
 
CCFL a pain, but possible

I just replaced the CCFL in a 15" powerbook LCD panel (1280x856). It was a pain, but it was possible. It is very similar to this walk through. In fact, I'm almost sure you could use that toshiba walkthrough to do it. The problem is that taking the metal housing off the front of the panel exposes the stack of layers, meaning that if you let these lose, it's problems.

The CCFL reflector is VERY touchy. It loves to get bent, which pugs up the light reflecting into the transmitting prism layer, so you get dark/light areas. The problem with this is that the CCFL reflector is glued to this tiny strip of plastic framing, which creates all sorts of hassles for you. My suggestion is to break the plastic framing off and glue it back on with krazy glue gel. I didn't do this but wish I did.

But listen to this... Bought a "dead" screen for $5 +$12 s/h and replaced the CCFL in it with the good one from the cracked screen that I was replacing. So total output: $17. That's a cheap fix.

holler for more specifics, but I think it's a great value to replace the CCFL.
 
Great to hear that someone has done this successfully!

Yes, please do post more specific information -perhaps even photos; especially of that section you mentioned was glued and tricky to remove.
So in that respect the displays Apple use are a bit different from the other brand laptops? From what I've seen, searching the net for instructions, replacing backlights in other types of laptops doesn't impose such problems.

When you've managed to open up the (previously glued) part, and replaced the faded/non-working CCFL tube with a working one, do you have to glue it together, or can you use tape? I'd like to be able to replace the tube again if I need to.

Finally, I don't understand why you bought a dead screen instead of just a brand new CCFL tube. Am I missing something here which makes the process easier?

PS: did you manage to catch the brand name/model number of your screen? It would be interesting to see if this is a standard laptop screen which CCFL tubes are readily available for (e.g. via LCDparts) or if Apple has gone to lengths making it hard for people to fix stuff themselves, and needing to buy a new laptop instead (the environmentalists they are) :p
 
some bright light

The reason I bought the dead screen (click for eBay link, though no model #) for $5 was because it was the one with the good picture but dead backlight. They are standard, so I didn't check out what the model number was, but I'm almost sure that any 1280 x 960 display for powerbooks will work with another of the same resolution.

The one I already had was cracked, so I needed a freshy LCD, not a new CCFL. The PDF link I posted is almost exactly the same as what I went through with the Apple LCD, though with a couple exceptions: 1) there was more tape to remove to free up the metal frame from the front of the screen. 2) there was not a hanger for the inverter on the bottom (pg. 4). 3) At the top of page 5 you can see the plastic chase that the backlight and backlight reflector - the metal part still attached to the bottom of the screen - sit inside. This is the part that is glued. they don't mention this, but my best guess for getting it out easily is to slide a razor blade along it to release the glue. I just broke it at both ends, then glued it back on. Kinda the he-man method. At the bottom of that page they show the backlight being pulled away... I don't know how they do that, because for me the plastic chase had to be completely bent out of the way to release the backlight reflector. So it's a bit more tricky than that.

I don't have photos of my job, sorry. I found this walkthrough and though I could augment it a bit, it works for the most part.

Just be careful to not let the screen layers get lose when you're doing it. once you release the metal frame, they tend to want to get out.
 
I've successfully detached the display from the main unit of my Powerbook G4 (1.67GHz model), but I can't figure out how to open up the display so I can get to the actual LCD panel.
The Ifixit pages only show how to remove the whole display unit, but not how to take the LCD display out of the plastic casing. Anyone?
 
OK, I figured out how to remove the LCD unit from the Powerbook plastic display "frame"...
For those who are wondering about the same thing: -I wedged a piece of plastic card (you can probably use a credit card, or better yet -something even thinner) between the silver-like frame (e.g. the part where "Powerbook G4" is printed on, and the rest of the enclosure. Just carefully wedge your way around the display until the inner frame/LCD panel pops out.
I wouldn't use anything hard like a screwdriver because it'll make marks/cuts in the plastic.

My 15" LCD display is labeled:
Samsung LTN152W6-L01

thehumble1: I'm not sure I follow your comments about the frame, snapping it off etc.
What I've done so far is pop open the Powerbook display assembly. So now I have the rear plastic part (the one with a white Apple logo in it which lights up) and the "Powerbook G4" marked plastic frame which the Samsung LCD panel is mounted inside.

I removed the many small black screws around the LCD panel which almost made it possible to remove it from the frame, until I found out that in addition to those screws it was glued to the bottom part of the frame (the backside of where the frame has "Powerbook G4" printed on it.
A real pain, but I managed to separate the Samsung LCD panel from that frame by wedging my plastic card between the metal frame (there's a metal frame all around the Samsung LCD panel) and the Powerbook plastic frame. Fortunately the glue was the sticky kind (as opposed to the hard, crazy glue type), so I did manage to separate the two, taking extra care not to slip and scratch up the LCD with my plastic card!

So, do I need to open up the whole LCD panel? According to the walk-through you linked to previously I don't have to as the CCFL backlight is located in a "compartment" at the bottom of the LCD panel.
There's a yellow warning label on the top side of the LCD device which says "Do not touch the white tape. Sensitive area".
I can see a green electronic circuit board through the transparent plastic where that label is affixed.

There's a metal "frame" around the whole LCD panel (think of the actual LCD display as the picture and the metal as a picture frame). Do I have to unclip this frame in order to get to the CCFL? Is that what you're saying?
And in order to do so I will at the same time expose all the innards of the LCD panel?
The white tape goes around the metal frame at the top, so if I'm not to touch it (I assume by "touching" they mean removing it) I can't remove the frame either.
There's also some white tape in the middle of the left side and all along the right side of the LCD display. I'm really confused now.
From what I've read it seems that the white tape has been mounted in a very specific way to apply even pressure to the whole LCD so that I won't be running into problems such as streaks or uneven lines in the picture, so how on earth do I remove the metal frame (in order to access the backlight) without removing the white tape (which covers the metal frame)?
 
nice work. just be patient with the rest

Great job separating the LCD from the frame.

Yep, you are going to have to open up the LCD. Check out the walkthrough I posted two posts ago. this is a pictorial guide to taking apart the screen.

Why don't you look through the guide and respond to that. I'll get back quickly after you check it out, but it doesn't seem like your responses are in reference to that really nice walkthrough. I posted the originating site first and then (as above) the walkthrough that I think most closely represents the job, so give it a look.

You will be removing the metal frame and you will need to keep the pieces of plastic together. I'd suggest using masking tape or something similar to hold the layers together while you mess with the CCFL. You will need to remove the white tape (i'm almost sure) to get at the frame. The tape is protecting and covering the sensitive parts, but the tape isn't the issue, there should be another layer of protection under that.

Write back after you check out the guide.
 
I've followed the walkthrough you posted, but some things are still a bit unclear.
Still, I've gotten really far, learned a lot and better yet I'm taking photos and notes all along and hope to be able to put together a full documentation for anyone else to follow :)

I've completely removed the LCD display from the computer, removed the white tape around the LCD panel itself and finally removed it from its metal frame. No problems so far (I've taken it veeery slow as my display is 100% working fine (the CCFL has faded though), so I won't risk damaging it).
I've taken great care not to remove the PCB with the ribbon cables (I don't want to risk disconnecting them from the LCD as I've heard this will render it useless because it's impossible to reconnect).

What I don't understand is the next step in the process.
Look at the photo I've taken which shows several separated layers.
The metal frame is at the very bottom, surrounding the layers (I'm not sure if you can see it in the photo), then there's what seems like several layers all in one piece made of glass etc. (this is probably the LCD itself), next there's a very shiny metallic layer (I assume this is the reflector), and finally a glossy white plastic layer. Above this is the thick white plastic that you see from the outside.

In the next photo I've just removed the metal frame around the LCD panel, but haven't pulled the whole thing apart.
There's a long piece of metal which I've already removed (the same type as shown in the top photo of page 5 in the walkthrough you've referred to).
That leaves a narrower strip underneath, as shown in the same photo in the walkthrough, and in my photo enclosed here. I know the CCFL is placed here and believe the metal strip keeps it in place, right?

My question is how to remove it and gain access to the CCFL. Is this the tricky section you've talked about before which is glued to a plastic frame?
There have been other parts which have been glued, but with patience and very careful handling I've managed that just fine.
According to the lower photo of page 5 in the walkthrough it seems like it's just a matter of sliding it out, but I can't seem to do that, and I don't want to experiment using unnecessary force, which is why I want to ask here first.

Not being sure of where you meant things were glued I've been wondering if a knife or a flat-bladed screwdriver could be used to separate the metal from the plastic layer (jamming the knife underneath the metal strip as the red arrow in my photo indicates), but I still can't seem to figure it out.
 

Attachments

  • 1.jpg
    1.jpg
    55.6 KB · Views: 612
  • 2.jpg
    2.jpg
    37.3 KB · Views: 621
fricking sweet

nice job. It looks like you are right where you need to be with no big mistakes yet. You are right where I was when I decided to just break it. One trick that might help is to use some tape (masking might come off easiest) to keep those layers together and to keep dust/dirt out. They should have tabs or holes in them to help them line up perfectly too.

Anyway, you are exactly right. Under that metal frame at the bottom is the CCFL and it is tricky to get at. One though (mine) is to break it and glue it back on, because it looks like it's held in by a plastic piece. the ends of the CCFL have rubber caps that fit tightly in the plastic frame. What you will also find is a very important metal track that the light sits in. It is U shaped so as to reflect the light directly into the plastic prism layer of the screen. If this gets bent, the light doesn't come out evenly. Prying or wedging the light in or out will almost certainly damage this U channel and mess up the light distribution and make the screen look like crap.

To be honest, I can't quite figure out how they so easily removed the U track and CCFL without snapping the frame. I know that when I did it, I didn't fully remove the metal frame and thought that with the metal frame removed, it would be easier, but it still seems like it's not so easy. I'd hope that there are some clips or another part of the frame that snaps off (without breaking). I wish I could walk you through the rest, but It might come to breaking and gluing (or cutting and gluing) as the only reasonable option. Let's keep researching it a bit first.
 
maybe it's just this easy

Page 5 of this manual seems to show a detailed view of the removal of the CCFL from the plastic frame. Like you said, it might be as easy as ungluing it from the plastic frame. I don't remember there being glue as much as just a physical difficulty in removing it without bending the reflector track, but this might help.
 
Thanks.
Yes, this is indeed very complicated, which is why I'm taking it real slow.

I've also been looking at a page at Laptop repair 101 where an LCD similar to mine seems to be used. It definitely shows a Samsung display and shares a lot of the same design.

But the tricky part is getting past the stage where I'm at right now.
The Laptop repair 101 site shows that I have to open up the whole LCD panel, while from your reply (and the walkthrough you've been referring to) it seems that opening up the LCD panel that much isn't necessary.
I'd rather not open it up more than absolutely necessary.

In the meantime I'll take a closer look at my LCD panel and get back here if I find out something new.
I've also bought a pair of thin cotton gloves. They will probably come in handy when touching the CCFL tube, so as to avoid oil from my fingers.
 
Another question...
I'm worried about handling the LCD itself, being afraid that all those layers will separate, the contacts loosen etc.
So I looked up Wikipedia on "LCD" which (top right hand side of the page) shows the various layers.

It looks like the backmost layer ("6. Reflective surface to send light back to viewer. (In a backlit LCD, this layer is replaced with a light source.)" in the Wikipedia illustration) is the mirror-like layer I found in my LCD (although "In a backlit LCD, this layer is replaced with a light source" doesn't quite make sense then.
I don't know what that glossy white layer at the very top of my Samsung LCD panel is equivalent to though.
But my guess is that the glossy white and the mirror-like layers aren't overly sensitive and critical (although I'll do my best not to damage them).
I'm more worried about the LCD itself -do you know if those layers come in one piece, or are they loosely placed on top of each other? I worry that if I take it all out of the metal frame surrounding the LCD panel things might slide apart, shift positions, the LCD flat-cable connectors will fall off etc. and render my LCD panel useless :eek:
There's not much information to be found about LCD panels when digging this deep into it.
 
Success!!! :):):):):)
I've actually managed to get all the way to the CCFL.
It wasn't an easy job, but I think it's worth it and when I'm done with the instructions I'll probably make a lot of people happy.
Although the Laptop repair 101 guide I linked previously helped me a lot I have yet to come across a fully detailed guide which doesn't leave gaps where you have to guess what to do next. This sort of thing isn't obvious to everybody, and with something so expensive and fragile you really don't want to second guess, which is why I've taken photos of every step along the way.

Yes, the metal "frame" which held the CCFL was indeed glued to the plastic base, but with a flat-bladed knife and some patience I was able to separate it without damaging anything.
I won't go into any more detail for the time being as my photos will explain things much better than any words would do, suffice to say it was a lot more work than I had expected. Apparently Samsung wants to sell as many replacement LCDs as they can, instead of just replacing a burnt out CCFL for $15 by allowing easy access to it.

All I need to do now is order the CCFL tube (I measured it to be 328mm long without the electrodes and 2mm in diameter) before I reassemble everything again.
Any suggestions for good places to get new CCFL tubes?
It seems that most people buy them from LCDpart/Moniserv, but they haven't replied any of my emails, so I'm a bit reluctant ordering from them in case they've recently closed down or something. Has anyone here ordered from them recently or in the past?
According to their site I should order part no. MS20324 which says its for the Powerbook G4, but it's only 324mm long while I measure 328mm from each end of the glass tube. CCFL direct has a 325mm tube, but I suppose 1mm doesn't make a difference. Do you think 4mm less makes a difference?
 
Dust -where does it matter?

OK, I need some advice again :confused:
The LCD display has been waiting for over a week for me to figure out which CCFL to order, to actually order it, and awaiting its arrival, which probably wasn't such a good idea -but what do you do when there isn't any documentation for this sort of thing already available and you don't even know which CCFL to get!
Hopefully, for others, when I'm done with figuring this out and documenting it others can just order the correct CCFL right away, then go ahead with it all in one go.

Anyway, dust has gathered inside the unit, despite my attempt to cover up the separate parts as much as possible with cloth etc. so now I'm wondering which parts of the LCD are sensitive to dust and which parts aren't as it's hard to get rid of it :(
I've been trying to use a camera "blower brush" (something like this), but apparently I had a cheap one with hairs falling off all the time, and it doesn't blow a whole lot of air either.
I guess it doesn't help that the LCD parts are plastic, which probably generates static electricity and attracts even more dust. Ugh!!!!

So here's the thing. I've replaced the CCFL, placed it in its metal frame. attached it to the white plastic outer-frame for the Samsung LCD and now is the time to put it all together.
There are 4 plastic "sheets" of different kinds which stack on top of the LCD panel itself. I guess they're reflectors and what have you.

1) Starting with the very rear end (the opposite side of where you look into when using the computer) there's a thin white. It's white, but since it lets light through I assume it lets the CCFL light through in a diffuse sort of way (to light up the white apple logo at the back of the Powerbook.

2) Next, there's a thick (I'm guessing around 1mm) completely transparent plastic sheet which is rough one side (by means of small dots) -the side which faces/makes contact with the thin white semi-transparent sheet I just mentioned.
The other side is completely smooth and will face towards the inside of the LCD assembly (the reflector, LCD itself etc.)

The above two layers mount inside the white plastic outer-frame with the help of a couple of "snap and lock" metal clips.
So to conclude: from the rear end of the Samsung LCD there will be a thin white plastic layer followed by a thick transparent layer. The white outer-frame holds it all in place.
So, I'm assuming that dust in between these two layers isn't critical as it probably just does the job of making a diffuse light to the whole back panel which in turn will light up the white apple logo -do you agree?

3) Next comes two layers, and I'm a little confused now as to which layer faces the LCD panel, and which one faces the thick transparent layer in step 2. One of these is a matte, diffused transparent layer with a printed black frame around it, then comes a silvery layer. Oh wait a minute.... it looks like there are 3 layers here! I took care not so separate them from each other.
I'll scratch my head a bit and see if I can figure this out.

But again, I'm not sure where it matter if there's dust or not, and how much dust makes a difference. Is the problem with back side of the actual LCD? Is that where I should avoid getting dust because that'll show up as spots when using the computer?

PS: sorry about not having any photos to show you what I mean. I have taken photos all the way, but on this ancient PC I'm using now it's just too cumbersome to bring them out of my camera, edit and upload them, so I hope you know what I'm talking about with word descriptions.
 
I've got some news, but it's not any good.
I was too impatient to await any replies about the dust issues, so I went ahead and re-assembled the display and LCD and the computer.

I now have a problem :(
The display lights up (yay!! the new CCFL works), but the display itself only shows vertical lines. Different kind of lines going from the top to the bottom of the screen. Video output from the Powerbook works fine (I tested it on my TV, so at least the computer is fine).
I've been very careful with the ribbon connectors of the LCD, and I don't think I've wiggled any of them loose (at least not on the display PCB end, as slightly wiggling the connectors makes no difference to the lines as it should do if there was a bad connection).
I'm not sure how it's attached to the LCD itself as I've been very careful not to move it around too much.

I've also taken care to check if the two connectors from the Mac are properly connected as well, and they are, so at this stage I have no idea what the problem is and what to do.
Suggestions?
 
CCFL Replacement 17" Powerbook

Glad to see a post about doing this replacement. As I purchased my PB with a dark display most information pointed to a bad inverter, replaced that first and it did nothing. So next was to replace the whole LCD. Figuring I was going to junk the old LCD I took the time to take it apart to find the CCFL backlight. I recommend patience and a gentle touch but it is possible to remove it. It is located at the bottom of the back of the LCD and it is not necessary to remove the reflector or the white plastic base that it is attached to. From what I have read bending the reflector causes light and darkness issues when re-assembled.

Much to my suprise the CCFL was broke at one corner, they can be found for under $15.00 on EBay. A little bit of sodering is all that is needed. One other thing use latex gloves not cotton as you don't want any dust or debris in and around the backlight. I will try and take pictures or talk someone through it if needed. THe backlight should be here in a few days.

Fingers Crossed,

Sam
 
What is the difference between the Core Duo LCD screen and the Core 2 duo screen(non led that is)?

Also is it possible to use a MBP LED screen on a non LED model? If not why?
 
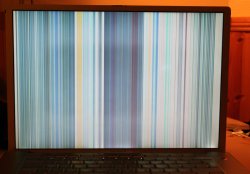
17"G4Powerbook: Good to hear you've taken photos as well. I've taken photos at every step of the way, but unfortunately something's gone wrong as my LCD display shows vertical lines (see attached photo). But held at a certain angle it changes to display a flickering and distorted desktop. It's obviously a contact problem, but where? It could be the LCD panel itself or the video cable which attaches to the Powerbook. I'm going to try to fix it, or else I'll need to buy a new Samsung LCD panel (or have the LCD panel professionally fixed, depending on the cost compared to a new one).

Anyway, the plan is to fix my Powerbook, and when I do I'll make a "how to" document with text and pictures showing it all step-by-step. I really need to do the editing on my Mac and not on this PC which I'm using as an emergency solution in order to check my mail etc.
If you beat me to it, no problem ;)

bloodycape: What you need depends...
If your LCD display is working fine, but the backlight is getting dim you only need a new CCFL tube. However, opening up the LCD panel to exchange the CCFL tube involves a lot of patience which can be nerve-wrecking at times. On the other hand, your other option is to buy a brand new LCD panel, so you have nothing to lose by trying to exchange the $15 CCFL tube first.
If you don't want risking damage to your working LCD panel, but also don't feel like wasting money on a new LCD panel just because the $15 CCFL tube is burnt out you could have some professional company do it for you. Moniserv/LCDparts seems to be able to do this as they repair LCD displays, sell CCFLs (that's where I bought mine from), inverters and other LCD related parts. Their price-list didn't reveal any costs for just replacing the CCFL, but fixing damaged LCD panels is there. I suggest you contact them to ask.

If you want to attempt to replace the CCFL tube yourself I strongly suggest you wait for myself or 17"G4Powerbook to finish making a guide with photos you can follow. It's been a real pain to go through this for the very first time without any real instructions. And quite costly too, provided I don't find a simple solution to my display problems.


I have no idea if the part is legit or not. The seller does have a pretty high rating (99.7%) and according to his customers' feedback they seem happy. However, there's not much detailed information about the brand/model of the screen. This price on the other hand seems pretty low, because compared to my Powerbook screen I would have to pay around $300 to 500 for a new one (I haven't searched eBay though). I would assume a Macbook Pro LCD panel would cost around the same, but I really can't say.

I don't have a Macbook Pro, so I don't know the details, but I'd suggest you open up the display to see the actual model number, then ask the eBay seller to tell you which model/brand of the display he sells, checking if it's the same kind or not.
There are at least a couple of different ways to open up the display (so you can check its brand/model no.).
I believe the Macbook Pro is designed more or less along the way of my Powerbook G4, so if that's the case you can either do it 
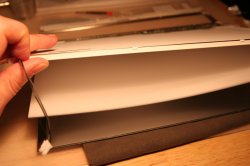
the simple way, which involves just removing the back (top) part of the display, which exposes the actual LCD panel to you, without actually having to unmount the LCD panel. The difficult part here is to access the two screws on the front sides of the display. On my Powerbook these are hex screws, on the Macbook pro it seems like they've used regular screws.
Once this is done you use a "spudger" tool (I bought a pair for $10 from Techound1 at eBay -they also have a separate webstore site, and the purchase also includes download access to Apple service-manuals! Very useful for me as I haven't been able to find a Powerbook service manual elsewhere).. to pry open the rear display cover (the big plastic section which has the semi-transparent Apple logo which lights up) from the display frame (which also holds the actual LCD panel).
You can also use a credit card (I'd suggest an expired one as it can get damaged) or something similar. Done carefully and with some patience it should "pop" off. Take care not to push down on the LCD panel while you work your way around the display frame. If you need to hold somewhere, press your fingers on to the frame (the "picture frame" section all around the LCD display).

If you have problems accessing the front screws of the display you need to separate the whole display unit from the rest of the computer so there's no computer blocking access to those screws.
Basically, what you do is remove the top of the actual computer (this holds the keyboard, trackpad etc. as a single section), then you disconnect the internal display cable, the backlight cable and the Airport antenna cables from the main board, unscrew the display hinges from the main board, and presto! you've separated the display from the computer. From then on you remove the two front screws of the display frame, then use the spudger/credit card as explained above to "pop" up the display hood.
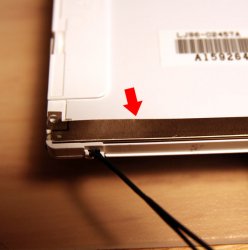
Once the hood (the big plastic section with the backlit Apple logo on it) has been removed you will see the back of the LCD panel itself.
It should look something like this where a large sticker should reveal its brandname and model number which you should be able to look up on the Internet for more details and prices.
(Actually, the above link (Laptoprepair 101) was where I learnt the most about how to open up the LCD panel and replace the CCFL tube. I plan to make a much more detailed guide though as the one above leaves out a lot of details, assuming you've done this sort of thing before (which in my case I had never done, which explains a lot of my mistakes and possibly the reason for why my display doesn't work properly any longer).

Keep in mind that Apple doesn't actually make the LCD panels, so you don't need to buy a new LCD panel from then even if you have a Mac.
In fact, if they do agree to sell you a replacement (I have no idea if they do, or if they only supply spare parts to their repair-centers where qualified personnel do the actual job) they will only sell you the complete display unit which means the whole top part of the computer, at an outrageous price.
You can save quite a bit of money if you buy just the LCD panel itself from other places where they sell replacement parts for all sorts of laptops or specialized LCD display stores.

macbattle: I have no idea as I don't have a Macbook Pro. I suggest you do what I suggested to bloodycape; open up the display to confirm 100% which display your computer uses. If you want to change the display or CCFL backlight you need to open it anyway, and with the hood off you can still use the computer in my opinion.
I'd recommend getting the exact same LCD display as the one you already have as that leaves out any guesswork.

Given that CCFL tubes need a high voltage "inverter" circuit to supply its power (around 1000V I think), and LEDs work at a much lower voltage (around 2V as far as I can remember) the computer's main board would have that section made very differently. I would love to have an LED backlight for my Powerbook, but given that it's not simply a matter of supplying power to that strip of LEDs, but the fact that you can control its brightness and on/off from the keyboard there has to be some electronic circuitry to drive it.
Unless you're a dedicated hardware hacker I wouldn't try exchanging a CCFL backlit LCD panel with one that uses LEDs or vice versa.
 

Attachments

  • lcd_lines.jpg
    lcd_lines.jpg
    132.5 KB · Views: 544
Register on MacRumors! This sidebar will go away, and you'll see fewer ads.