bsuto
macrumors newbie
Text clippings were introduced in System 7.5, which I only remember because they were the basis for the "secret about box" easter egg
This menu will also appear when right clicking on the System Settings app if the app is closed. On pre-Ventura this menu would appear at all times when right clicking.Backup regularly, all your productivity is meaningless if you aren't backed up.
Use the "view" pull down menu when system settings is opened, 40 choices to pick from rather than navigate the vertical hierarchy.

1. Copy and Paste Text Excluding Formatting
If you'd rather paste the copied text elsewhere as purely plain text, use the key combination Command-Shift-V and it will be stripped of any formatting.
11. Don’t spend all your time reading macrumors.
The CloudClip app (syncs Mac/pad/phone) lets you store 10 or more copied things. Invaluable.
When it comes to working on your Mac, there are so many handy time-saving tricks hidden away in macOS that there's a good chance you're missing at least one or two. Here are 10 quick tips, any of which could be key to turbo-charging your productivity.
This article assumes you're using a Mac running macOS Ventura, but most of these tips also work in earlier versions of Apple's Mac operating system.
1. Copy and Paste Text Excluding Formatting
When you select some text on a Mac, pressing Command-C copies it to the clipboard, and pressing Command-V pastes it along with any formatting.
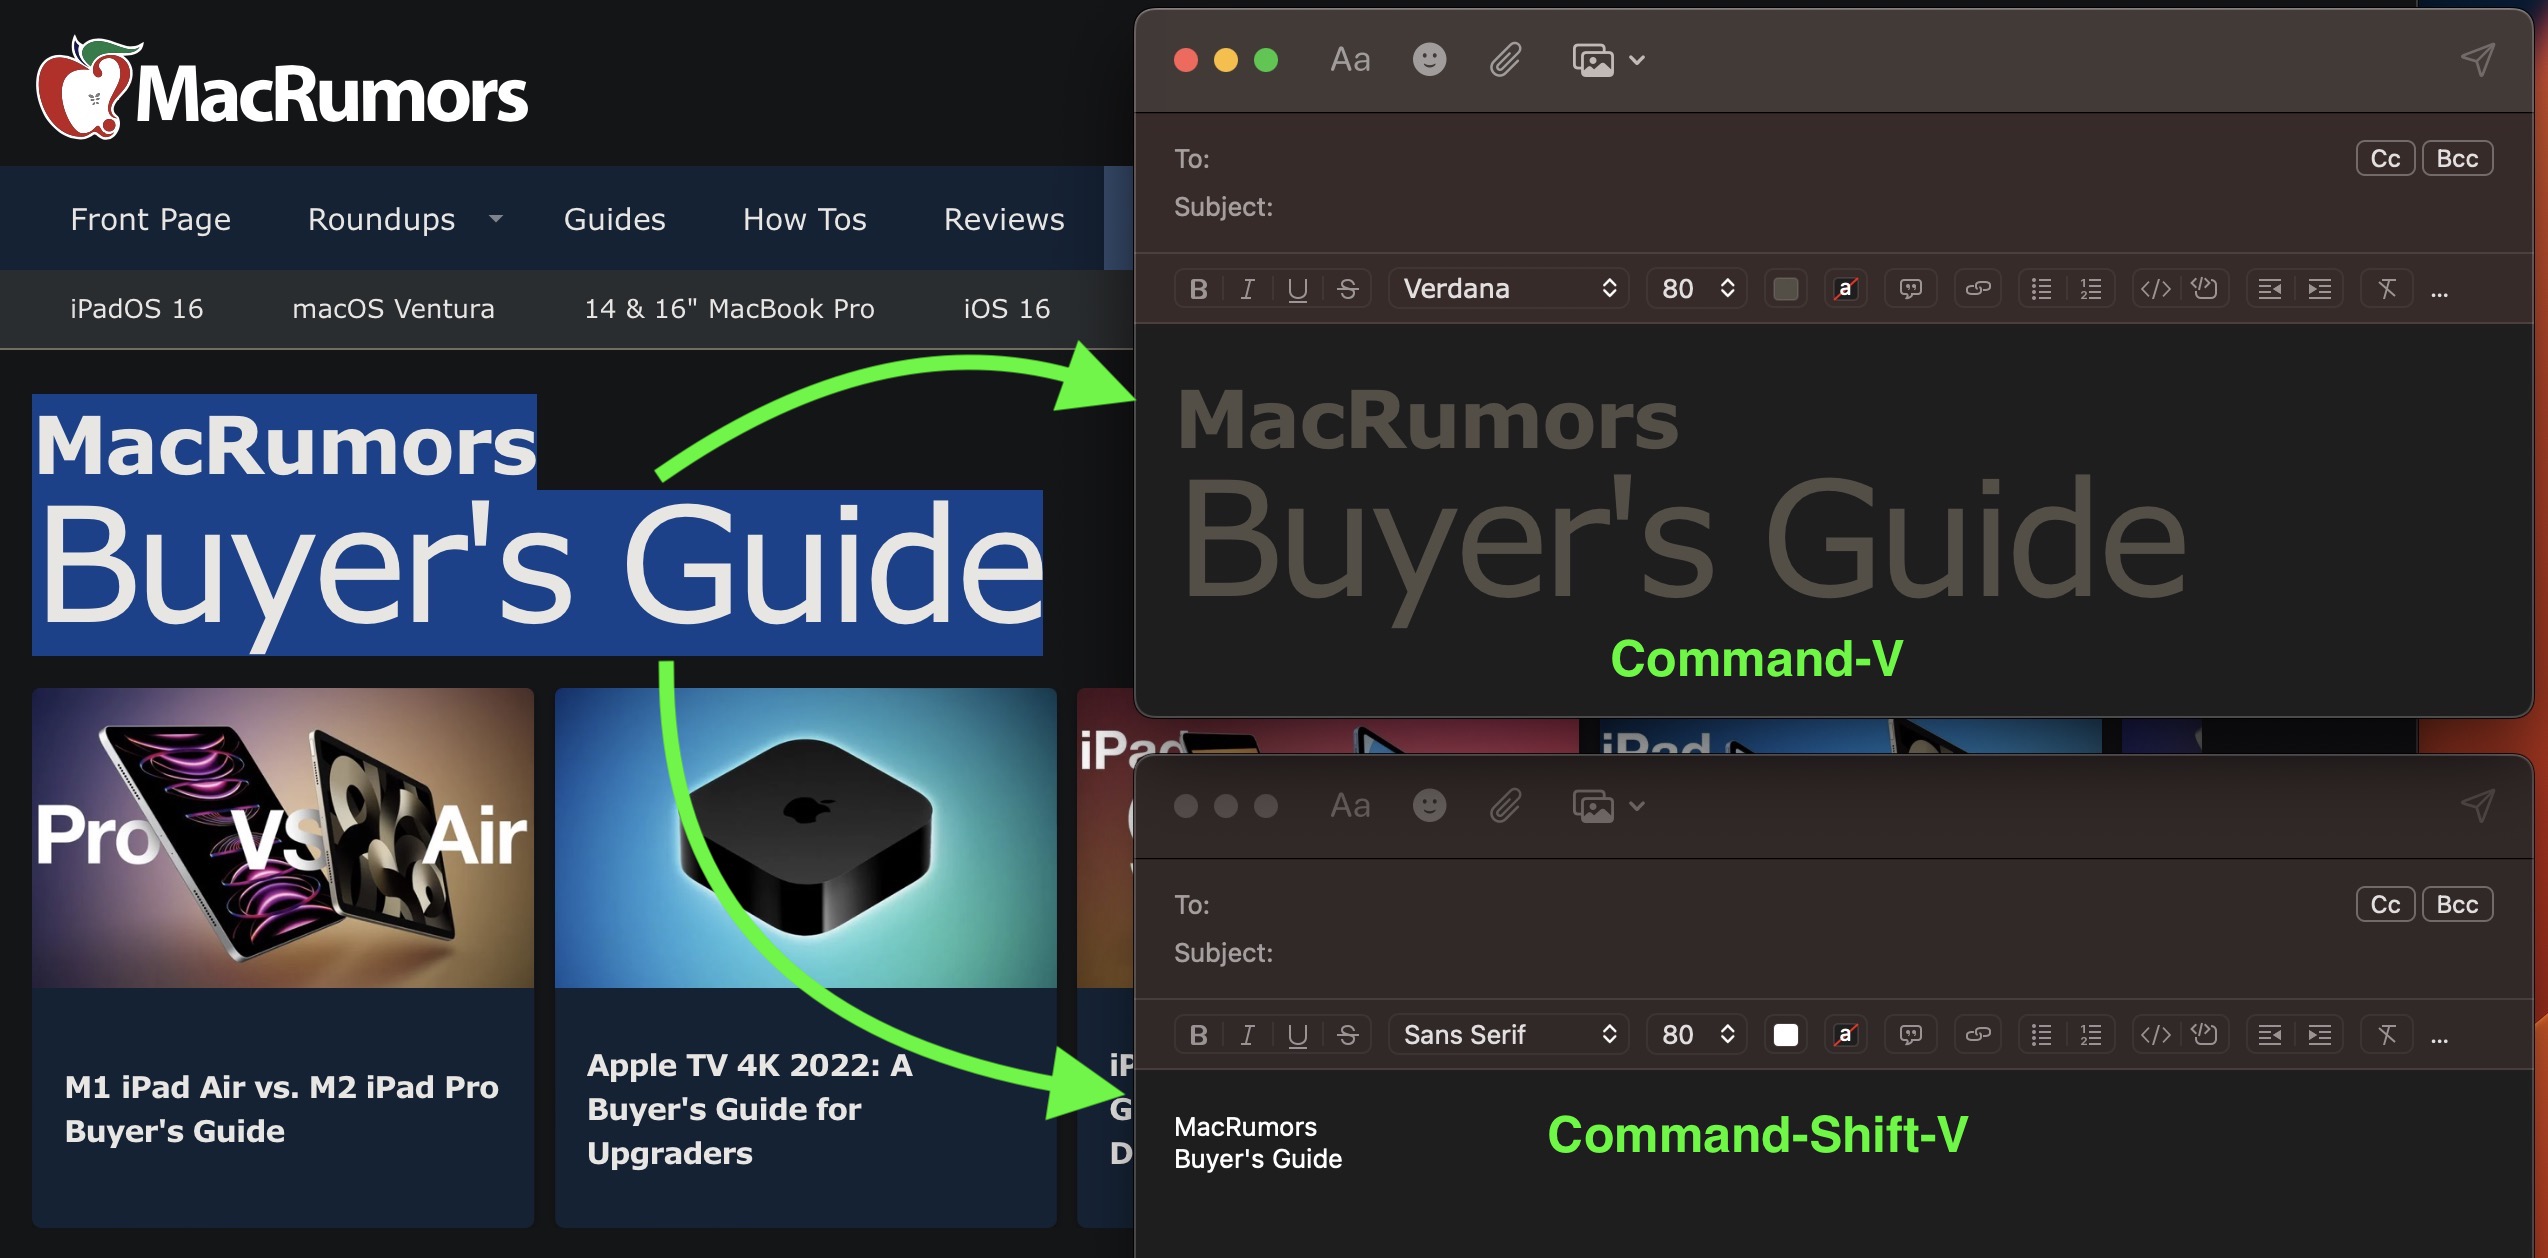
If you'd rather paste the copied text elsewhere as purely plain text, use the key combination Command-Shift-V and it will be stripped of any formatting.
2. View All Calendar Events as a List
Some calendar apps allow you to view all your upcoming events as a vertical list. Many users find this sort of viewing mode beats staring at the regular calendar interface, since it provides a quick at-a-glance summary of their entire schedule over the coming days and months.
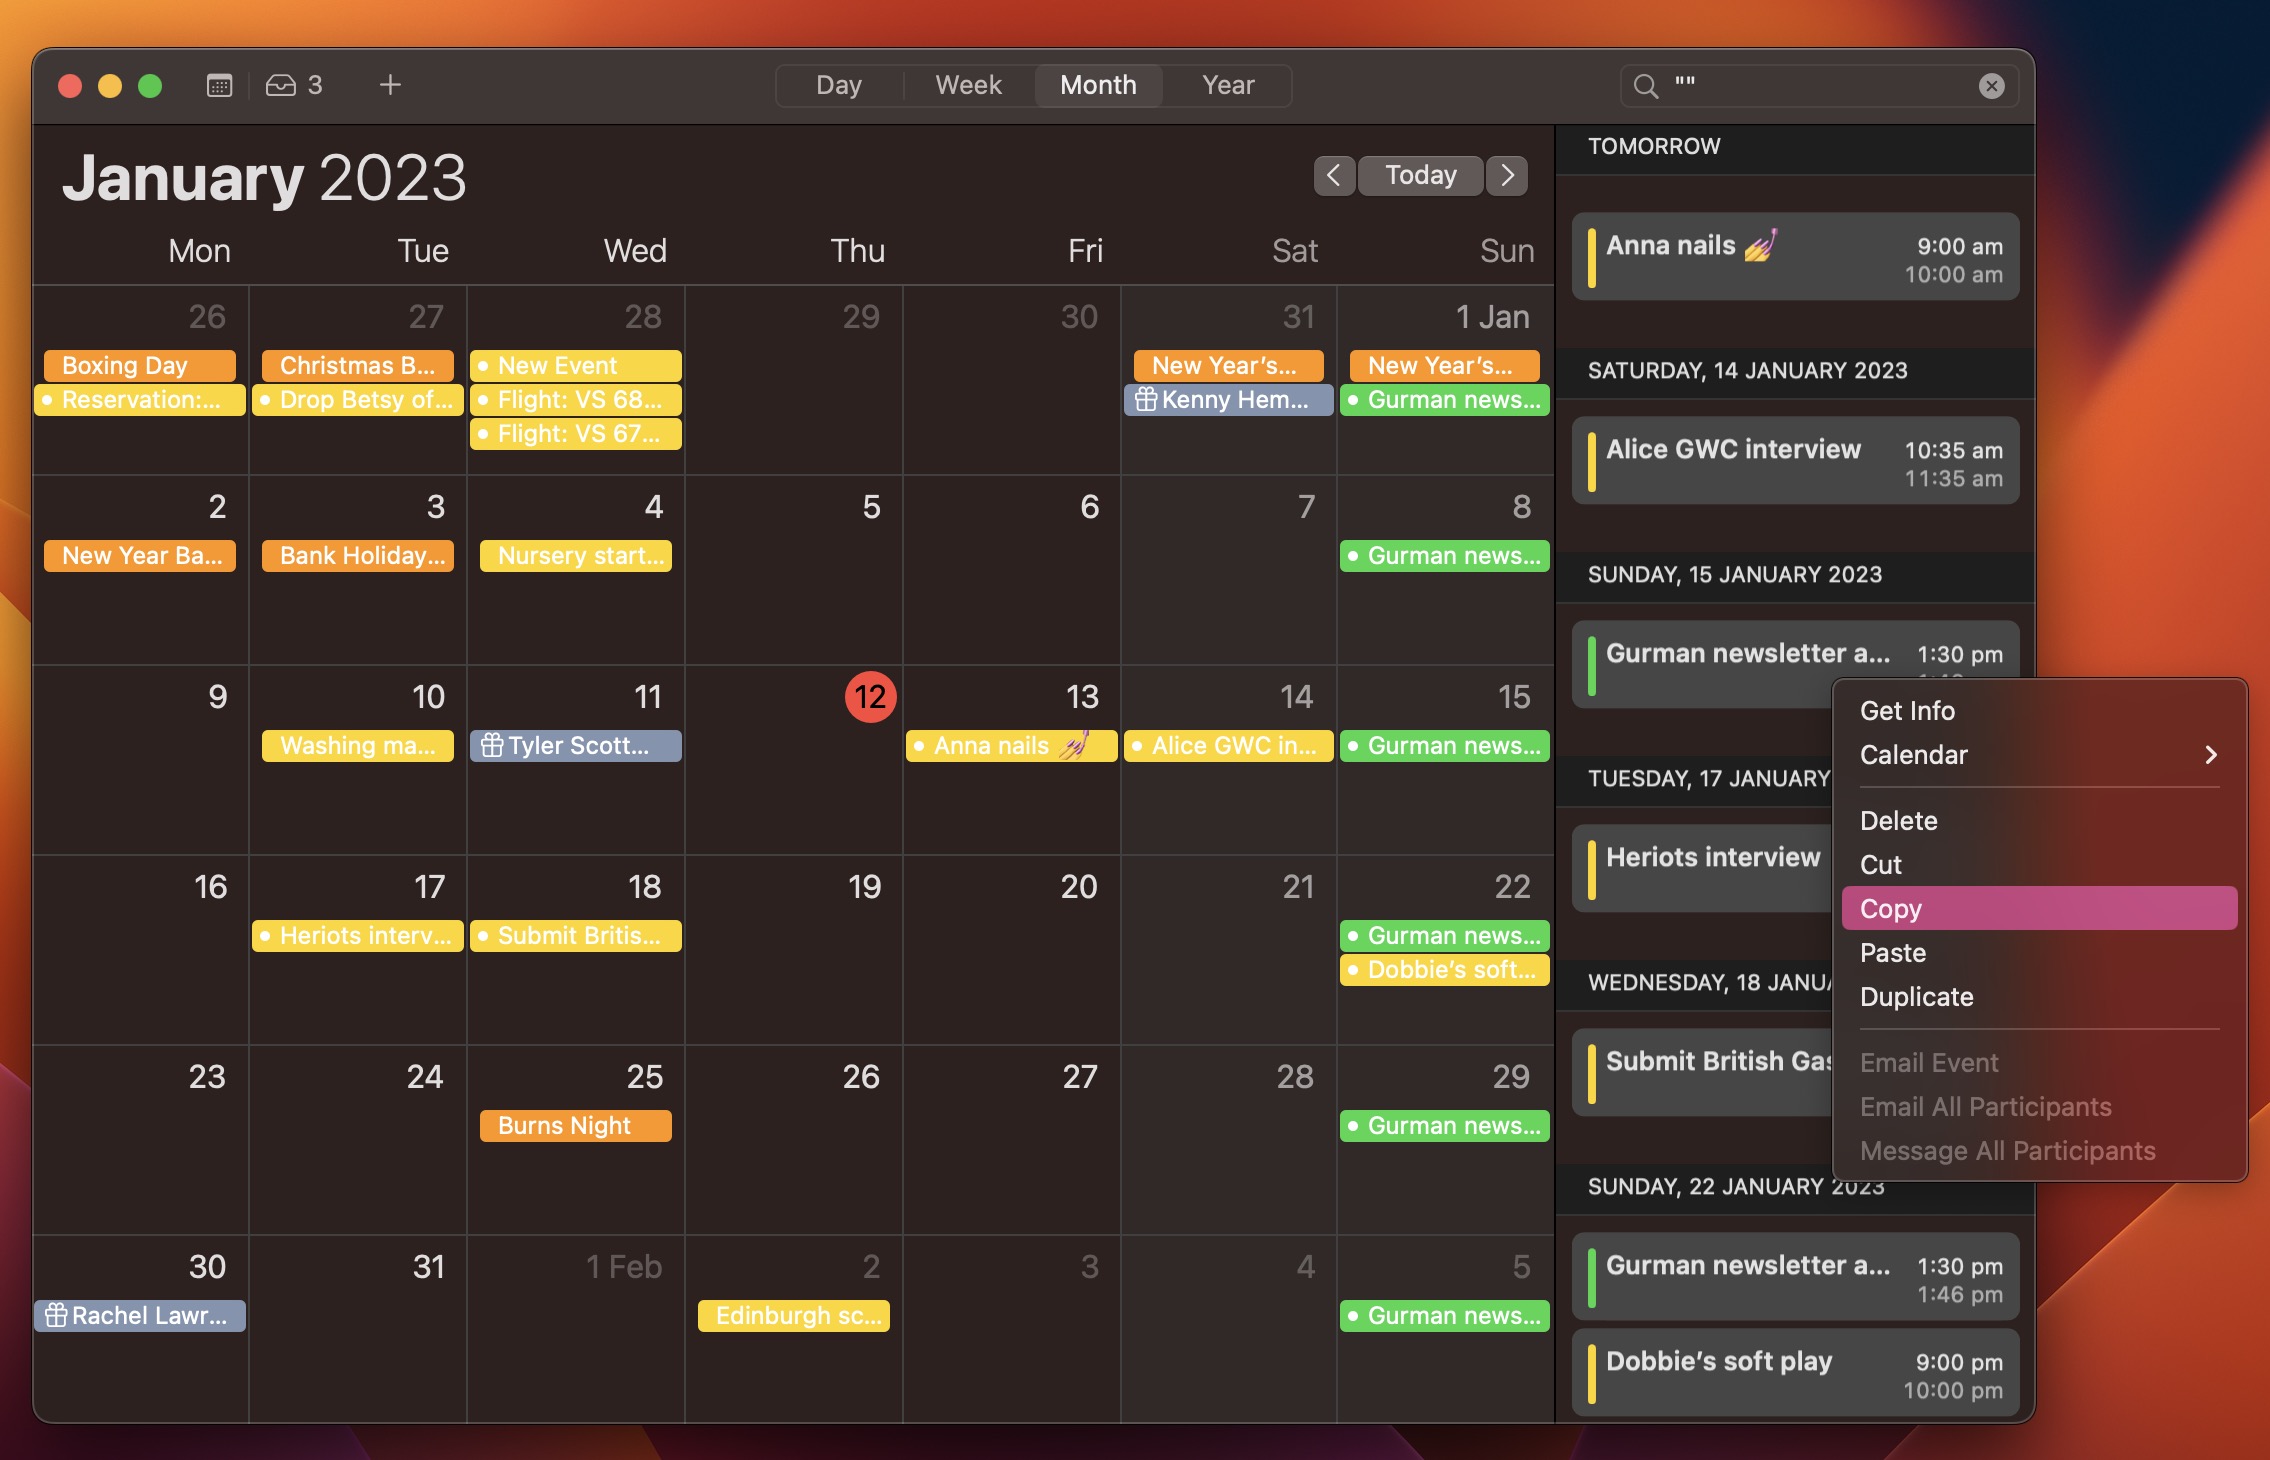
On the face of it, Apple's Calendar app for macOS lacks an equivalent feature. However, there is one way to force a list view that includes all your events. Click the Search field in the upper right corner of the Calendar window and type two double quotes ("") to generate a list of all upcoming events. This makes it easier to copy multiple events and paste them into other apps in chronological order.
3. Perform a Quick Website Search in Safari
There are several ways to search the web in Apple's Safari browser. One of the lesser-known methods is called Quick Website Search. The option is designed to work with sites that have a built-in search field, like the one you can find at the top of the main page at MacRumors.com. Here's how it works.
Let's say you want to look up articles on MacRumors that mention "headset". Instead of typing "macrumors headset" into Safari's address bar to get results from your default search engine, you could navigate to MacRumors.com and use the search field provided at the top of the page.
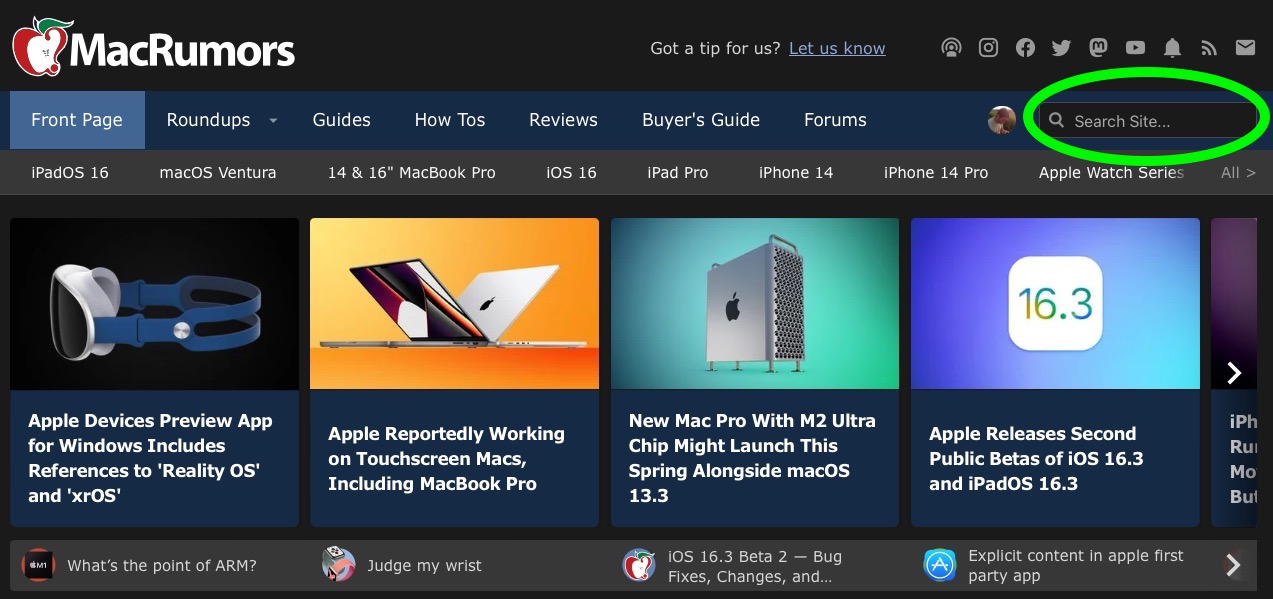
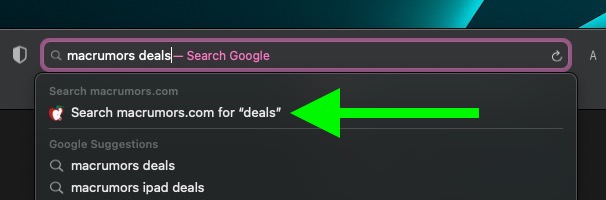
If Quick Website Search is enabled, Safari will remember that you've used the MacRumors search field and offer to use it again in future searches that include the website's name. For example, if you type "macrumors" followed by "deals" directly into Safari's address bar, a Search macrumors.com for "deals" option will pop up in the suggestions box, as shown above. Selecting it returns instant results from MacRumors' own on-site search function.
To make sure the Quick Website Search is enabled, select Safari -> Settings... from the menu bar, choose the Search tab, and make sure the checkbox is ticked next to Enable Quick Website Search. If you click the Manage Websites... button next to the checkbox, you can also view Safari's list of website search shortcuts, remove individual websites, or clear the list completely.
4. Pause a Copying File to Resume Later
When you copy a large file or folder to another location in Finder using the Copy and Paste options, a pie chart progress indicator next to the copying item's name gives you an idea of how long the copy will take to complete. If it looks like it's going to take longer than you'd like, you can always pause the copy and resume it later. Here's how it works.
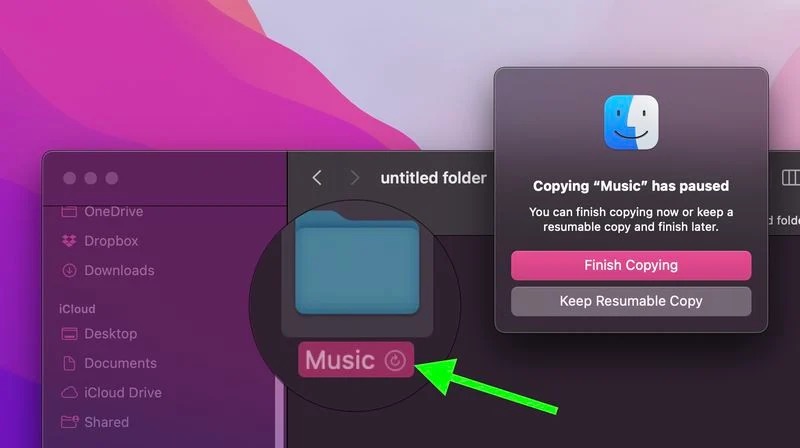
If you stop a copy midway through using the X button, a ghosted version of the file or folder will remain in the destination location. Just click it and you'll be given the option to Finish Copying it, or you can Keep the Resumable Copy and finish the transfer at another time that's more convenient.
5. Quickly Convert Images in Finder
There are many third-party apps available for Mac that will convert images for you, but if you're running macOS Monterey or later, you can convert an image or a selection of images from directly within Finder using a Quick Action.
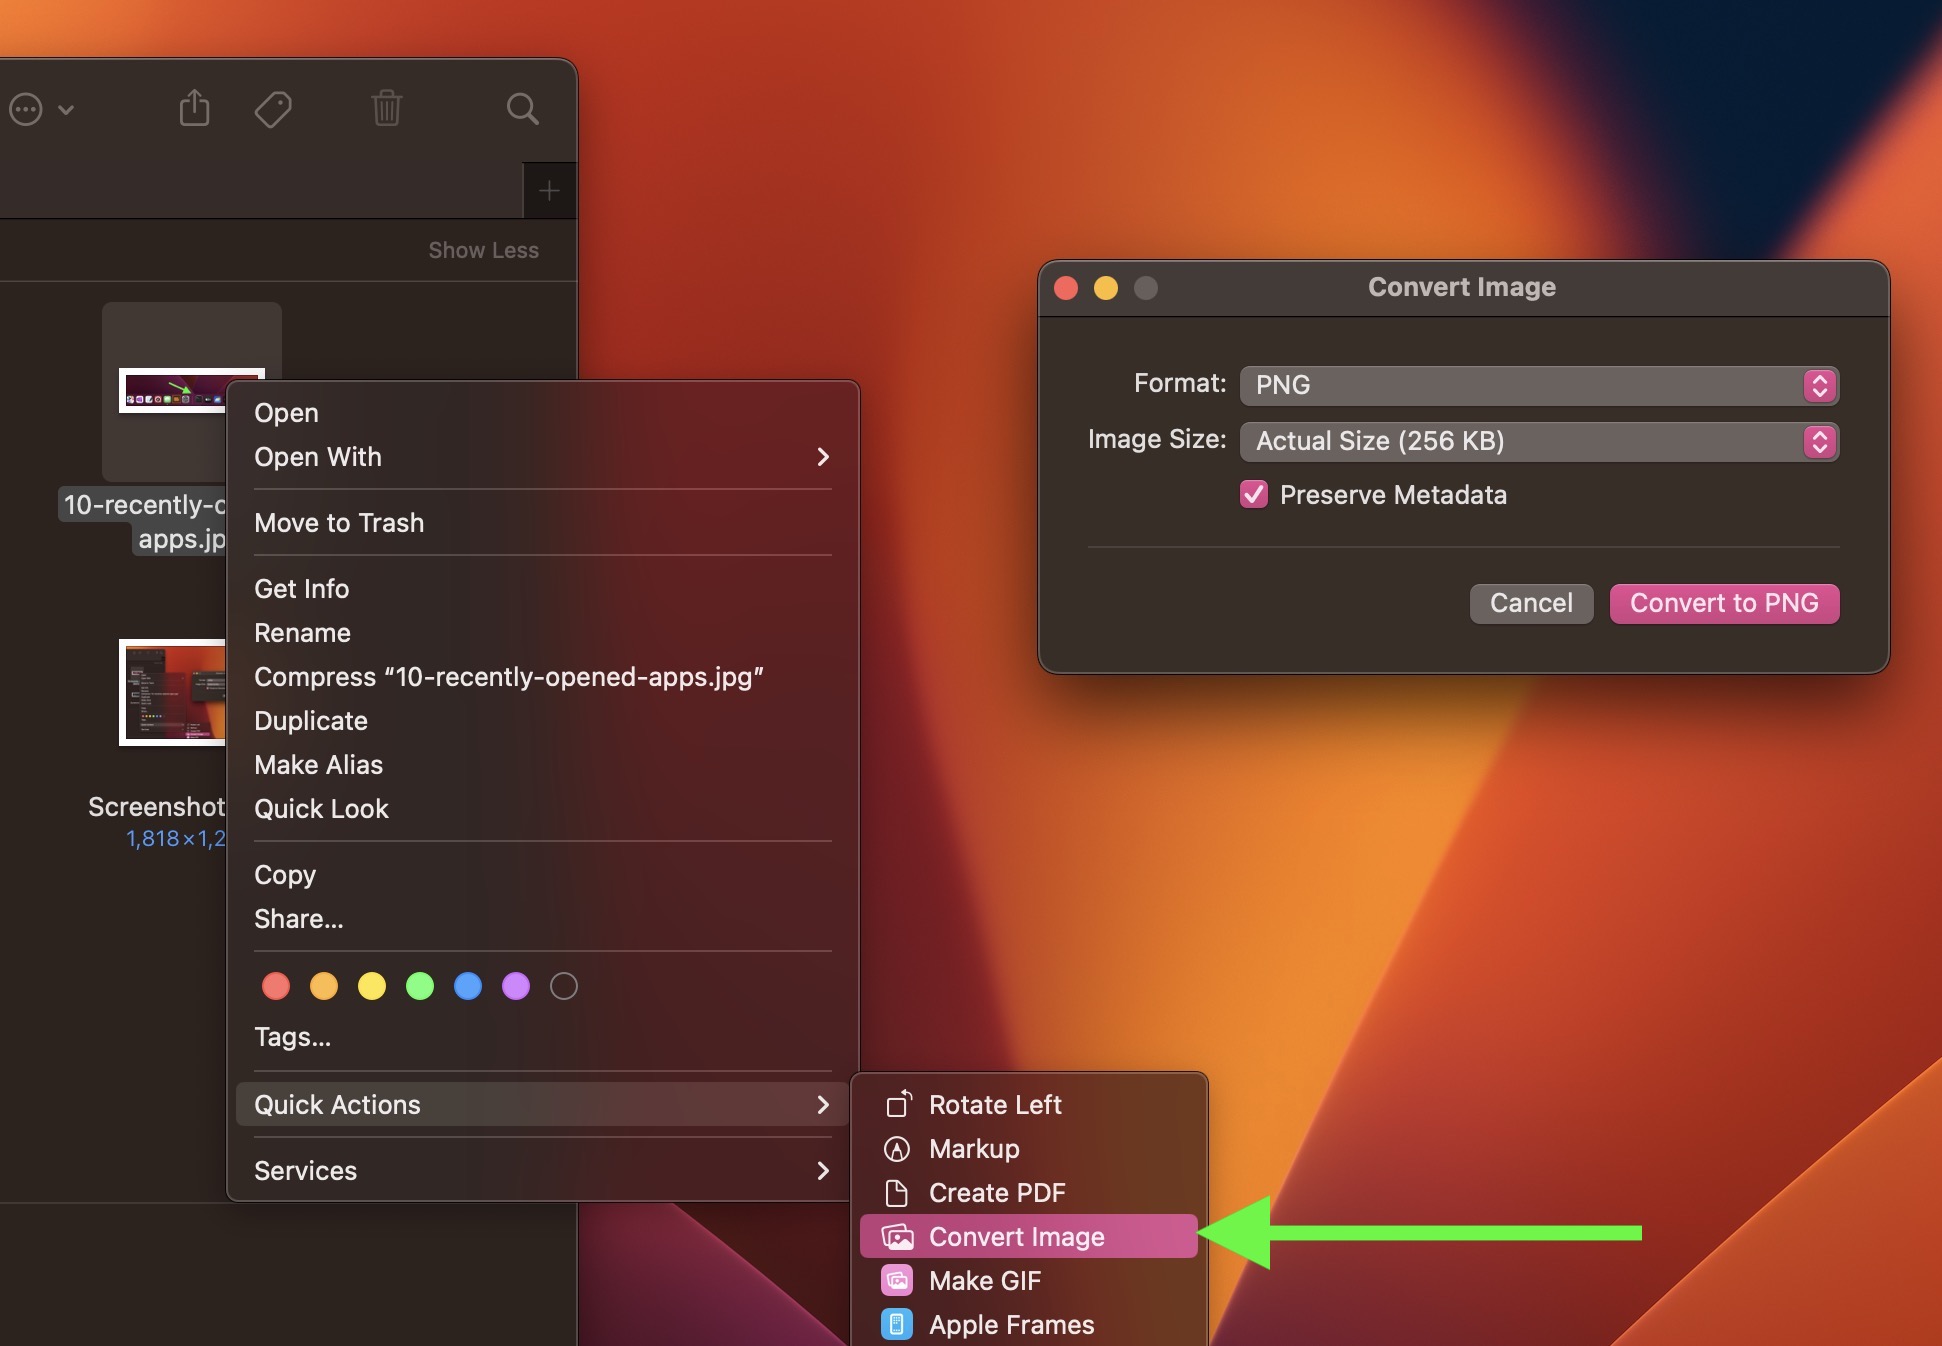
If you're not familiar with them, Quick Actions help you perform certain tasks, such as creating a PDF or rotating an image, right from the Finder or your desktop, without opening an app. The "Convert Image" Quick Action can quickly convert an image file from one format to another. It also lets you batch convert selections, change the file size, and choose whether to keep the file's metadata in the converted image.
To use the Convert Image Quick Action, select an image file or drag a selection box over several files, then Ctrl-click and select Quick Actions -> Convert Image. In the dialog that appears, choose the desired format (JPEG, PNG, or HEIF) and the output file size (small, medium, large, or actual). Check the box to preserve the original image's metadata in the output image, then click Convert to [Format]. The converted image will be saved in the same folder as the original image, which will remain intact.
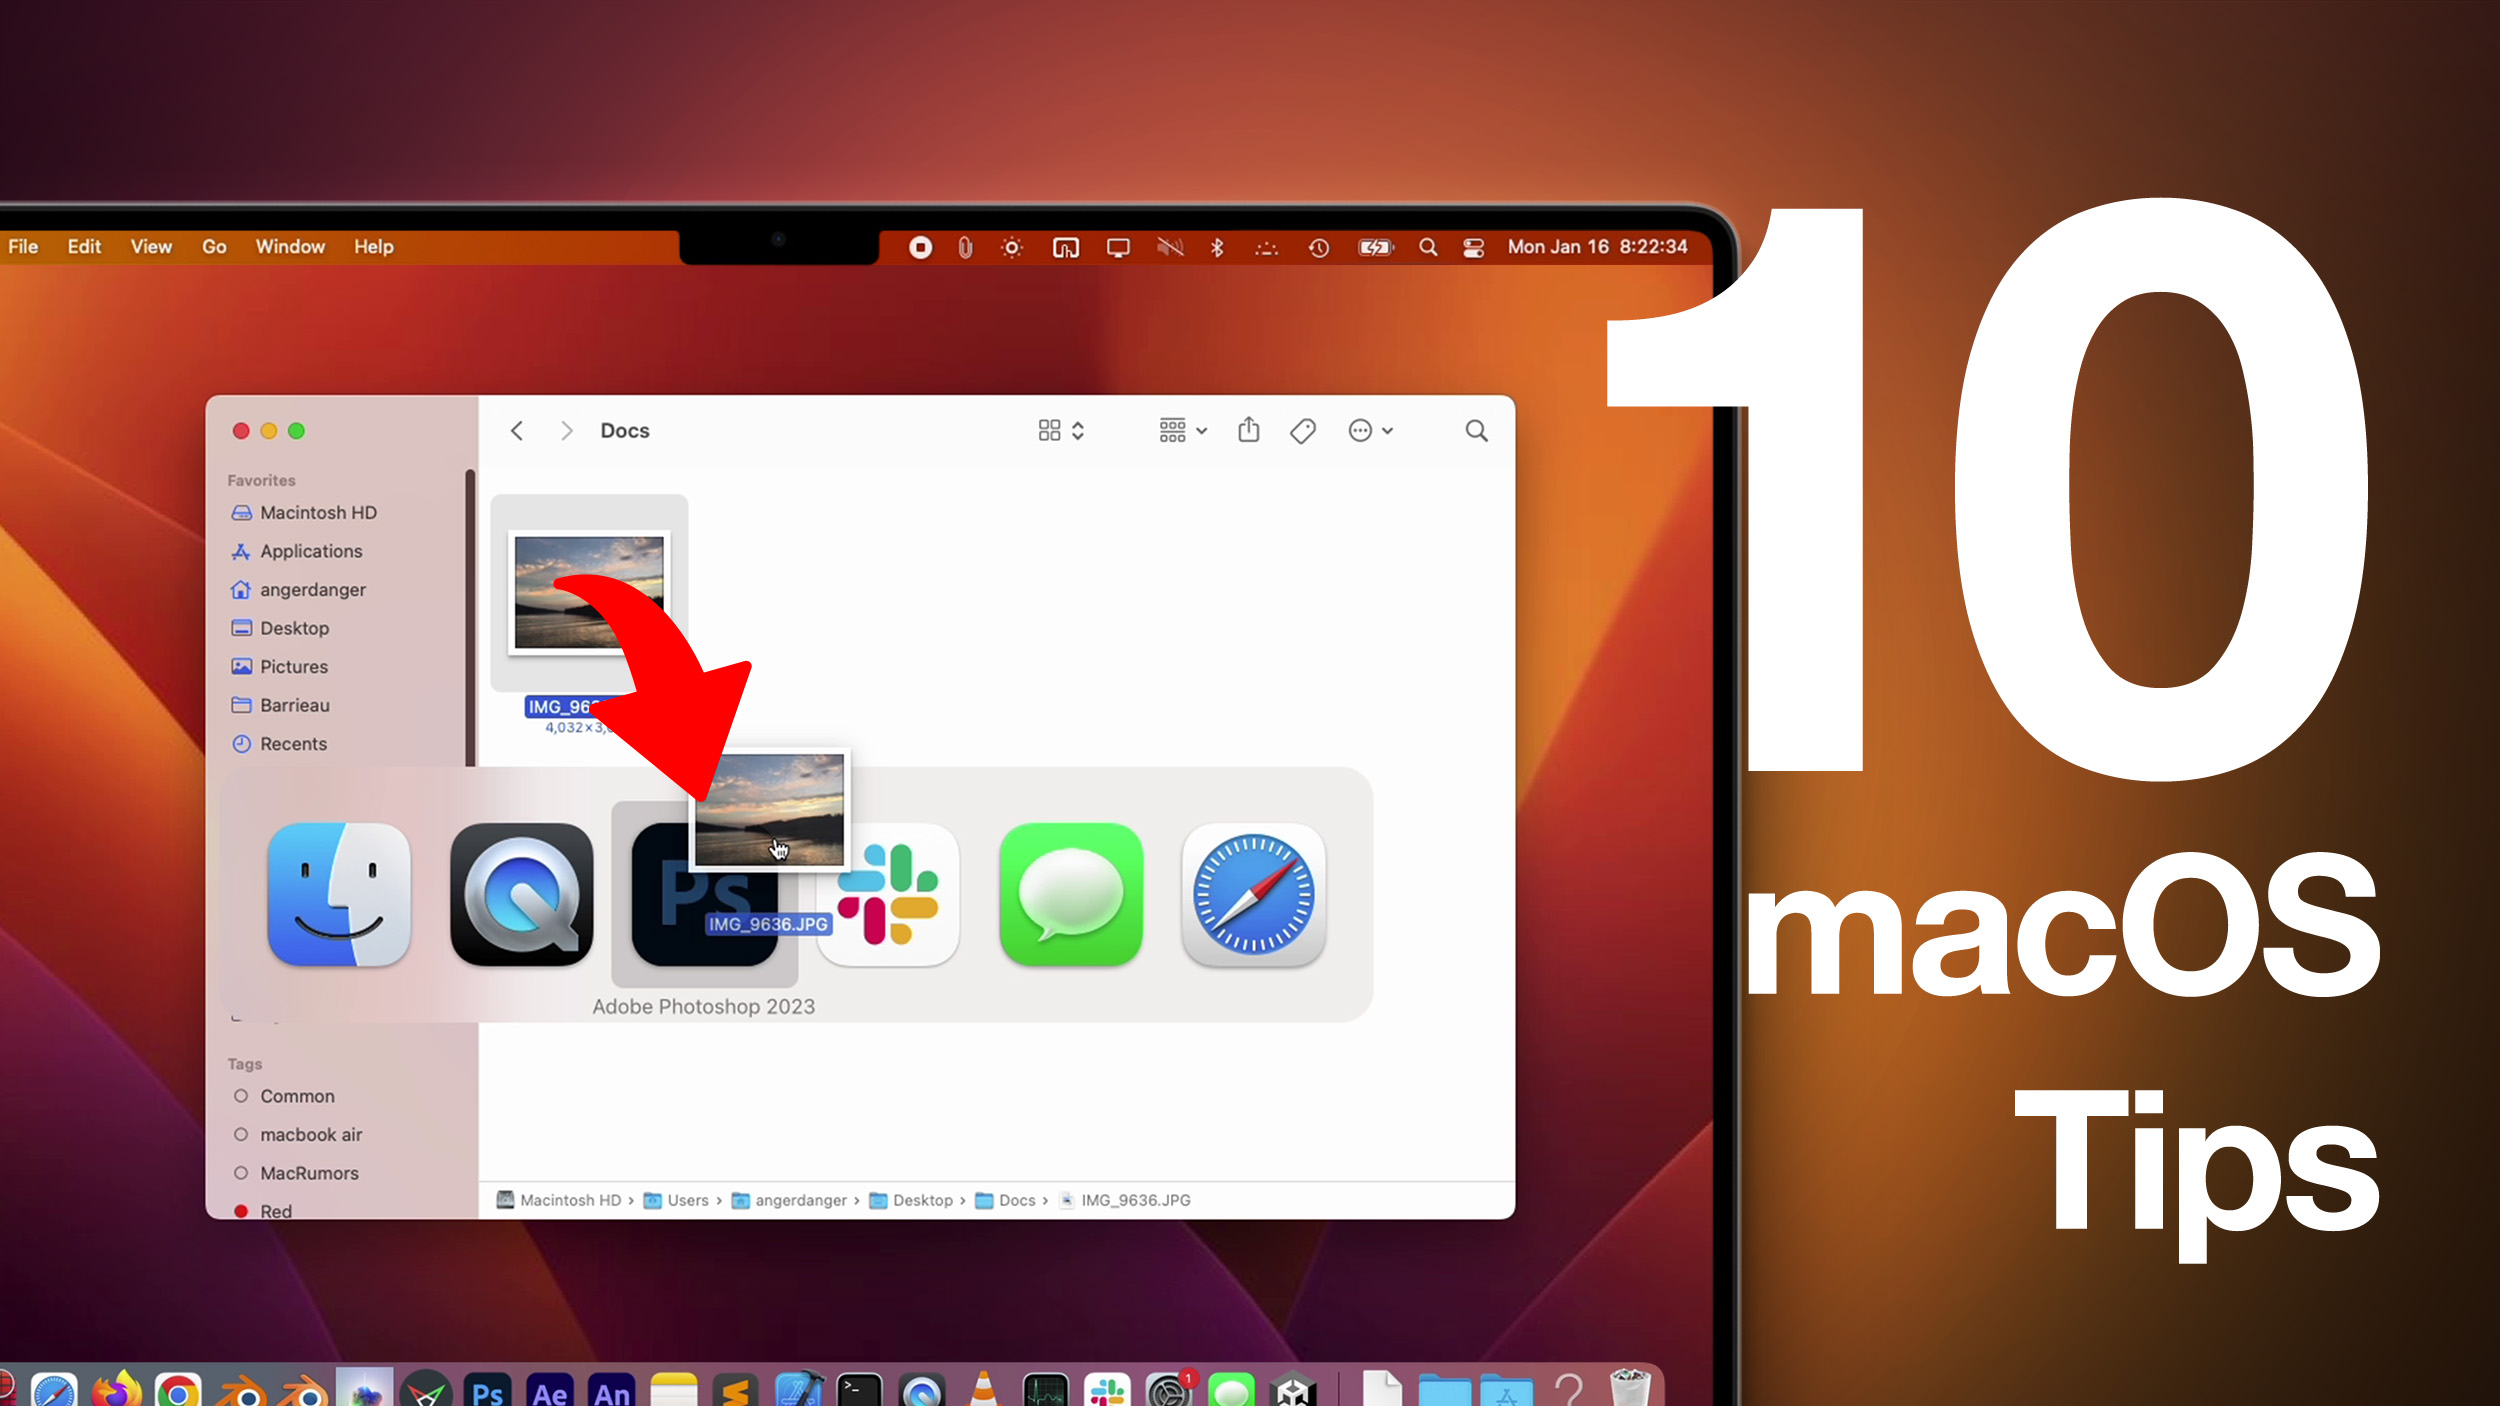
6. Open Files From the App Switcher
Most long-time macOS users will be aware of the Application Switcher. It's invoked using the Command-Tab keyboard shortcut, and lists all of the apps currently running on your Mac, enabling you to quickly switch between them.
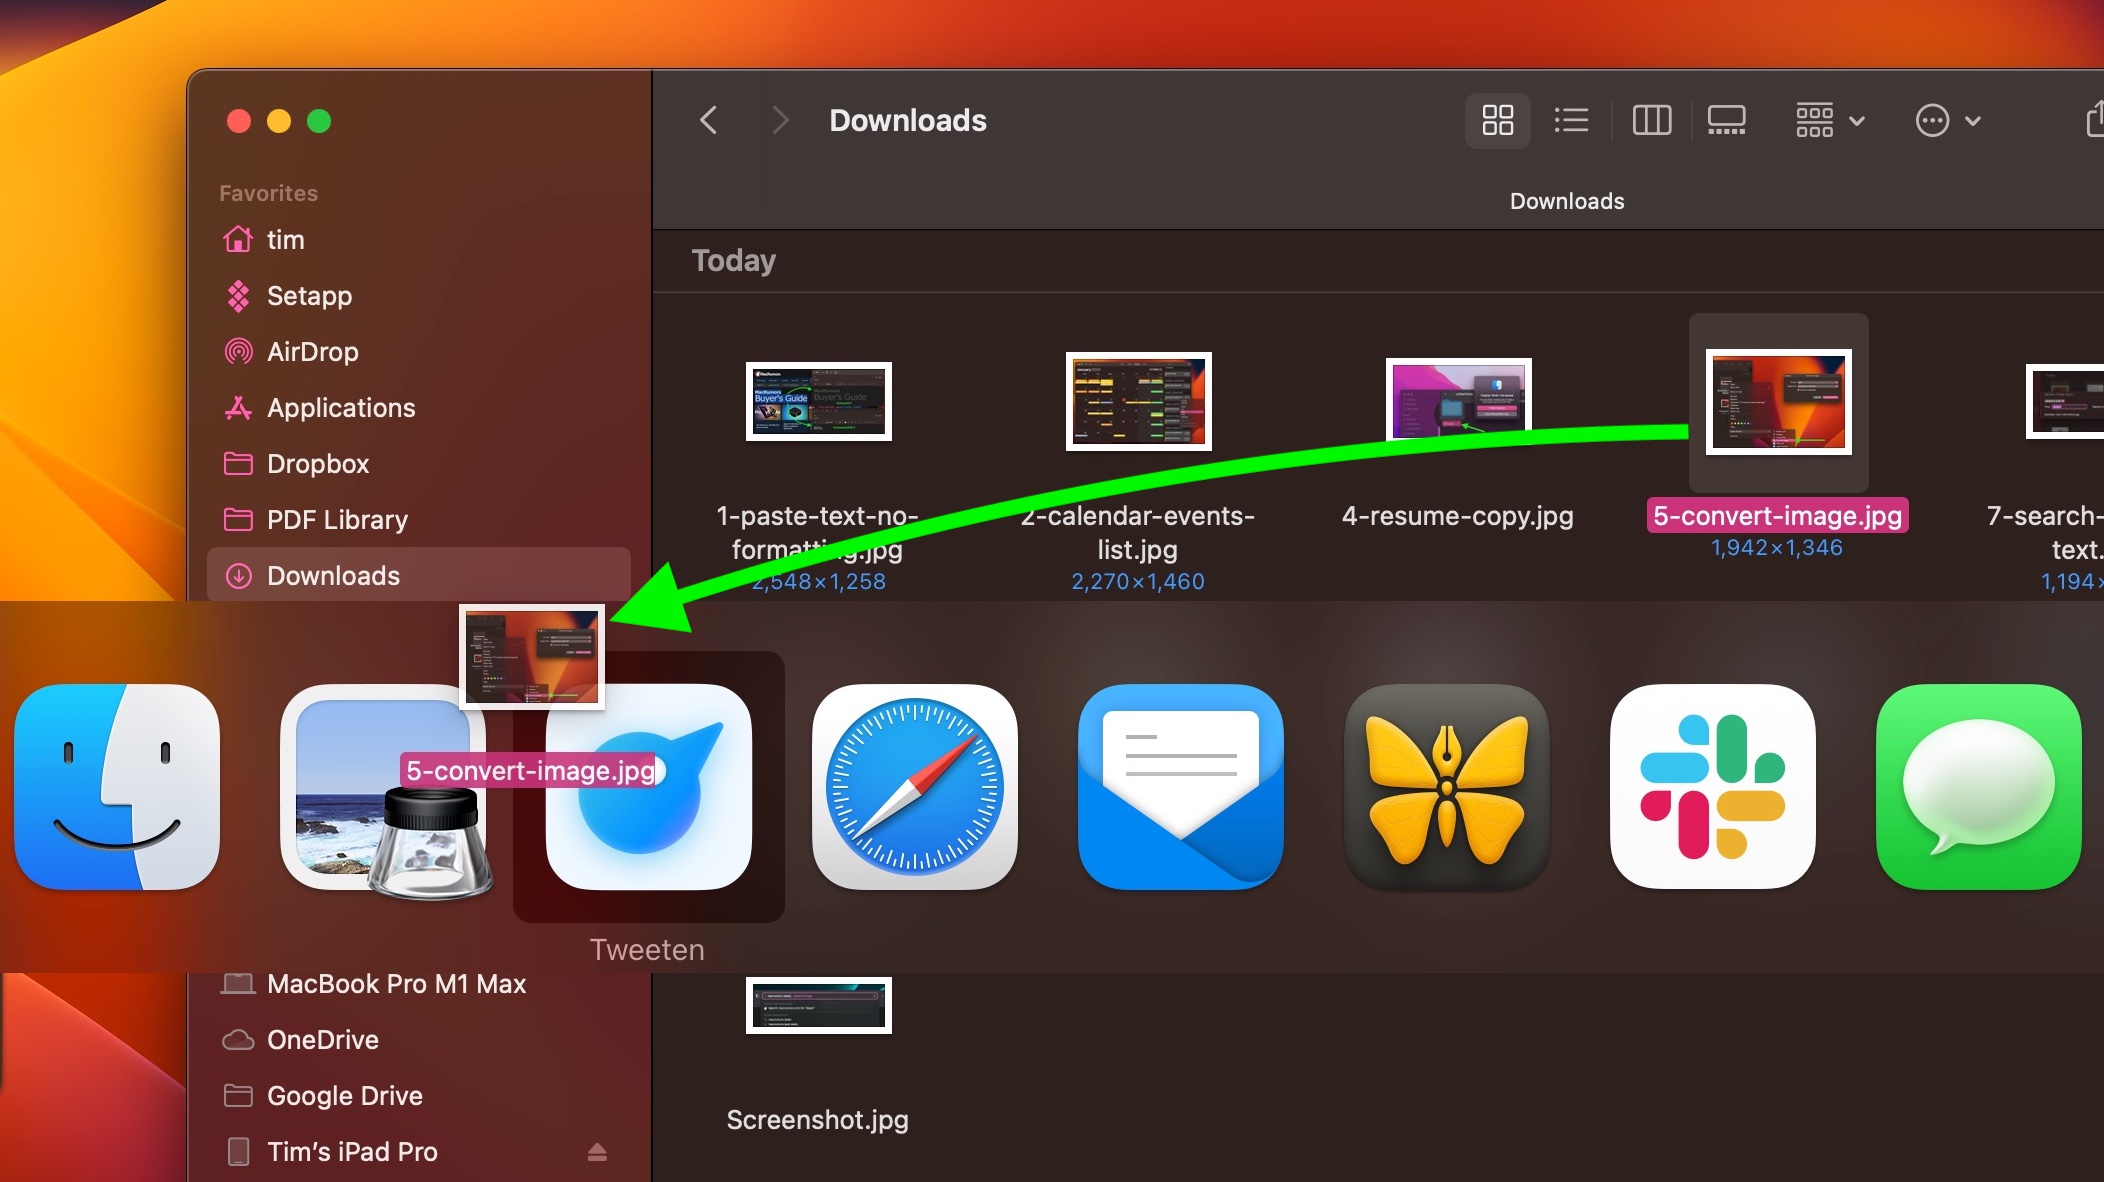
An oft-overlooked function of the App Switcher is its ability to open files. Simply begin to drag a file from a Finder window, then invoke the App Switcher and drag the file onto the relevant app icon in the overlay. Let go of the file and it should open in the selected app.
Bonus tip: To quit an open app with the App Switcher, highlight the app and tap Q. To quickly quit multiple apps, try cycling through the overlay with the Tab key, tapping Q as you go.
7. Search and Replace Text in Filenames
When you highlight several files in Finder, you can use the Rename... option in the Ctrl-click menu to rename all of them. The Rename dialog also allows you to rename only specific files in a selection whose names include a certain piece of identifying text. This is really handy if you have tens or hundreds of files in a folder with different names and you only want to change those files that contain a particular word.
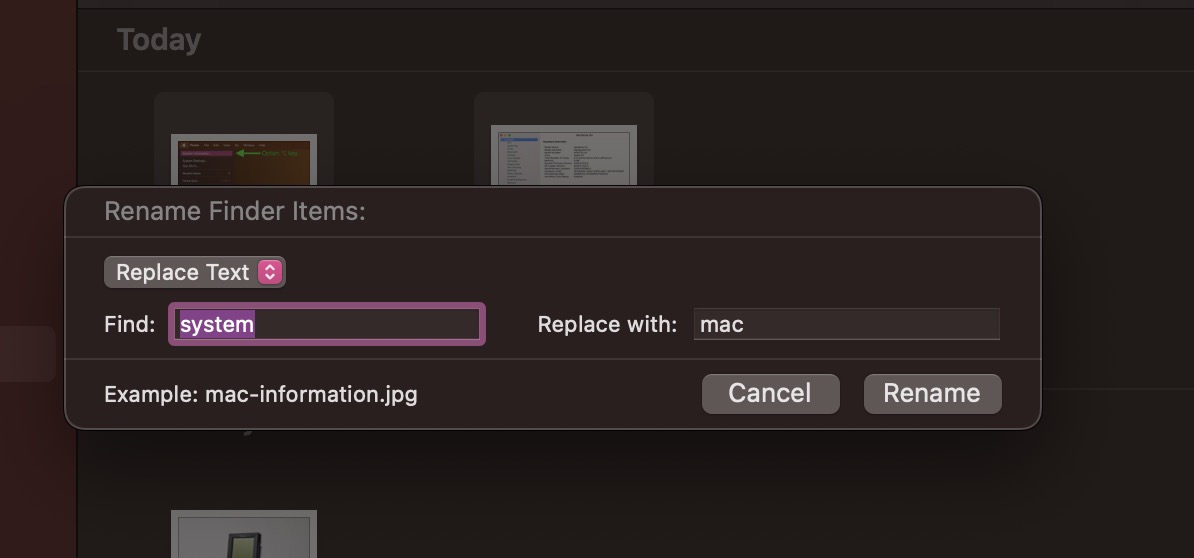
Select all the files in a folder (make sure they're all of the same kind, or this won't work), then Ctrl-click and select Rename.... Select Replace Text in the first dropdown. Now simply type the identifying text you want to replace into the "Find" field, and enter the text you want to replace it with in the "Replace With" field, then click Rename.
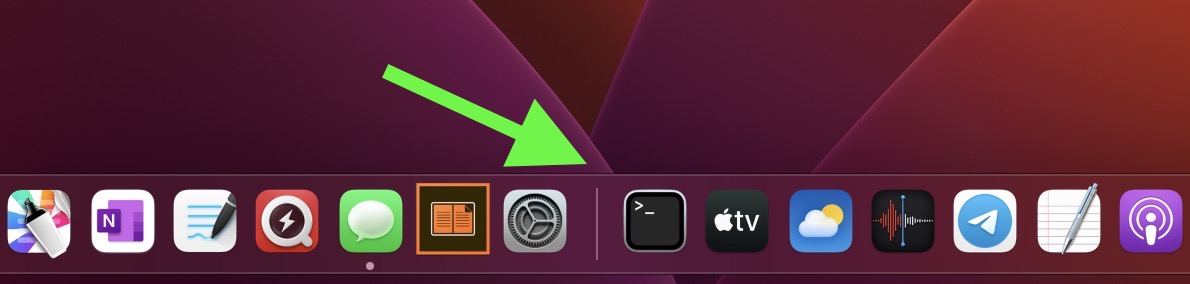
8. Use Text Clippings
In macOS, a Text Clipping is a selection of text that you've dragged from an application to another location on your Mac, where it becomes a unique kind of standalone file. The relatively little-known feature has been around since at least Mac OS 9, and it offers a convenient way to save out pieces of text from pretty much anywhere for later use in another app or document.
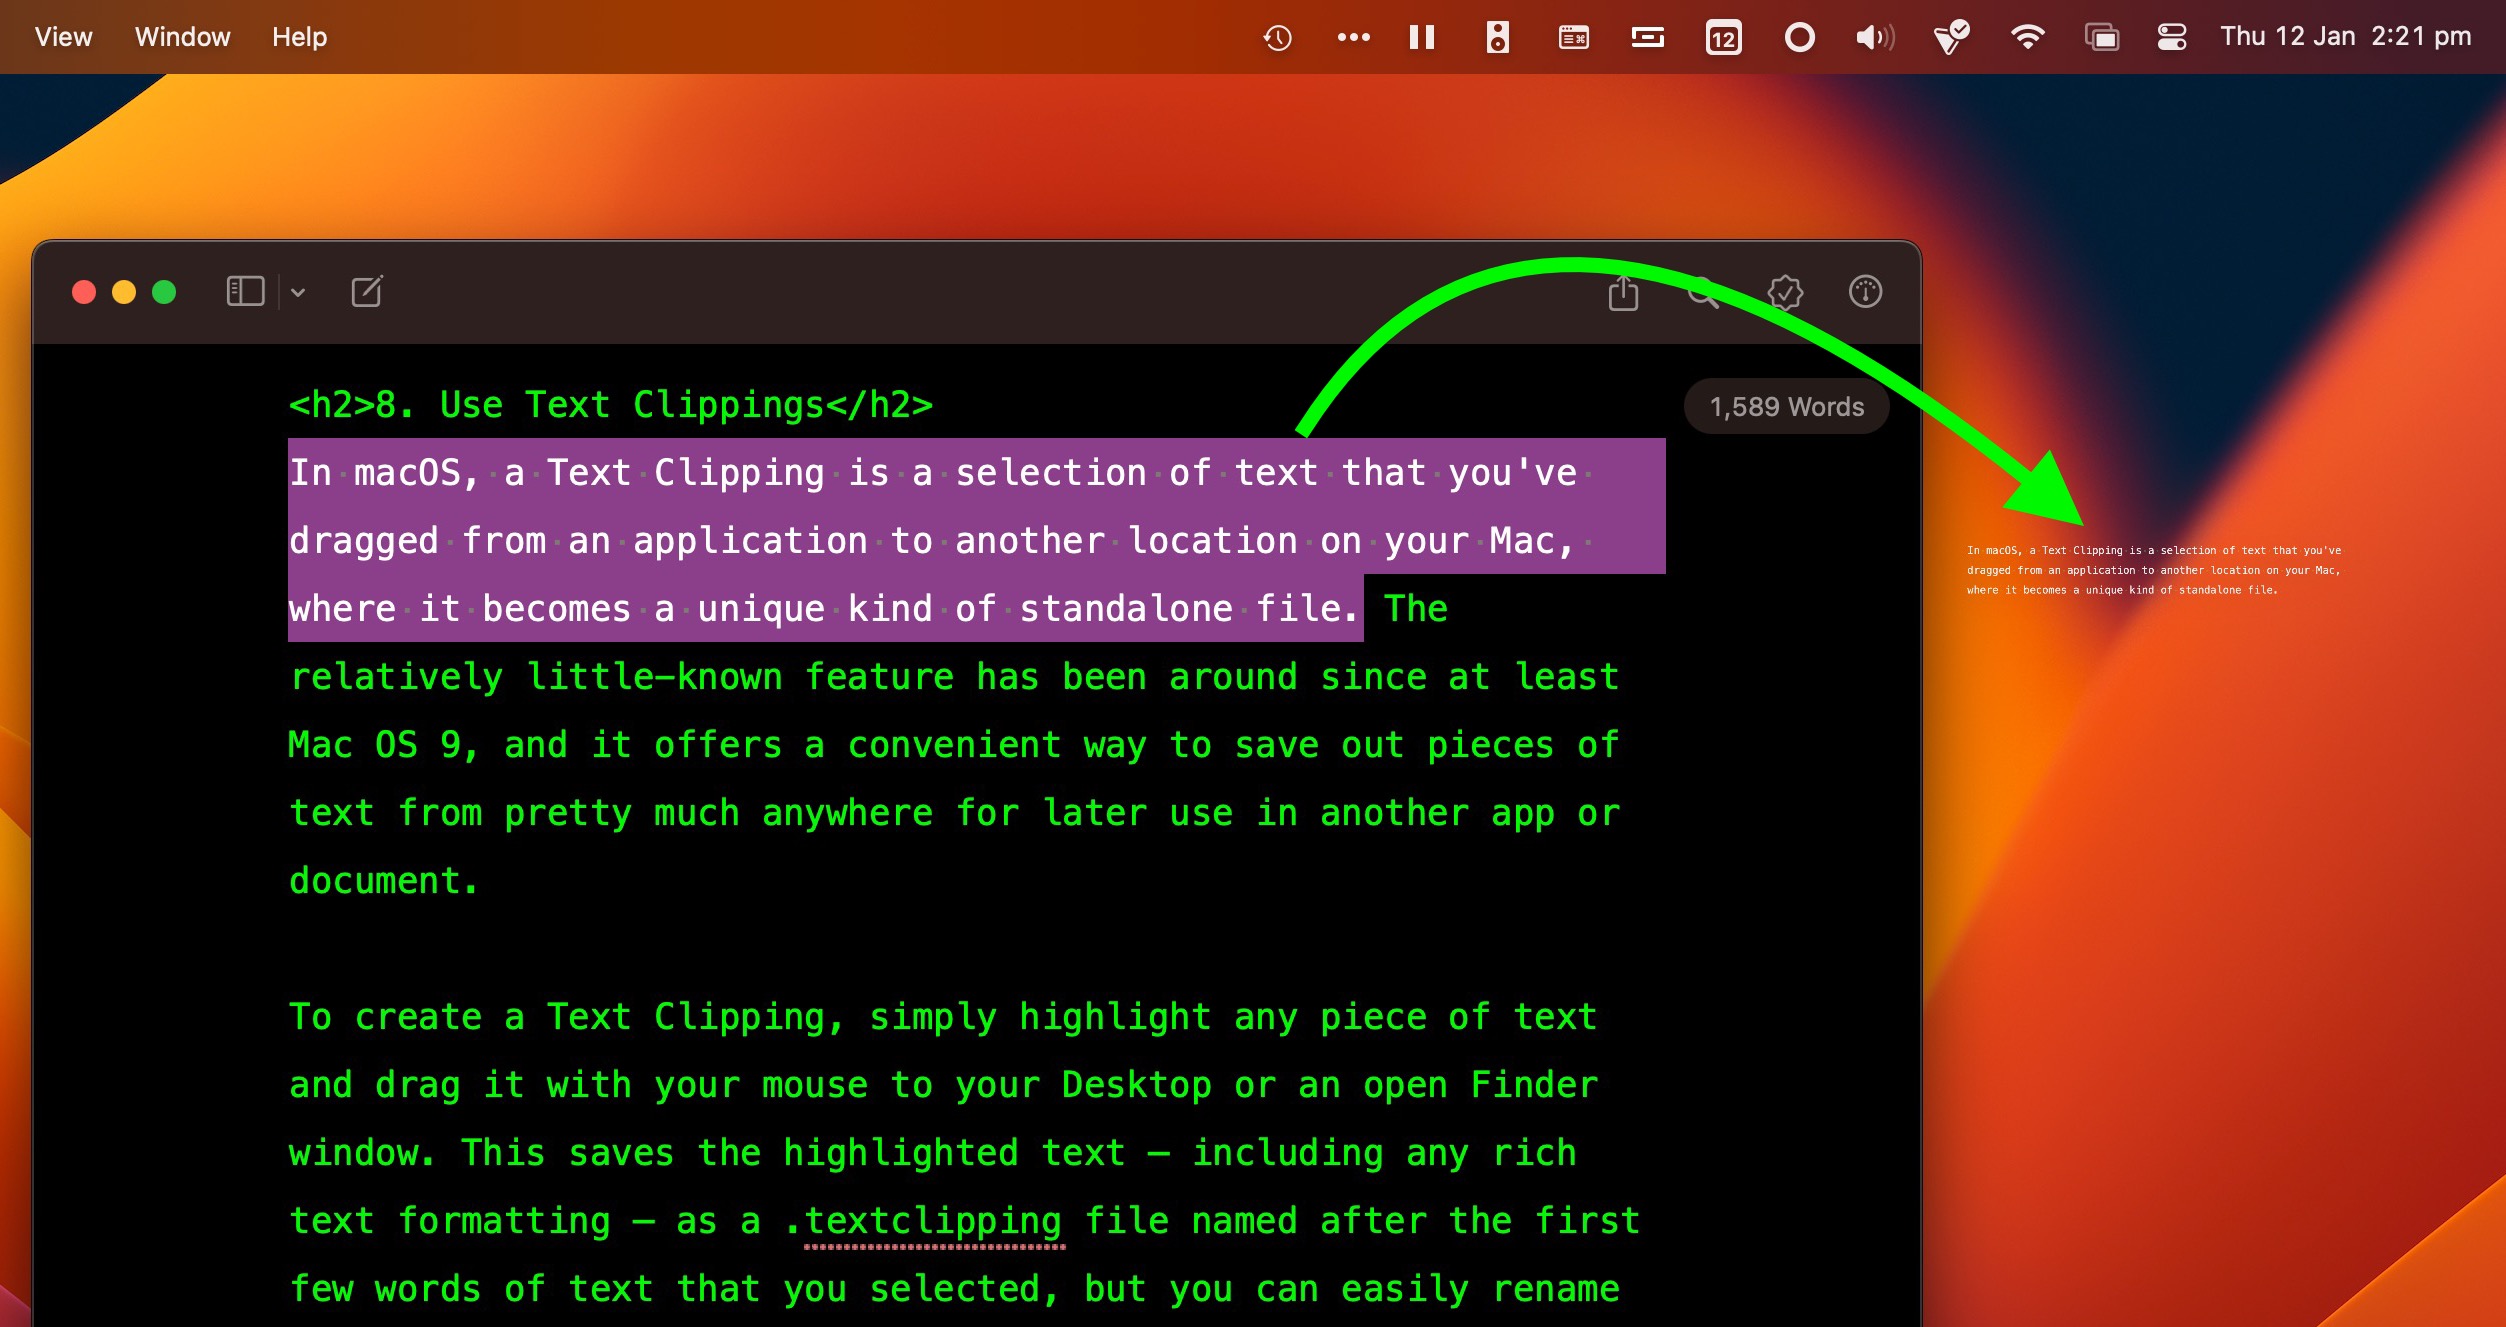
To create a Text Clipping, simply highlight any piece of text and drag it with your mouse to your Desktop or an open Finder window. This saves the highlighted text – including any rich text formatting – as a .textclipping file named after the first few words of text that you selected, but you can easily rename it to make it more identifiable.
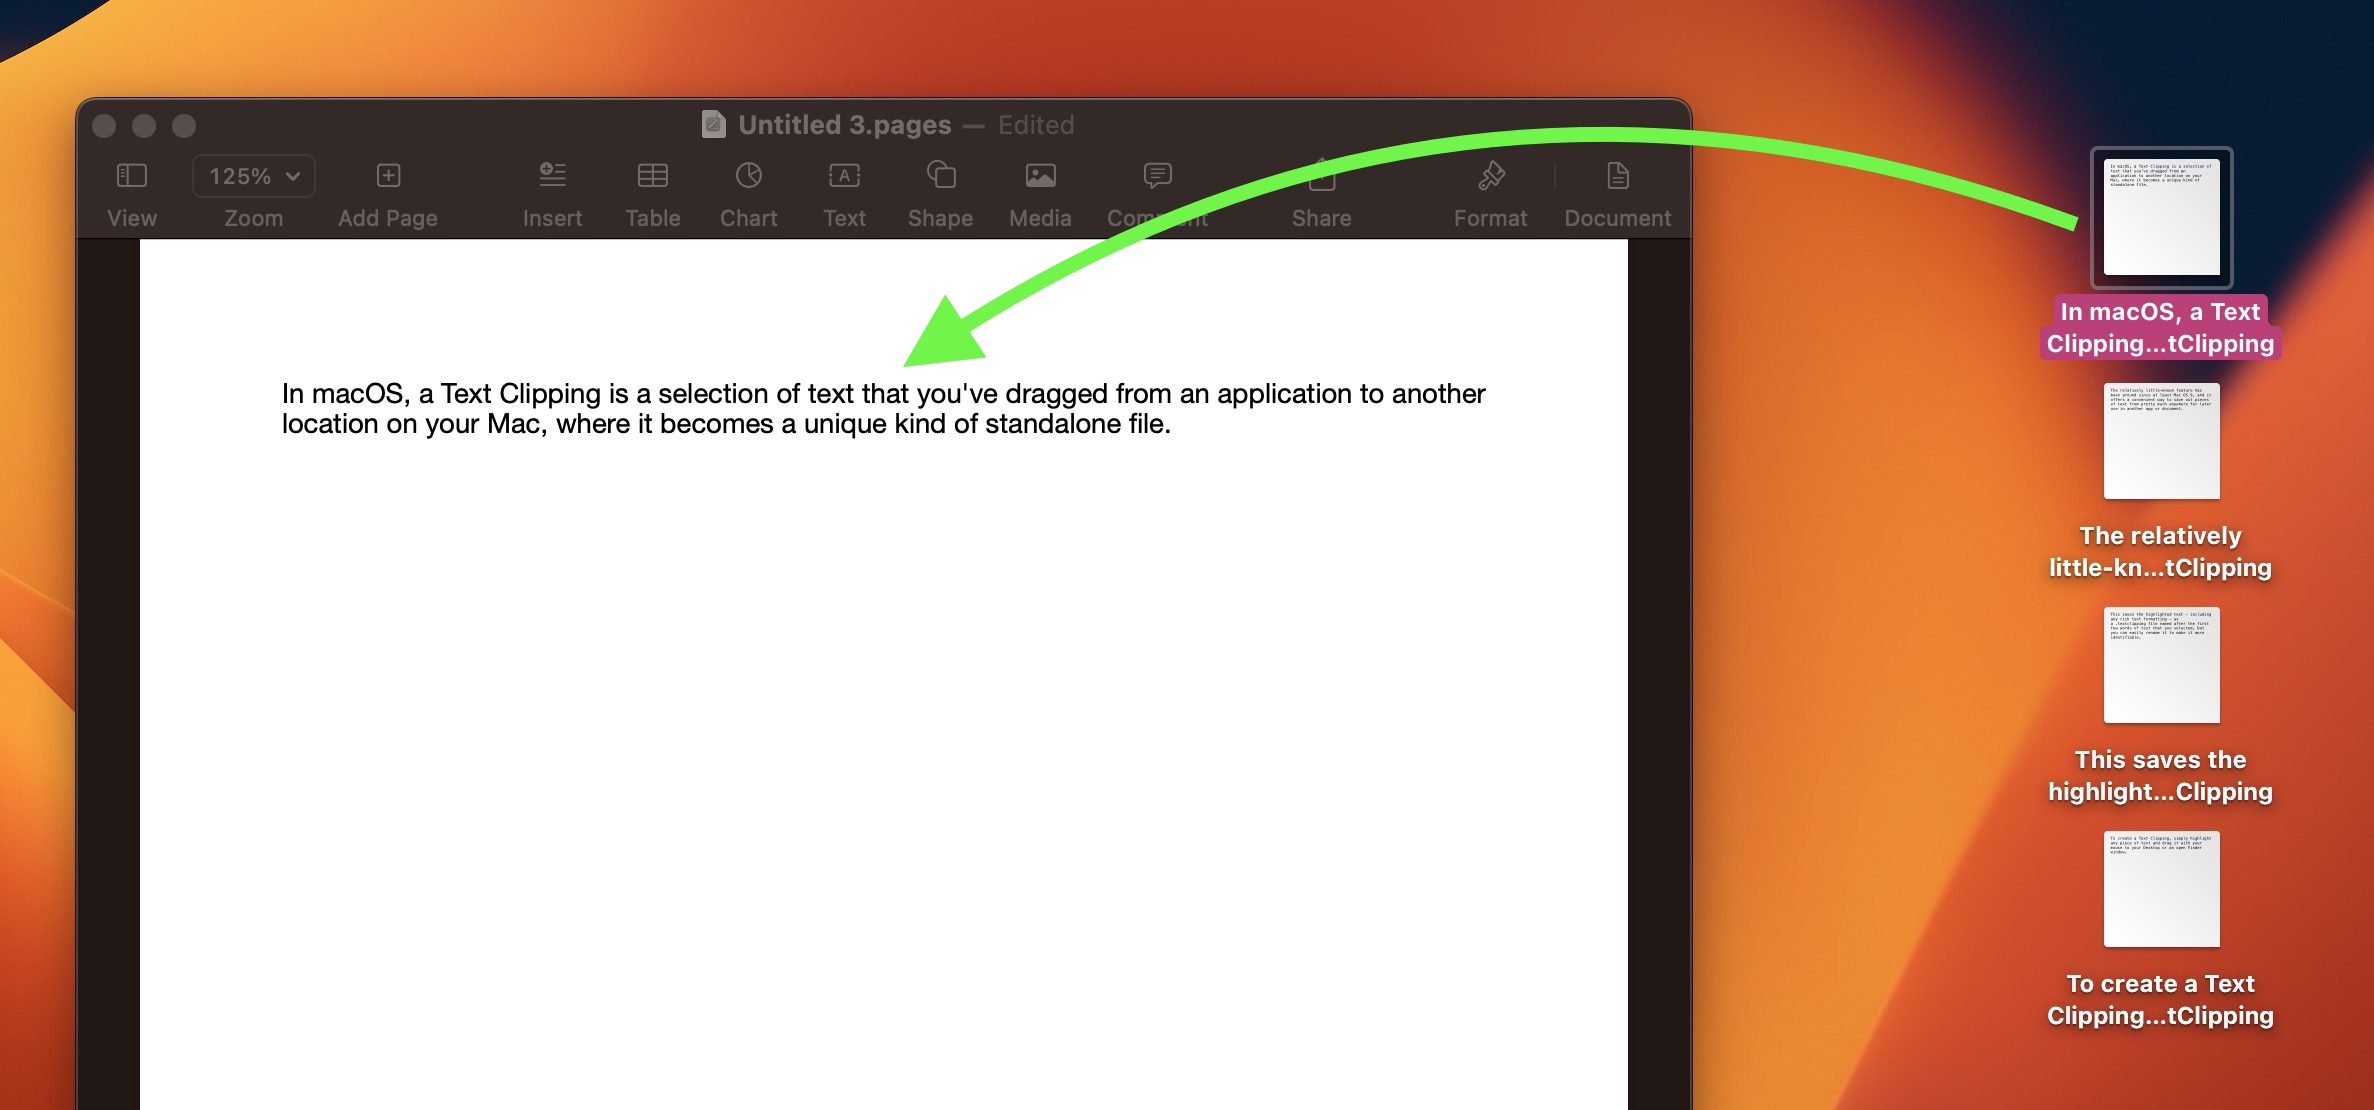
To use the selected text in another file like a Pages document, drag the Text Clipping into the open document and the text will be automatically pasted wherever the cursor is located. You can paste the clipping in the same way into all sorts of open files and apps, including browser search engines, Mail compose windows, Xcode projects, and more.
9. Copy and Paste Photo Edits
In macOS Ventura, if you have multiple photos that you want to edit in the same way, or if you've made changes to one photo that you want to replicate in another photo, you can use the new copy and paste edits tools in the Photos app.
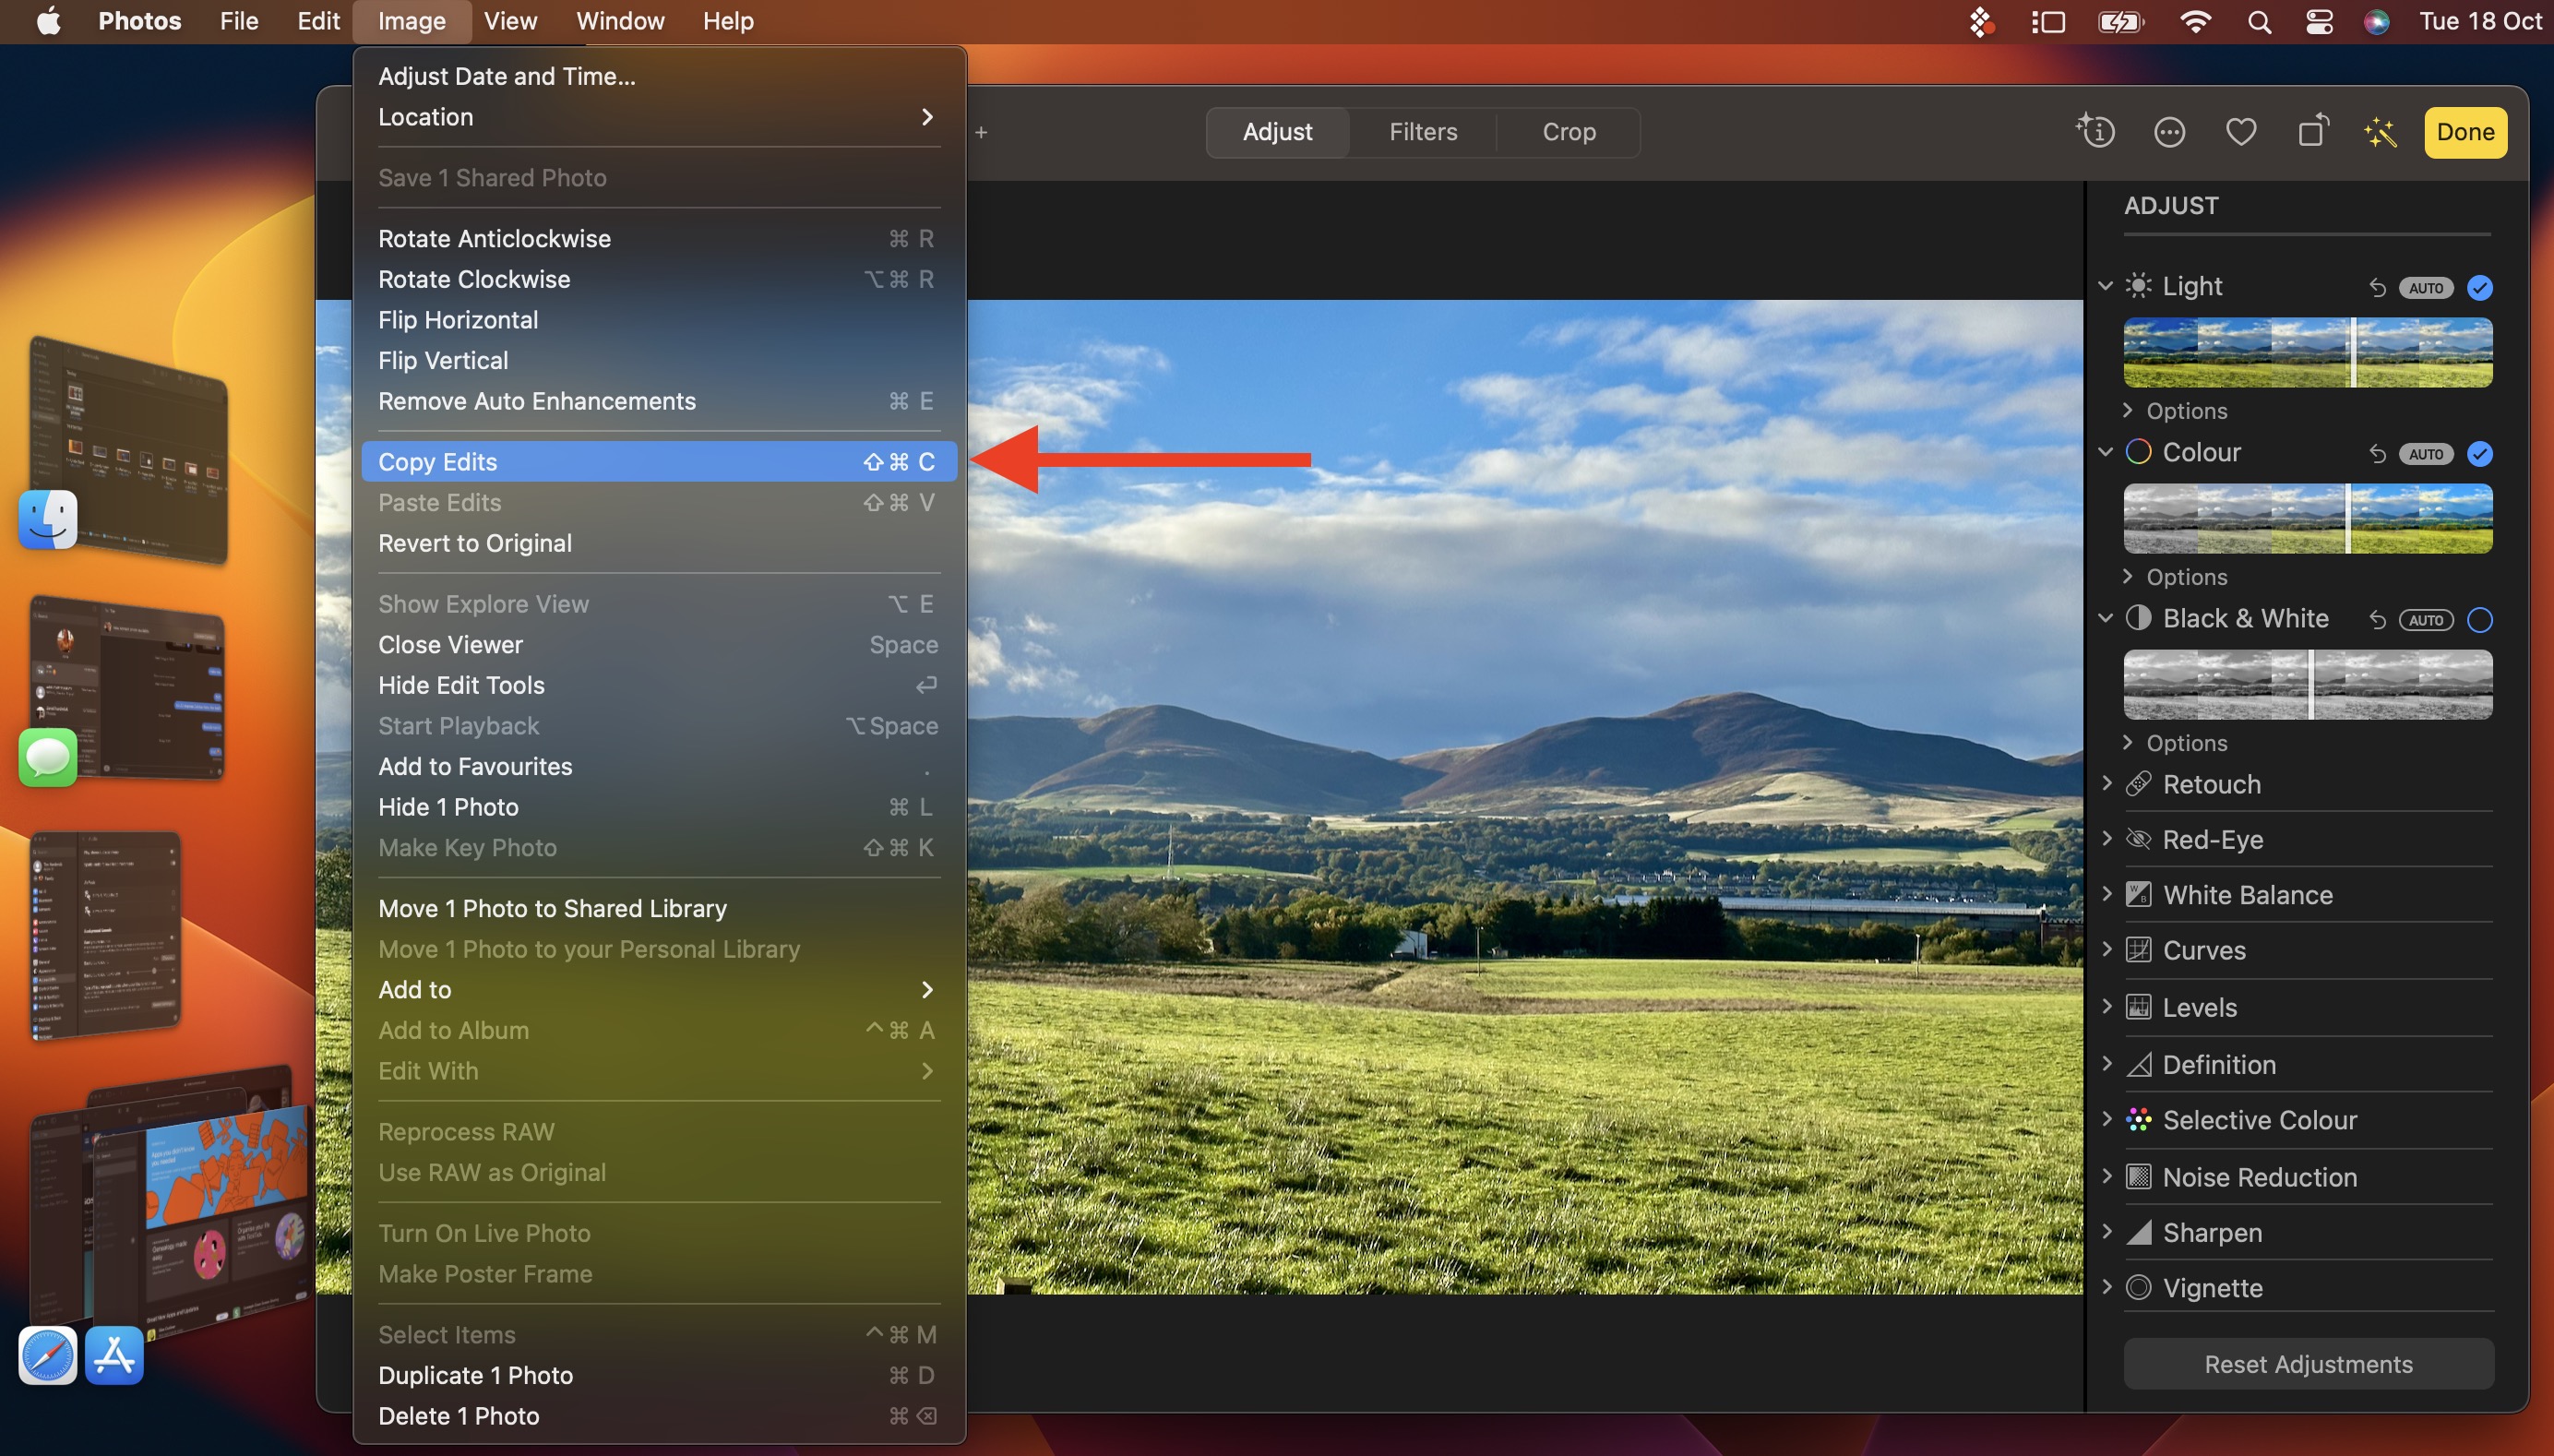
To use the new option, first open an image, click Edit, then make your changes. When you're done, choose Image -> Copy Edits from the menu bar, then select the image (or images) you want to paste them to. Finally, choose Image -> Paste Edits from the menu bar.
10. Show More Recent Applications in Dock
In macOS, a handy option called Show recent applications in Dock (found in System Settings -> Desktop & Dock) adds a divider to the right-hand side of your Dock and after it displays any apps you recently used that aren't permanently docked. This option only shows the three most recently used apps that have since been closed. What if your workflow would be more efficient if it could show more?
If you're comfortable pasting commands into Terminal, it's perfectly possible to increase or decrease the number of recently opened apps that show in your Dock. Open a Terminal window and paste the following at the command prompt, then press Enter:
defaults write com.apple.dock show-recents -bool true;
defaults write com.apple.dock show-recent-count -int 10;
killall Dock
Note that the -int argument defines the number of recently opened apps that you want to display in the Dock after the divider (10 in this case). You can change the number to suit.
Article Link: 10 macOS Tips to Boost Your Productivity
Paste and match style is slightly different than paste unformatted, which is what Cmd-Shift-V does (but apparently not all languages and not in apps that override the key command).
9. Copy and Paste Photo Edits
In macOS Ventura, if you have multiple photos that you want to edit in the same way, or if you've made changes to one photo that you want to replicate in another photo, you can use the new copy and paste edits tools in the Photos app.
To use the new option, first open an image, click Edit, then make your changes. When you're done, choose Image -> Copy Edits from the menu bar, then select the image (or images) you want to paste them to. Finally, choose Image -> Paste Edits from the menu bar.
#1 didn't work for me. ?? (nothing gets pasted with command-shift-V)
When it comes to working on your Mac, there are so many handy time-saving tricks hidden away in macOS that there's a good chance you're missing at least one or two. Here are 10 quick tips, any of which could be key to turbo-charging your productivity.
This article assumes you're using a Mac running macOS Ventura, but most of these tips also work in earlier versions of Apple's Mac operating system.
1. Copy and Paste Text Excluding Formatting
When you select some text on a Mac, pressing Command-C copies it to the clipboard, and pressing Command-V pastes it along with any formatting.
If you'd rather paste the copied text elsewhere as purely plain text, use the key combination Command-Shift-V and it will be stripped of any formatting.
2. View All Calendar Events as a List
Some calendar apps allow you to view all your upcoming events as a vertical list. Many users find this sort of viewing mode beats staring at the regular calendar interface, since it provides a quick at-a-glance summary of their entire schedule over the coming days and months.
On the face of it, Apple's Calendar app for macOS lacks an equivalent feature. However, there is one way to force a list view that includes all your events. Click the Search field in the upper right corner of the Calendar window and type two double quotes ("") to generate a list of all upcoming events. This makes it easier to copy multiple events and paste them into other apps in chronological order.
3. Perform a Quick Website Search in Safari
There are several ways to search the web in Apple's Safari browser. One of the lesser-known methods is called Quick Website Search. The option is designed to work with sites that have a built-in search field, like the one you can find at the top of the main page at MacRumors.com. Here's how it works.
Let's say you want to look up articles on MacRumors that mention "headset". Instead of typing "macrumors headset" into Safari's address bar to get results from your default search engine, you could navigate to MacRumors.com and use the search field provided at the top of the page.
If Quick Website Search is enabled, Safari will remember that you've used the MacRumors search field and offer to use it again in future searches that include the website's name. For example, if you type "macrumors" followed by "deals" directly into Safari's address bar, a Search macrumors.com for "deals" option will pop up in the suggestions box, as shown above. Selecting it returns instant results from MacRumors' own on-site search function.
To make sure the Quick Website Search is enabled, select Safari -> Settings... from the menu bar, choose the Search tab, and make sure the checkbox is ticked next to Enable Quick Website Search. If you click the Manage Websites... button next to the checkbox, you can also view Safari's list of website search shortcuts, remove individual websites, or clear the list completely.
4. Pause a Copying File to Resume Later
When you copy a large file or folder to another location in Finder using the Copy and Paste options, a pie chart progress indicator next to the copying item's name gives you an idea of how long the copy will take to complete. If it looks like it's going to take longer than you'd like, you can always pause the copy and resume it later. Here's how it works.
If you stop a copy midway through using the X button, a ghosted version of the file or folder will remain in the destination location. Just click it and you'll be given the option to Finish Copying it, or you can Keep the Resumable Copy and finish the transfer at another time that's more convenient.
5. Quickly Convert Images in Finder
There are many third-party apps available for Mac that will convert images for you, but if you're running macOS Monterey or later, you can convert an image or a selection of images from directly within Finder using a Quick Action.
If you're not familiar with them, Quick Actions help you perform certain tasks, such as creating a PDF or rotating an image, right from the Finder or your desktop, without opening an app. The "Convert Image" Quick Action can quickly convert an image file from one format to another. It also lets you batch convert selections, change the file size, and choose whether to keep the file's metadata in the converted image.
To use the Convert Image Quick Action, select an image file or drag a selection box over several files, then Ctrl-click and select Quick Actions -> Convert Image. In the dialog that appears, choose the desired format (JPEG, PNG, or HEIF) and the output file size (small, medium, large, or actual). Check the box to preserve the original image's metadata in the output image, then click Convert to [Format]. The converted image will be saved in the same folder as the original image, which will remain intact.
6. Open Files From the App Switcher
Most long-time macOS users will be aware of the Application Switcher. It's invoked using the Command-Tab keyboard shortcut, and lists all of the apps currently running on your Mac, enabling you to quickly switch between them.
An oft-overlooked function of the App Switcher is its ability to open files. Simply begin to drag a file from a Finder window, then invoke the App Switcher and drag the file onto the relevant app icon in the overlay. Let go of the file and it should open in the selected app.
Bonus tip: To quit an open app with the App Switcher, highlight the app and tap Q. To quickly quit multiple apps, try cycling through the overlay with the Tab key, tapping Q as you go.
7. Search and Replace Text in Filenames
When you highlight several files in Finder, you can use the Rename... option in the Ctrl-click menu to rename all of them. The Rename dialog also allows you to rename only specific files in a selection whose names include a certain piece of identifying text. This is really handy if you have tens or hundreds of files in a folder with different names and you only want to change those files that contain a particular word.
Select all the files in a folder (make sure they're all of the same kind, or this won't work), then Ctrl-click and select Rename.... Select Replace Text in the first dropdown. Now simply type the identifying text you want to replace into the "Find" field, and enter the text you want to replace it with in the "Replace With" field, then click Rename.
8. Use Text Clippings
In macOS, a Text Clipping is a selection of text that you've dragged from an application to another location on your Mac, where it becomes a unique kind of standalone file. The relatively little-known feature has been around since at least Mac OS 9, and it offers a convenient way to save out pieces of text from pretty much anywhere for later use in another app or document.
To create a Text Clipping, simply highlight any piece of text and drag it with your mouse to your Desktop or an open Finder window. This saves the highlighted text – including any rich text formatting – as a .textclipping file named after the first few words of text that you selected, but you can easily rename it to make it more identifiable.
To use the selected text in another file like a Pages document, drag the Text Clipping into the open document and the text will be automatically pasted wherever the cursor is located. You can paste the clipping in the same way into all sorts of open files and apps, including browser search engines, Mail compose windows, Xcode projects, and more.
9. Copy and Paste Photo Edits
In macOS Ventura, if you have multiple photos that you want to edit in the same way, or if you've made changes to one photo that you want to replicate in another photo, you can use the new copy and paste edits tools in the Photos app.
To use the new option, first open an image, click Edit, then make your changes. When you're done, choose Image -> Copy Edits from the menu bar, then select the image (or images) you want to paste them to. Finally, choose Image -> Paste Edits from the menu bar.
10. Show More Recent Applications in Dock
In macOS, a handy option called Show recent applications in Dock (found in System Settings -> Desktop & Dock) adds a divider to the right-hand side of your Dock and after it displays any apps you recently used that aren't permanently docked. This option only shows the three most recently used apps that have since been closed. What if your workflow would be more efficient if it could show more?
If you're comfortable pasting commands into Terminal, it's perfectly possible to increase or decrease the number of recently opened apps that show in your Dock. Open a Terminal window and paste the following at the command prompt, then press Enter:
defaults write com.apple.dock show-recents -bool true;
defaults write com.apple.dock show-recent-count -int 10;
killall Dock
Note that the -int argument defines the number of recently opened apps that you want to display in the Dock after the divider (10 in this case). You can change the number to suit.
Article Link: 10 macOS Tips to Boost Your Productivity
And what ⌘ + Option + Shift does is paste the new text in copying the style of the text in the document to which you are pasting it.
Cmd-Shift-V doesn't paste anything at all on my Mac. (I have standard English set, and do not appear to haev any shortcuts assigned to Cmd-Shift-V)Paste and match style is slightly different than paste unformatted, which is what Cmd-Shift-V does (but apparently not all languages and not in apps that override the key command).
Super helpful, thanks! I can't find a damn thing in System Settings since the Ventura redesign. I'm sure the old way needed work but at least things seemed to be grouped in some way. Now it seems every bit as random as the one in iOS.This menu will also appear when right clicking on the System Settings app if the app is closed. On pre-Ventura this menu would appear at all times when right clicking.
View attachment 2145372
set plainTEXT to Unicode text of (the clipboard as record)


tell application "System Events" to keystroke plainTEXTCommand-Shift-V <<<OMFG!! How long has this been part of MacOS?!? I could've used this daily for like 25 years!!