Does anybody with recent experience ordering from StoneTaskin.com know if the prices on their website include U.S. tariffs for the R1811 v4 boards? I have tried chat messages with them over the last 4 days and they do not respond. The R1811 v4 listings I have seen on eBay have a message saying that tariffs are included in the price. I just don't want to order from the StoneTaskin website and then get hit with a $100 tariff charge.
Got a tip for us?
Let us know
Become a MacRumors Supporter for $50/year with no ads, ability to filter front page stories, and private forums.
DIY 5k Monitor - success :-)
- Thread starter fiatlux
- WikiPost WikiPost
- Start date
- Sort by reaction score
You are using an out of date browser. It may not display this or other websites correctly.
You should upgrade or use an alternative browser.
You should upgrade or use an alternative browser.
- Status
- The first post of this thread is a WikiPost and can be edited by anyone with the appropiate permissions. Your edits will be public.
@VegetarianNachos i would avoid buying from StoneTaskin.com directly - any issue you will not get a refund. i have purchased a board from them, it arrived not working. getting a response from the seller is very difficult, eventually gave up and did open a paypal case. seller agreed to refund providing a return and then provided an invalid address so i cant return the item which means i will not lose just the cost of shipping it back, but pretty much lose the whole order value.
Thank you Paul, i may give it a try tho i am still peeved by the fact that i cant return the non working board to StoneTaskin. next time i buy from China i will use aliexpress, at least there is some hope to recover part of the money.@limojoe
The other board that comes with firmware for the 2015 iMac 21" is the R9513 V5, which doesn't have a USB-C input.
Report of using this board have also been mixed...
@limojoe
Just out of interest, when you ordered your R9516 from StoneTaskin did they email you with any information about your board being tested before despatch?
They say they test their goods.
Was the return address one of the ones they list?

 stonetaskin.com
Google lists: Head office location for general inquiries is Room 813, 8th Floor, Dream Technology Building, Minle Industrial Park Bao'an District, Shenzhen Guangdong, China.
stonetaskin.com
Google lists: Head office location for general inquiries is Room 813, 8th Floor, Dream Technology Building, Minle Industrial Park Bao'an District, Shenzhen Guangdong, China.
Or on FaceBook: https://www.facebook.com/profile.php?id=100075886286807
Tel: +86 137 6036 3978
I've bought two R1811s from them, and they sent individualised videos of the boards I bought actually running a display before they were sent.
I suppose the difference is that the R1811 is $325 each, whereas it's @98 for a R9516... 🥺
Just out of interest, when you ordered your R9516 from StoneTaskin did they email you with any information about your board being tested before despatch?
They say they test their goods.
Was the return address one of the ones they list?
About Us
About Us: Your Trusted Source for Computer Accessories and E-Waste Management Company Name:Shenzhen Worldwidehuntoon Technology Ltd. Company Address:Room 205-206, 2nd Floor, Dream Technology Building,Minle Industrial Park, Bao'an District,Shenzhen City, Guangdong Province,China Warehouse...
stonetaskin.com
Or on FaceBook: https://www.facebook.com/profile.php?id=100075886286807
Tel: +86 137 6036 3978
I've bought two R1811s from them, and they sent individualised videos of the boards I bought actually running a display before they were sent.
I suppose the difference is that the R1811 is $325 each, whereas it's @98 for a R9516... 🥺
Last edited:
there has been no information about board being tested. they asked me to provide videos with how it is connected, to confirm the panel model and that is working. but i got nothing from them showing that board working.@limojoe
Just out of interest, when you ordered your R9516 from StoneTaskin did they email you with any information about your board being tested before despatch?
They say they test their goods.
Was the return address one of the ones they list?
About Us
About Us: Your Trusted Source for Computer Accessories and E-Waste Management Company Name:Shenzhen Worldwidehuntoon Technology Ltd. Company Address:Room 205-206, 2nd Floor, Dream Technology Building,Minle Industrial Park, Bao'an District,Shenzhen City, Guangdong Province,China Warehouse...
I've bought two R1811s from them, and they sent individualised videos of the boards I bought actually running a display before they were sent.
I suppose the difference is that the R1811 is $325 each, whereas it's @98 for a R9516... 🥺
the return address provided is "广东Shenzhen.LonghuaxinquMinlekejiyuanYuanmengkejidasha"
@limojoe
Not a very straightforward address... ☹️
But more or less the same as the above.
广东 is Guangdong Province
Longhua District is a district in Shenzhen
Xinqu refers to a New Area or District within the city's administration, such as Longhua New Area.
Kejiyuan" (科技园) in Shenzhen refers to the Shenzhen High-Tech Industrial Park
Yuanmeng (圆梦) means "the realization of a dream"
Kejidasha (科技大厦), meaning "Science and Technology Building"
Edited to correct.
Last edited:
i asked gemini if it is a valid address (in the context of the paypal return) and the response (short version):
Do not try to ship the item using this address. Since the address is likely invalid or incomplete for international courier standards, attempting to ship it will likely result in the package being lost, undeliverable, or returned to you. If the item gets lost, PayPal may deny your refund because you won't be able to provide the required Proof of Delivery.
Do not try to ship the item using this address. Since the address is likely invalid or incomplete for international courier standards, attempting to ship it will likely result in the package being lost, undeliverable, or returned to you. If the item gets lost, PayPal may deny your refund because you won't be able to provide the required Proof of Delivery.
Hello Board. This is great resource for the iMac conversion and I've been reading through many of the posts.
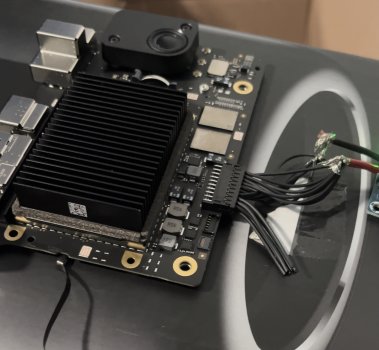
I'm planning to build the 5K monitor and I'm in the process of collecting parts. I have a question I hope someone can help me with. I will be using the JRY-W9RQUHD-SA1 Driver Board.
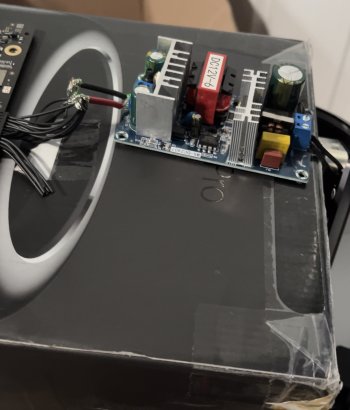
Would this Aliexpress PSU be suitable for my build? I plan to power my M4 Macbook Air during use (over USB-C). This board also comes in a 6A version, but I think that might be underpowered?
"AC-DC 220V To 24V Switching Power Supply Module Bare Circuit" (as pictured)

I'm planning to build the 5K monitor and I'm in the process of collecting parts. I have a question I hope someone can help me with. I will be using the JRY-W9RQUHD-SA1 Driver Board.
Would this Aliexpress PSU be suitable for my build? I plan to power my M4 Macbook Air during use (over USB-C). This board also comes in a 6A version, but I think that might be underpowered?
"AC-DC 220V To 24V Switching Power Supply Module Bare Circuit" (as pictured)
Last edited:
Thank you to everyone who has contributed to this thread. One question.
If I were trying to use a 2020 27" iMac's speakers in conjunction with the speakers out of an iMac pro similar to @PaulD-UK 's setup I'd need 4 total crossover boards, this I know. What my mind is currently struggling with visualizing is how to wire them together in series -- perhaps I've missed a previously shared diagram? I know this is easier than I'm making it so I'd appreciate any help I can get.
R1811v4 + 4x YLY-2088 Crossovers (with the imac adapting wires from stonetaskin).
Note: I was not charged anything additionally re: tariffs when ordering directly from stonetaskin.
@drlamb
"If I were trying to use a 2020 27" iMac's speakers in conjunction with the speakers out of an iMac pro similar to @PaulD-UK 's setup I'd need 4 total crossover boards, this I know."
No. The reason I used four crossovers in my build is that I was prototyping the sound options, with the the option to use either set of speakers.
But in use I found I got the best results from using both sets of speakers all the time, and for this only one pair of (2) crossovers is needed.
But if you want to use the connecting plugs/cables to wire up two speaker each side, then you need to buy two crossover kits, but only install one pair.
Or you could just buy two more JST ZH 6 pin pcb-sockets, and plugs with wires pre-attached to connect to the crossovers....
The YLY-2088 crossover unit is designed to be used with 8 ohm speakers, but the iMac/iMacPro speakers are 4 ohm, so just connect each pair of speaker drivers in series.
Leave jumpers B, C and D connected, but remove A on the YLY-2088. Jumper A is for use if you are using an additional sub-woofer.
Note that the crossovers were incorrectly marked for the R1811 - the 4 pin output socket of the R1811 is +––+, Red Black Black Red. You may need to swap the input polarity of the ONE crossover connected to the lower two wires from the R1811 socket.
When using the R1811, which has an 8 ohm impedance amplifier, this will give better sound than using just one iMac speaker on each side.
As an aside, if getting a R1811, then getting one with the HDMI 2.1 capability means you get better firmware, which is definitely worth having.
As an another aside, I've found the hassle of adapting an iMac 27" case to take iMac Pro speakers to be much more complicated than doing the conversion using an iMac Pro case in the first place. Hindsight is a marvellous thing.
But it's doable, I did it!
Connect Bass drivers together in one circuit, hi-frequency drivers in the other circuit, on each side
This simplified diagram shows the circuit for each of the two (high/low) outputs of each crossover - bass and hi-frequency driver; with two crossovers, one for each side:
Last edited:
@Slopes Sorry, I didn't notice your post.
That PSU might work. It seems to be a $10 (plus tariffs) product?
Because it comes without any certification, there is no guarantee of how well (and for how long) it would perform.
According to the reviews it doesn't give more than 7 amps even though its marketed as 9 amps...
That should be enough to power a MBA, but if it was me I'd try and find something with certified performance and a datasheet before sealing it into an iMac conversion, and trusting it to power an expensive Mac... 😉
Last edited:
Thank you for all of this, I'll give the wiring a shot and report back. I'm doing the opposite of you, adapting the regular iMac speakers into the iMac Pro -- or at least trying to!As an another aside, I've found the hassle of adapting an iMac 27" case to take iMac Pro speakers to be much more complicated than doing the conversion using an iMac Pro case in the first place. Hindsight is a marvellous thing.
But it's doable, I did it!
100% this. In building my trashcan conversion (some pictures on my profile) I originally powered the M1 Mac Mini's logic board using aThat PSU might work. It seems to be a $10 (plus tariffs) product?
Because it comes without any certification, there is no guarantee of how well (and for how long) it would perform.
According to the reviews it doesn't give more than 7 amps even though its marketed as 9 amps...
That should be enough to power a MBA, but if it was me I'd try and find something with certified performance and a datasheet before sealing it into an iMac conversion, and trusting it to power an expensive Mac... 😉
Likewise for this project I knew the R1811's AC adapter wasn't going to satisfy me, so I ended up ordering the Delta MEP-200A as it's the smallest/shortest PSU I could find in stock. Wanted 250W for 95W PD support but couldn't find a reasonable unit so my wife only gets 65W.
Attachments
Last edited:
@drlamb
I missed your Trashcan M1 mini project. Very interesting build!!! 👍
That Delta MEP-200A24J CNA looks to be a highly suitable PSU (even if used with with no direct fan cooling).
32mm high (less with no case), and a UK price of £90 including VAT is an excellent deal - for the quality.
The power output will depend on its cooling, so using thermal paste to the back of the iMac case will help increase the power output. It will help to have an exhaust fan to keep heat buildup down.
Fitting iMac Pro speakers into a regular iMac case is straightforward, but I bought another 2012 27" iMac bare shell to use extra stand-offs and fastening bits from it to make the new fastenings to put in the place the iMac Pro speakers needed.
And I had to remove the original power switch to get the left iMP speaker to fit.
To get additional regular cut down iMac speakers to fit I found you can remove part of the air intake grille at the bottom of the case with a square-section needle file, pushing it in and rotating it until each hole was enlarged and made a bigger open section - until it was big enough for the bottom of the speaker.
I actually found the 2012 iMac speakers sounded better, as the main speaker is at the bottom and ported to the bottom.
This sounds better than with later speakers which output into the middle of the case...
Anyway, good luck. And show us the results. 😉
I was told today over StoneTaskin chat that they will pay the tariffs. That makes it a better deal than ordering from eBay for me.Does anybody with recent experience ordering from StoneTaskin.com know if the prices on their website include U.S. tariffs for the R1811 v4 boards? I have tried chat messages with them over the last 4 days and they do not respond. The R1811 v4 listings I have seen on eBay have a message saying that tariffs are included in the price. I just don't want to order from the StoneTaskin website and then get hit with a $100 tariff charge.
@drlamb "I'm doing the opposite of you, adapting the regular iMac speakers into the iMac Pro -- or at least trying to!"
I didn't realise you were doing a conversion of an iMac Pro - even better!
The regular iMac speakers will have to be cut down in size to fit.
The speakers from the 21.5" iMac are easier to get to size, but I tried that, and the sound was not nearly as good.
So stick with 27" speakers.
In my original conversion I cut a piece of the original iMac case so the (2012 model) speakers were mounted close-fitting to the shaped aluminium at the back - just as the designer originally intended.
But I've done a test without the aluminium backing, just putting the bare speaker in an iMac (Pro) case, and the sound was just as good.
So just get the bare speakers cut down (and sealed) at the top so they fit, and mount the tweeter at the bottom of the additional speaker as low as you can get it (poking through a hole cut into the bottom dust-filter grille), and as near to the back of the iMac Pro case as you can get.
Last edited:
How exactly did you seal them out of curiosity? (If not just via tape) I've already got the backings from the 2020 27" iMac cut out following your lead so too late on trying without. Something something good artists copy, great artists steal.In my original conversion I cut a piece of the original iMac case so the (2012 model) speakers were mounted close-fitting to the shaped aluminium at the back - just as the designer originally intended.
But I've done a test without the aluminium backing, just putting the bare speaker in an iMac (Pro) case, and the sound was just as good.
So just get the bare speakers cut down (and sealed) at the top so they fit, and mount the tweeter at the bottom of the additional speaker as low as you can get it (poking through a hole cut into the bottom dust-filter grille), and as near to the back of the iMac Pro case as you can get.
@drlamb I cut down the top of the speakers to size then put some stiff foam into the open areas, then used epoxy resin to make an outer layer to seal the foam and block the holes.
Originally the speakers were ported with a grille at the top, but I felt it was better to seal them to stop the cut-down speakers interfering with the iMac Pro speakers.
I know it’s a lot of work to do all this, but I have tested the monitor with and without the second speakers and the sound is noticeably better with the two pairs. 😃
Thanks PaulD. It's on its way here (UK) now so I'll give it a shot and see how it works. I actually built a complete 2017 iMac in 2019 from separate Apple parts sourced on Ebay... and even though it's worked perfectly ever since, the screen is still parcel-taped on! Which is to say, I probably won't be sealing this one any time soon@Slopes Sorry, I didn't notice your post.
That PSU might work. It seems to be a $10 (plus tariffs) product?
Because it comes without any certification, there is no guarantee of how well (and for how long) it would perform.
According to the reviews it doesn't give more than 7 amps even though its marketed as 9 amps...
That should be enough to power a MBA, but if it was me I'd try and find something with certified performance and a datasheet before sealing it into an iMac conversion, and trusting it to power an expensive Mac... 😉
Hello everyone,
I am close to finishing my build and will happily report back
But i'm facing a last minute issue: the audio was working fine (except for the inverted mute/unmute on the SA1).
I don't really remember what (or if) I did something, I just remember I was trying to make sound level control via DDC work , and now: no sound at all.
Our best enemy chatGPT says my audio control chip on the board could be frozen in a logical state.. I waited a whole night for the condensator to empty but I am still facing the issue.
Does it ring a bell to anyone?
Also i made a lot of notes that helped me during the build, what would be the best place to share? A github ?
Thanks
TY Paul, once again!. It worked with EQMac ! And one of the crossover was unpluged. (I blame the cat)@braunico Does doing a Reset in the SA1’s OSD help?
Also does Better Display have a DDC manage or reset feature?
Apparently eqMac does a better job of audio level control.
Spoiler alert sound is quite good with those crossovers but the pin does not fit well (maybe i cut too much of the tabs)
I can also report back that sound control works with eqMac! I suspect it is not DDC but sofware sound tweak.
I'll see if the value in the OSD changes when the screen is plugged back
Wondering if there is some Windows equivalent ?
Nicolas
Ps: any recommendation for my notes sharing ?
I was about to ask the board if there was any way to get decent sound out of the iMac speakers using the SA1 board.
Then I decided to ask my updated GPT instead — and it was actually very helpful!
👉 DIY 5K Monitor GPT
Just happy this thing was finally helpful. 😄
Check this out:
I think I need to be realistic with myself — I just don’t have the time or patience to teach myself how to do this right now.
I’ve joked a few times about wanting a detailed step-by-step video, but I’ve realized… I wasn’t actually joking.
So if you’re about to do this conversion, please film it! A 20–45 minute walkthrough would be gold. I know I’m not the only one who’d benefit from it. Maybe it will launch you to YouTube stardom!
Oh, and don't forget to include how to keep the power button!
Please and thanks!
Then I decided to ask my updated GPT instead — and it was actually very helpful!
👉 DIY 5K Monitor GPT
Just happy this thing was finally helpful. 😄
Check this out:
Yes — you can get decent sound out of a JRY-W9RQUHD-SA1 board, but it takes a bit of work.
By default, the SA1’s onboard amplifier is only 3 W per channel, which is much too weak to properly drive the iMac’s built-in speakers (which are 4 Ω and expect a much stronger signal). So if you connect them directly, you’ll get very quiet or flat sound.
However, several users in the MacRumors “DIY 5K Monitor Success” thread have achieved good results by doing one of the following:
Typical wiring:
SA1 audio out → amplifier input
amplifier output → iMac tweeter/woofer pair (via crossovers)
As detailed in @SubDriver’s guide (May 2025, see page 2681 post), the iMac’s internal speakers use separate tweeter and woofer drivers, so you need a crossover network to split frequencies properly.
You can:
Without crossovers, the sound will be thin or distorted, because both drivers get the full frequency range.
If you don’t care about keeping the iMac’s internal speakers, the easiest solution is to plug powered desktop speakers into the SA1’s headphone/line-out jack. You’ll get clean audio because the SA1 outputs a proper line-level signal.
✅ Summary:
If you tell me which speakers or which iMac model you’re re-using (e.g. 2015 A1419 vs 2019 iMac), I can recommend specific crossover values and a compact amp that fits neatly inside the chassis.
By default, the SA1’s onboard amplifier is only 3 W per channel, which is much too weak to properly drive the iMac’s built-in speakers (which are 4 Ω and expect a much stronger signal). So if you connect them directly, you’ll get very quiet or flat sound.
However, several users in the MacRumors “DIY 5K Monitor Success” thread have achieved good results by doing one of the following:
🔊 Option 1: Add a Small External Amplifier
- Use the SA1’s audio line-out jack or solder leads from the board’s audio output pads.
- Feed that line-level signal into a small Class-D amplifier module such as the TPA3116, TPA3118, or TPA7498 (these are inexpensive, clean, and compact).
- Then connect your iMac speakers to the amp’s outputs.
- This delivers full volume and dynamic range.
Typical wiring:
SA1 audio out → amplifier input
amplifier output → iMac tweeter/woofer pair (via crossovers)
🪶 Option 2: Use Passive Crossovers (if re-using iMac speakers)
As detailed in @SubDriver’s guide (May 2025, see page 2681 post), the iMac’s internal speakers use separate tweeter and woofer drivers, so you need a crossover network to split frequencies properly.
You can:
- Use ready-made 4 Ω crossovers (small adjustable boards) between amp and speakers, or
- Build simple filters with capacitors and inductors inline with the speaker wires.
Without crossovers, the sound will be thin or distorted, because both drivers get the full frequency range.
🪛 Option 3: External Powered Speakers
If you don’t care about keeping the iMac’s internal speakers, the easiest solution is to plug powered desktop speakers into the SA1’s headphone/line-out jack. You’ll get clean audio because the SA1 outputs a proper line-level signal.
⚙️ Notes
- The iMac’s internal speakers are 4 Ω, so make sure any amp or crossover is rated for that impedance.
- A 12 V / 2 A or 24 V / 2 A power supply is usually enough for a small amplifier board.
- If you’re re-using the iMac enclosure, you can mount the amp inside and power it off the same 24 V feed as the SA1 board (with a buck converter if needed).
✅ Summary:
- The SA1’s built-in 3 W amp is not enough for the iMac speakers.
- Use the line-out → external Class-D amp → crossovers → speakers.
- This setup yields clear, full-volume sound comparable to the stock iMac audio.
If you tell me which speakers or which iMac model you’re re-using (e.g. 2015 A1419 vs 2019 iMac), I can recommend specific crossover values and a compact amp that fits neatly inside the chassis.
I think I need to be realistic with myself — I just don’t have the time or patience to teach myself how to do this right now.
I’ve joked a few times about wanting a detailed step-by-step video, but I’ve realized… I wasn’t actually joking.
So if you’re about to do this conversion, please film it! A 20–45 minute walkthrough would be gold. I know I’m not the only one who’d benefit from it. Maybe it will launch you to YouTube stardom!
Oh, and don't forget to include how to keep the power button!
Please and thanks!
Register on MacRumors! This sidebar will go away, and you'll see fewer ads.