Become a MacRumors Supporter for $50/year with no ads, ability to filter front page stories, and private forums.

toru173

macrumors 6502
Original poster
Apr 5, 2007
318
137
Edit: See this later post for a better solution.

I've been able to get Mojave to install on to a RAID array of 4x 8GB USB sticks!

Screen Shot 2018-06-27 at 3.34.43 AM.png Screen Shot 2018-06-27 at 3.36.30 AM.png
The process is as follows:

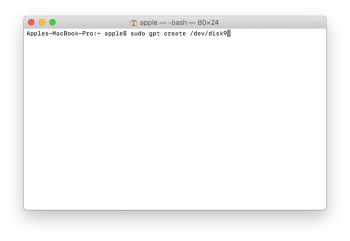
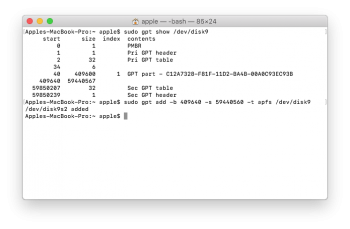
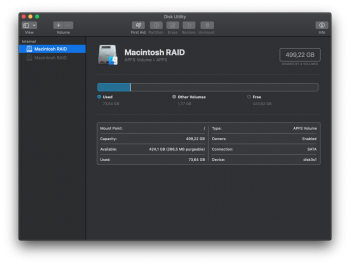
- Create RAID set using command line or disk utility. Format to HFS+
- Mount InstallESD from /path/to/beta/app/Contents/SharedSupport
- Double Click on Packages/OSInstall.mpkg. Select the RAID array as target
- The install will fail with an error, but don't worry:
Code:
system_installd[465]: kextcache: /Volumes/Macintosh RAID: unrecognized /usr/standalone/bootcaches.plist; aborting
-
Code:
cp -ap /Volumes/Macintosh\ RAID/usr/standalone/i386/boot.efi /Volumes/RAID/System/Library/CoreServices/
- Use
Code:
diskutil info /Volumes/Macintosh\ RAID
to find the volume UUID and the booter volume:
Screen Shot 2018-06-27 at 3.38.59 AM.png Screen Shot 2018-06-27 at 3.39.36 AM.png
- Populate the booter volume using the above. Make sure to edit com.apple.boot.plist:
Screen Shot 2018-06-27 at 3.40.51 AM.png Screen Shot 2018-06-27 at 5.05.55 AM.png
- Reboot, and enjoy!

Mine rebooted twice before it flicked through, but after that, no issues. I wasn't able to bless the volume, but I was able to choose it from the boot manager.

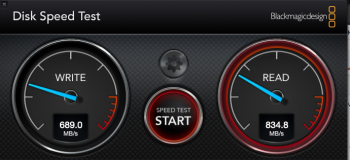
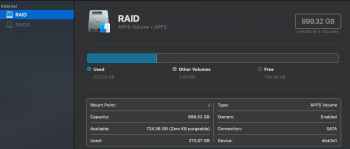
Performance of array:
Screen Shot 2018-06-27 at 5.22.37 AM.png
One disk:
Screen Shot 2018-06-27 at 4.37.08 AM.png
Four disks in RAID:
Screen Shot 2018-06-27 at 3.59.39 AM.png
What I've learned: BUY BETTER USB STICKS!

Now I just need to work on the installer process. If I can do that from the command time and update an existing install, I'll be happy.

This was only testing with HFS+ and Mojave, but it should work with APFS and High Sierra with some tweaking.
 
Last edited:

toru173

macrumors 6502
Original poster
Apr 5, 2007
318
137
Ok, I have a much faster install method. As I don't care about hiding things or marking them read only, I am not running any of the post-install scripts either.

- Format target destination as HFS+ (for now). Ensure "Ignore Ownership" is DISABLED
Code:
- sudo su
- pkgutil --expand-full /Volumes/InstallESD/Packages/Core.pkg /Volumes/macOS\ Mojave\ Beta/macOS\ Install\ Data
- Wait some time n_n
- /Volumes/OS\ X\ Base\ System/System/Library/PrivateFrameworks/PackageKit.framework/Versions/A/Resources/shove -sH /Volumes/macOS\ Mojave\ Beta/macOS\ Install\ Data/Payload /Volumes/macOS\ Mojave\ Beta
- cp -ap /Volumes/macOS\ Mojave\ Beta/usr/standalone/i386/boot.efi /Volumes/macOS\ Mojave\ Beta/System/Library/CoreServices/
- systemsetup -setstartupdisk /Volumes/macOS\ Mojave\ Beta
- Reboot!

The only quirk I've seen is the time shifting Mojave wallpaper is not present as it's not in the Core.pkg archive. Again, a particular wallpaper isn't my goal so I didn't care too much.

I've successfully installed to an APFS RAID using the above and I can boot to single user mode, then it gets stuck in a boot loop attempting to update the kernel cache. The single power off event I saw last time was ALSO due to it updating the cache, but the first time it was successful.

More work to do! I hope my quick and dirty install method can offer some assistance to other installers as you are only offline for the 2 minutes it takes to do the reboot and configure the new OS, not the 30-45 minutes waiting for the OS to install.
 

Fishrrman

macrumors Penryn
Feb 20, 2009
28,346
12,461
What do you have the USB flashdrives -mounted in-?

Just plugged into the back?
 

toru173

macrumors 6502
Original poster
Apr 5, 2007
318
137
What do you have the USB flashdrives -mounted in-?

Just plugged into the back?

I used a cheap 4 port hub. It’s USB 3, but older. I think I recall it reporting as a VIA chipset. Th test of one drive was with it plugged straight in.
 

toru173

macrumors 6502
Original poster
Apr 5, 2007
318
137
I just tried to do an upgrade from El Capitan (JHFS+) to High Sierra using the method outlined in post one. It took nearly 14 hours with the shove command reporting changed permissions on most of the items in root, then I was unable to boot the array due to what looked like permissions errors. I was previously able to upgrade to Sierra with no issue, but in that case used the current Sierra app downloaded from the App Store in the supported way. I’ll try again, but from Sierra to High Sierra this time and report back.

What looks to be the case so far is that a clean install boots fine, an upgrade has issues. That’s not too much an problem with good backups, but does mean the method I’m outlining is little different from creating an image of the array, upgrading the image then restoring it to the array again.
 

toru173

macrumors 6502
Original poster
Apr 5, 2007
318
137
Ok, I’m beginning to think the issues I had upgrading to High Sierra are hardware related.

I deleted the array, formatted the disks as ‘free space’ then rebuilt the array and re-installed El Capitan. I just updated El Capitan to Sierra (using the App Store app, as before) and this time it took nearly 5 hours, and wouldn’t boot on first attempt. Previously it only took 45 minutes to an hour. Second attempt booted after several minutes, and each /dev/diskXsY in the array reported an “alignment error.” Performance is worse than it was previously.

Quick research doesn’t show many results for this error, apart from failing disks; however, disk utility reports the array as healthy and passed a first aid run. As I’ve subjected these cheap USB sticks to multiple whole-disk writes over the past week I wouldn’t be surprised if I’ve killed them! I’m going To press on with the update, and zero the disks if it run in to any more troubles.
 

toru173

macrumors 6502
Original poster
Apr 5, 2007
318
137
More experiments! I got the long install (14 hours) and permissions issues (many apps crashing with "too many corpses") when upgrading Sierra to High Sierra again. Before I rebooted, though, I noticed that "Ignore ownership on this volume" had re-ticked itself. I'm trying a clean install of High Sierra now just to make sure I can boot it.

As this thread is devolving in to me reporting on my progress with various configurations, I might stop responding for a bit and report back if I have any major successes.
 

iamtheonlyone4ever

Suspended
May 27, 2016
334
174
well I can easily boot Mojave in RAID0 using HFS+ but I took it one step further
I was able to boot Mojave in RAID0 using APFS
there are 2 ways
you can run the installer to install it directly to the RAID Volume
but it will fail with the following error

could not create a Preboot volume for APFS install

well there is a way to bypass that error using some terminals commands
then you will be able to copy Mojave Installer directly to the Raid0
to then run the installation process
but then the installation will fail at the very end with the following error

Mac OS could not be installed in your computer
running bless to place boot files failed

even after receiving that error you still be will be able to boot the raid volume
but you have to mount the volume manually in order to do that you have to boot with -s
and run 2 commands

but I don't do it that way

the way I do it in order to simplify everything
I use the latest beta version of Carbon Copy Cloner that has Mojave support

install Mojave to a single non RAID drive
create the RAID Volume using Disk Utility and select APFS
then clone Mojave single drive to the RAID Volume using Carbon Copy Cloner
after you finished the cloning process restart your Mac and then
select the RAID0 that you want to boot from

but here is the trick
you need to have SIP enable
boot with -v -s
mount the Raid0 Volume manually
/sbin/mount -uw /
hit enter or return
touch /System/Library/Extensions/
now type
exit
hit enter or return
now it will boot

this just shows that is possible. I personally don't like to have to mount the drive manually etc
but I did it just for learning purposes and to find out if it can be done
but since we are not supposed to use RAID0+APFS yet then drive can't be bless
and the only way to make the RAID drive boot is by manually mounting the drive

another important fact is that the iMac Pro has a T2 chip
that supposedly is responsible for making the iMac Pro boot with RAID+APFS
but this is unconfirmed

I just hope apple add APFS support for RAID the same way they did with Fusion drivers and Mechanical drives
soft raid is working to add APFS support for the next version of softraid V6
[doublepost=1530575656][/doublepost]if you are going to try with usb sticks
get usb 3.0 or usb 3.1 drives to speed things up
those drives that you are using with that speed it will take for ever

I have 4 samsung 970 Pro hitting 12,000 read and 9,000 Write
 
Last edited:

toru173

macrumors 6502
Original poster
Apr 5, 2007
318
137
Hi iamtheonlyone4ever, welcome and thank you for your input!

A few points:

you can run the installer to install it directly to the RAID Volume
but it will fail with the following error

could not create a Preboot volume for APFS install

I encountered this error as well. I've been stuck trying to get an 'upgrade' install to work, but I think I might abandon that path and concentrate on an easy way to get APFS RAID working.

well there is a way to bypass that error using some terminals commands
then you will be able to copy Mojave Installer directly to the Raid0
to then run the installation process
but then the installation will fail at the very end with the following error

Mac OS could not be installed in your computer
running bless to place boot files failed

Could you tell me what terminal commands you used to bypass the error? I'm keen to learn as much as possible about the boot and installation process, and this is helping me.

but here is the trick
you need to have SIP enable
boot with -v -s
mount the Raid0 Volume manually
/sbin/mount -uw /
hit enter or return
touch /System/Library/Extensions/
now type
exit
hit enter or return
now it will boot

That looks like you are manually triggering a rebuild of the kernel cache each boot. I know what I tried to get APFS on RAID working, it would boot loop attempting to rebuild the cache. That could be a valid workaround! What did it do if you tried to let it boot normally?

another important fact is that the iMac Pro has a T2 chip
that supposedly is responsible for making the iMac Pro boot with RAID+APFS
but this is unconfirmed

I thought the iMac Pro had hardware RAID? IE, didn't use Apple's RAID software, so didn't have these problems?

I have 4 samsung 970 Pro hitting 12,000 read and 9,000 Write

Very impressive speeds! That's what I'm aiming for, but I'm proof-of-concepting on my MacBook for portability.
 
  • Like
Reactions: iamtheonlyone4ever

iamtheonlyone4ever

Suspended
May 27, 2016
334
174
is much better to clone a drive, you can also use a usb "stick" but if the usb is 2.0 is going to be very slow
I have 2 usb 3.1 and I use one of them for beta testing
so you can easily install Mojave on a usb stick, boot from the usb stick
then clone the stick to a raid array
that is if you don't have any more spare drives around

is a bit complicated to explain and my English is not 100% but I will try my best
the problem with dumping the installer to the raid is
that you need to get the right disk # and if you make a mistake it can lead to data loss
so is much better to clone the drive so you can skip many steps
those steps are just necessary if you want to run the installer from the raid array
but there are not necessary if you clone a single drive to the raid volume

what you mentioned about the reboot loop I also had that problem but I solved by doing the last step
simply install Mojave on a single drive, boot from that Mojave drive
download the last beta version of Carbon Copy Cloner
create the raid using disk utility and choose APFS
now clone the single drive to the APFS+RAID
now boot your Mac and choose the APFS+RAID
but remember to boot with -v -s
then do this and it will boot to the desktop

mount the Raid0 Volume manually
/sbin/mount -uw /
hit enter or return
touch /System/Library/Extensions/
now type
exit
hit enter or return
now it will boot

I can tell you the other way but is a bit risky
I can still write it if you want me to
the method works but if you enter a wrong disk #
you might have to start all over again

I will only recommend you to try it but only if you have another disk that you can use as an emergency bootable backup
I don't want to delete your bootable system by mistake
is all up to you
you can try it just for learning purposes
but I suggest that you try the simple method first
and if it works for you then I tell you how to do it using the installer
I think is better like that so you don't waste your time
doing it using the installer is a longer method and a bit harder
do the easy way first and if it works then you can do the other method
is not that is hard is just that it requires a few more steps
if you avoid the extra steps everything will be more secure, easier and faster
 

toru173

macrumors 6502
Original poster
Apr 5, 2007
318
137
I can tell you the other way but is a bit risky
I can still write it if you want me to
the method works but if you enter a wrong disk #
you might have to start all over again

I will only recommend you to try it but only if you have another disk that you can use as an emergency bootable backup
I don't want to delete your bootable system by mistake
is all up to you
you can try it just for learning purposes
but I suggest that you try the simple method first
and if it works for you then I tell you how to do it using the installer
I think is better like that so you don't waste your time
doing it using the installer is a longer method and a bit harder
do the easy way first and if it works then you can do the other method
is not that is hard is just that it requires a few more steps
if you avoid the extra steps everything will be more secure, easier and faster
I have a time machine backup, multiple bootable copies, an image of all installers from 10.2 through 10.14, my critical info in iCloud and my 20TB storage array. I’m not too worried about losing data except to bit rot! Please share your method, even if you just type the terminal commands like your previous posts.
 
  • Like
Reactions: iamtheonlyone4ever

iamtheonlyone4ever

Suspended
May 27, 2016
334
174
good to know that
the problem was that I got mix up with another post about the same thing
RAID+APFS
and I thought I was writing to another user
but after reading your first post, I see you done your homework
I know you are not going to have hard time with the terminal commands
is obvious that you already know about terminal commands

now that I noticed about the mix and how much you know
I'm not worry anymore
maybe if we can some how mix our methods we can come out with something even better
I will write it down later today and post it

can you at least try the backup method
because if the backup method works then this method is going to work too
the only difference between the two
is that the 1st one is for the installer and the 2nd one is just the final step of the installer method
but they will both end the same way
but using the backup method will skip many steps making everything easier

but I think is better to try the backup method just to test if it works for you
then we know for sure that the 1st method is going to work too
I just don't want you to go through the whole process if is not going to work
I don't want you to waste your time

anyway
I will write it down to see how can I explain so you can understand me
be back later

please do the clone method and tell me the results
 
Last edited:

iccb

macrumors member
Dec 27, 2009
44
8
Finland
I have mac mini with 2 500GB ssd. They are in RAID 0 setup, hfs+ filesystem. Macos Sierra is in use now. Just wondering can I upate to Mojave when it is released? Have anyone tryet to upgrade RAID system?
 

toru173

macrumors 6502
Original poster
Apr 5, 2007
318
137
I have mac mini with 2 500GB ssd. They are in RAID 0 setup, hfs+ filesystem. Macos Sierra is in use now. Just wondering can I upate to Mojave when it is released? Have anyone tryet to upgrade RAID system?

All my attempts to upgrade the system in place were unsuccessful. However, you can either do a time machine backup, clean install on RAID (as detailed here and elsewhere) and restore, or image the system to an external drive, perform the update there, and image it back. Both take an excessive amount of time for large arrays, I'm afraid!

I'd love to know if anyone else is working on this. I've only got my small array of 4x 8GB USB sticks with terrible read/write performance, so iteration is slow. It sometimes takes 30-40 hours to attempt an update!
 
  • Like
Reactions: iccb

Conway

macrumors member
May 6, 2009
41
1
Screen Shot 2018-09-27 at 11.10.33 AM.png
is much better to clone a drive, you can also use a usb "stick" but if the usb is 2.0 is going to be very slow
I have 2 usb 3.1 and I use one of them for beta testing
so you can easily install Mojave on a usb stick, boot from the usb stick
then clone the stick to a raid array
that is if you don't have any more spare drives around

is a bit complicated to explain and my English is not 100% but I will try my best
the problem with dumping the installer to the raid is
that you need to get the right disk # and if you make a mistake it can lead to data loss
so is much better to clone the drive so you can skip many steps
those steps are just necessary if you want to run the installer from the raid array
but there are not necessary if you clone a single drive to the raid volume

what you mentioned about the reboot loop I also had that problem but I solved by doing the last step
simply install Mojave on a single drive, boot from that Mojave drive
download the last beta version of Carbon Copy Cloner
create the raid using disk utility and choose APFS
now clone the single drive to the APFS+RAID
now boot your Mac and choose the APFS+RAID
but remember to boot with -v -s
then do this and it will boot to the desktop

mount the Raid0 Volume manually
/sbin/mount -uw /
hit enter or return
touch /System/Library/Extensions/
now type
exit
hit enter or return
now it will boot

I can tell you the other way but is a bit risky
I can still write it if you want me to
the method works but if you enter a wrong disk #
you might have to start all over again

I will only recommend you to try it but only if you have another disk that you can use as an emergency bootable backup
I don't want to delete your bootable system by mistake
is all up to you
you can try it just for learning purposes
but I suggest that you try the simple method first
and if it works for you then I tell you how to do it using the installer
I think is better like that so you don't waste your time
doing it using the installer is a longer method and a bit harder
do the easy way first and if it works then you can do the other method
is not that is hard is just that it requires a few more steps
if you avoid the extra steps everything will be more secure, easier and faster


I just wanted to confirm this method does work and thank you for posting!

2012 MacBook Pro non retina with dual Samsung SSDs 250gb each with raid 0 and Mojave

(not sure if this is slow or fast but in case anyone is wondering)
 
Last edited:

toru173

macrumors 6502
Original poster
Apr 5, 2007
318
137
good to know that
the problem was that I got mix up with another post about the same thing
RAID+APFS
and I thought I was writing to another user
but after reading your first post, I see you done your homework
I know you are not going to have hard time with the terminal commands
is obvious that you already know about terminal commands

now that I noticed about the mix and how much you know
I'm not worry anymore
maybe if we can some how mix our methods we can come out with something even better
I will write it down later today and post it

can you at least try the backup method
because if the backup method works then this method is going to work too
the only difference between the two
is that the 1st one is for the installer and the 2nd one is just the final step of the installer method
but they will both end the same way
but using the backup method will skip many steps making everything easier

but I think is better to try the backup method just to test if it works for you
then we know for sure that the 1st method is going to work too
I just don't want you to go through the whole process if is not going to work
I don't want you to waste your time

anyway
I will write it down to see how can I explain so you can understand me
be back later

please do the clone method and tell me the results

I’ve been able to get the installer to place the boot files and run through the whole install with no issue following the creation of a GPT, as per the InsanelyMac thread. everything works fine for HFS+, but APFS fails with an error similar to “cannot bless to place boot files”

I’ve tried touching /System/Library/Extensions, but I get a heap of invalid signature errors unless I disable SIP. Same issue if I try to update the kextcache manually. In any case, I get an error indicating com.apple.boot.plist, SystemVersion.plist, PlatformSupport.plist and some other files are not cached. The system then attempts to update the HFS+ “Boot OS X” partitions on the RAID then reboots.

I even tried converting the booster partitions to APFS containers with a single Preboot partition, but no luck.

For those that managed to get Mojave (or High Sierra) booting on an APFS RAID, exactly what procedure did you follow, what am I missing?

And is it possible to springboard a preboot from one container to another? My research appears to indicate that the Preboot volume will only boot stuff in the same container, not on a different container or physical disk.
 

toru173

macrumors 6502
Original poster
Apr 5, 2007
318
137
I’ve got it! I was reading the man page for kextcache (x-man-page://kextcache - you have to copy and paste as Macrumors does not seem to support the x-man-page URL format) and I found the following:

-U is used during system startup to check whether the cache from which the currently-running kernel was loaded is out of date. System startup interprets an EX_OSFILE exit code to mean that the system should be immediately rebooted off the newer kernel cache.

This sounds very much like the symptoms we are seeing. Kextcache is stuck in a loop attempting to update prelinkedkernel, but for some reason not actually updating it. However, also in the man page:

If kextcache cannot find or make sense of os_volume/usr/standalone/bootcaches.plist the volume is treated as if no caches need updating: success is returned.

Aha!

So what do we do? Allow a single reboot cycle to update the caches. Next, boot to single user (command-s at boot) then:

Code:
mount -uw /
mv /usr/standalone/bootcaches.plist /usr/standalone/bootcaches.bkp

Et Volià! A bootable RAID with a single APFS container with Data, Preboot, Recovery and VM volumes. Updates are found and downloaded correctly, applying the first one now. Screenshots to follow!

EDIT: Update was successful. Renamed bootcaches.bkp back to bootcaches.plist, and away she went! Had to name it back at boot, but it updated from Mojave DP1 to Mojave 10.14.0 with no issue. The only thing I needed to do was delete the downloaded Mojave app in /Applications
 
Last edited:
  • Like
Reactions: webg3

toru173

macrumors 6502
Original poster
Apr 5, 2007
318
137
Method:

(From Recovery, Installer USB, or another operating system):
- Create the RAID either through the GUI or terminal
- Edit the GPT of the newly mounted volume. Add an EFI partition and an HFS+ or APFS partition as required (thanks Taruga)
- Format the partition
- Mount the formatted volume
- Perform install as normal
- With APFS, expect an error towards the end of the install saying "Running bless to place boot files failed."
- Restart in single user mode. Mount root.
- Rename /usr/standalone/bootcaches.plist
- Reboot and enjoy macOS on RAID

Note that the process can also be applied to High Sierra, but because High Sierra will not auto-convert the array you retain a bootable HFS+ RAID install with correctly populated booter partitions. The booter partitions will populate for an APFS RAID as well, but the kextcache update gets you stuck in a boot loop.

Pictures!

- Create the RAID either through the GUI or terminal:
Code:
diskutil ar create stripe Macintosh\ RAID free /dev/disk5 /dev/disk6 /dev/disk7 /dev/disk8
Screen Shot 2018-10-08 at 11.53.20 pm.png

- Edit the GPT. I made mine with a few padder blocks to match what I saw with Apple's layout. Your start block (-b) and size (-s) values will be different. I had to keep unmounting the disk between each added entry.

Code:
gpt create /dev/disk9
gpt add -b 40 -s 409600 -i 1 -t efi /dev/disk9
gpt add -b 409640 -s 59440560 -i 2 -t apfs /dev/disk9
gpt show /dev/disk9
Screen Shot 2018-10-08 at 11.57.55 pm.png

- Format the partitions
Code:
For HFS+:
newfs_hfs -J -v Macintosh\ RAID /dev/disk9s2

For APFS:
newfs_apfs -v Macintosh\ RAID /dev/disk9s2
Screen Shot 2018-10-08 at 11.58.37 pm.png

- Mount the partition
- Install as normal. With a GPT on the disk, there is no need to trick the installer!

With HFS+ and High Sierra, you are done! You're Welcome! With APFS, expect an error:
Code:
macOS could not be installed on your computer

Running bless to place boot files failed.

This is because bless doesn't understand APFS on RAID - it tries to bless the preboot partition, and something says no. It doesn't matter! We can either manually select one of the booter partitions at the startup manager, or set it as the default volume there (http://hints.macworld.com/article.php?story=20080919150504866)

The new install will boot, attempt to update the boot helper partitions using kextcache, then reboot. It gets stuck in a loop attempting to update the cache. Allow a single reboot cycle to update the caches. Next, boot to single user (command-s at boot) then:
Code:
mount -uw /
mv /usr/standalone/bootcaches.plist /usr/standalone/bootcaches.bkp

This might even be able to be done from the installer, after the failure message, though I haven't tried it.

This results in a fully update-able install on APFS and RAID:

Screen Shot 2018-10-09 at 7.40.42 pm.png
Screen Shot 2018-10-10 at 7.45.03 pm.png
 

Attachments

  • Screen Shot 2018-10-08 at 11.54.13 pm.png
    Screen Shot 2018-10-08 at 11.54.13 pm.png
    26 KB · Views: 595
  • Screen Shot 2018-10-08 at 11.57.46 pm.png
    Screen Shot 2018-10-08 at 11.57.46 pm.png
    44.8 KB · Views: 557
Last edited:

_LiveSorcerer_

macrumors newbie
Oct 10, 2018
25
3
Itu-SP/Brazil
View attachment 789609 View attachment 789609


I just wanted to confirm this method does work and thank you for posting!

2012 MacBook Pro non retina with dual Samsung SSDs 250gb each with raid 0 and Mojave

(not sure if this is slow or fast but in case anyone is wondering)
I have the "same" model, the difference being that 2 SSD's are 500GB.
What was the exact procedure I use, could you tell us?
The step by step, has changed something informed here?
 

COMac

macrumors newbie
Oct 10, 2018
2
0
Method:

The new install will boot, attempt to update the boot helper partitions using kextcache, then reboot. It gets stuck in a loop attempting to update the cache! As above:

Allow a single reboot cycle to update the caches. Next, boot to single user (command-s at boot) then:
Code:
mount -uw /
mv /usr/standalone/bootcaches.plist /usr/standalone/bootcaches.bkp

This results in a fully update-able install on APFS and RAID:

View attachment 793705 View attachment 793704

I got "operation not permitted" when trying to move boot caches.plist from single user mode. I was able to boot in recovery mode then move this file in /Volumes/RAID and it's now working.

Has anyone been successful in booting an encrypted APFS RAID volume? I've tried enabling file vault and cloning to an encrypted volume but I can't get it to boot successfully.
 

toru173

macrumors 6502
Original poster
Apr 5, 2007
318
137
I got "operation not permitted" when trying to move boot caches.plist from single user mode. I was able to boot in recovery mode then move this file in /Volumes/RAID and it's now working.

Has anyone been successful in booting an encrypted APFS RAID volume? I've tried enabling file vault and cloning to an encrypted volume but I can't get it to boot successfully.

Glad you were able to get it working. The file might be protected by SIP - I can’t recall if I had it enabled or disabled. I’ll try enabling FileVault tonight, and see how I go getting it to boot.
 

Hapimp

macrumors newbie
Oct 27, 2013
3
0
Method:

(From Recovery, Installer USB, or another operating system):
- Create the RAID either through the GUI or terminal
- Edit the GPT of the newly mounted volume. Add an EFI partition and an HFS+ or APFS partition as required (thanks Taruga)
- Format the partition
- Mount the formatted volume
- Perform install as normal
- With APFS, expect an error towards the end of the install saying "Running bless to place boot files failed."
- Restart in single user mode. Mount root.
- Rename /usr/standalone/bootcaches.plist
- Reboot and enjoy macOS on RAID

Note that the process can also be applied to High Sierra, but because High Sierra will not auto-convert the array you retain a bootable HFS+ RAID install with correctly populated booter partitions. The booter partitions will populate for an APFS RAID as well, but the kextcache update gets you stuck in a boot loop.

Pictures!

- Create the RAID either through the GUI or terminal:
Code:
diskutil ar create stripe Macintosh\ RAID free /dev/disk5 /dev/disk6 /dev/disk7 /dev/disk8
View attachment 793697
- Edit the GPT. I made mine with a few padder blocks to match what I say with Apple's layout. Your start block (-b) and size (-s) values will be different. I had to keep unmounting the disk between each added entry.

Code:
gpt create /dev/disk9
gpt add -b 40 -s 409600 -i 1 -t efi /dev/disk9
gpt add -b 409600 -s 59440560 -i 2 -t apfs /dev/disk9
gpt show /dev/disk9
View attachment 793699
- Format the partitions
Code:
For HFS+:
newfs_hfs -J -v Macintosh\ RAID

For APFS:
newfs_apfs -v Macintosh\ RAID
View attachment 793701
- Mount the partition
- Install as normal. With a GPT on the disk, there is no need to trick the installer!

With HFS+ and High Sierra, you are done! You're Welcome! With APFS, expect an error:
Code:
macOS could not be installed on your computer

Running bless to place boot files failed.

This is because bless doesn't understand APFS on RAID - it tries to bless the reboot partition, and something says no. It doesn't matter! We can either manually select one of the booter partitions at the startup manager, or set it as the default volume there (http://hints.macworld.com/article.php?story=20080919150504866)

The new install will boot, attempt to update the boot helper partitions using kextcache, then reboot. It gets stuck in a loop attempting to update the cache! As above:

Allow a single reboot cycle to update the caches. Next, boot to single user (command-s at boot) then:
Code:
mount -uw /
mv /usr/standalone/bootcaches.plist /usr/standalone/bootcaches.bkp

This results in a fully update-able install on APFS and RAID:

View attachment 793705 View attachment 793704

Hi, thanks so much for all your work on this, and the guide. I followed it to be able to install Mojave on my non-retina 15" MacBook Pro 2012 with a couple of 256GB Samsung 850 EVOs.

Followed it to a tee, and happy to say that it works!

HOWEVER, I am experiencing extremely low write speeds (50-80mb/s), while read speeds are as expected 970mb/s.

Googling the issue, I can see other people having the same experience. Either from start or degrading fast after initial install (on older OSes).

Just putting this out there. Has any of you experienced this as well? Could it be that I messed up the editing of the GPT (have not done that before, but my results look like yours in the screenshots, obviously with different size).

Thanks again, really awesome work and great of you to share!

EDIT: I forgot to mention that in Disk Utility, only one of the disks if mounted/mountable. So maybe I did muck something up in the GPT-process after all.
 

Attachments

  • Screenshot 2018-10-11 at 21.15.17.png
    Screenshot 2018-10-11 at 21.15.17.png
    164 KB · Views: 726
Last edited:

toru173

macrumors 6502
Original poster
Apr 5, 2007
318
137
Hi, thanks so much for all your work on this, and the guide. I followed it to be able to install Mojave on my non-retina 15" MacBook Pro 2012 with a couple of 256GB Samsung 850 EVOs.

Followed it to a tee, and happy to say that it works!

HOWEVER, I am experiencing extremely low write speeds (50-80mb/s), while read speeds are as expected 970mb/s.

Googling the issue, I can see other people having the same experience. Either from start or degrading fast after initial install (on older OSes).

Just putting this out there. Has any of you experienced this as well? Could it be that I messed up the editing of the GPT (have not done that before, but my results look like yours in the screenshots, obviously with different size).

Thanks again, really awesome work and great of you to share!

EDIT: I forgot to mention that in Disk Utility, only one of the disks if mounted/mountable. So maybe I did muck something up in the GPT-process after all.

Your screenshots match mine - one is the RAID volume itself, the other is the APFS container. Don’t worry that one doesn’t show as mounted.

With respect to the speed, I noticed poor performance myself but I put it down to my setup (4x cheap USB sticks). It could be that APFS isn’t well suited to RAID, or that we should be choosing a RAID chunk size that more closely matches the block size of the container. Check Activity Monitor and see if there is any unusual disk activity, too

Messing up the GPT partitions won’t cause a degradation in read vs write speed, so don’t worry too much there!
 
Last edited:

COMac

macrumors newbie
Oct 10, 2018
2
0
2012 MBP non-retina 13"

I have two 500GB SSD, one EVO and one older. Haven't experienced the same speed degradation as you described.

Hi, thanks so much for all your work on this, and the guide. I followed it to be able to install Mojave on my non-retina 15" MacBook Pro 2012 with a couple of 256GB Samsung 850 EVOs.

Followed it to a tee, and happy to say that it works!

HOWEVER, I am experiencing extremely low write speeds (50-80mb/s), while read speeds are as expected 970mb/s.

Googling the issue, I can see other people having the same experience. Either from start or degrading fast after initial install (on older OSes).

Just putting this out there. Has any of you experienced this as well? Could it be that I messed up the editing of the GPT (have not done that before, but my results look like yours in the screenshots, obviously with different size).

Thanks again, really awesome work and great of you to share!

EDIT: I forgot to mention that in Disk Utility, only one of the disks if mounted/mountable. So maybe I did muck something up in the GPT-process after all.
 

Attachments

  • Screen Shot 2018-10-12 at 12.09.25 AM.png
    Screen Shot 2018-10-12 at 12.09.25 AM.png
    368 KB · Views: 775
  • Screen Shot 2018-10-12 at 12.10.44 AM.png
    Screen Shot 2018-10-12 at 12.10.44 AM.png
    148.7 KB · Views: 801
Register on MacRumors! This sidebar will go away, and you'll see fewer ads.