The screenshot you have is the normal login screen. So safe mode doesn't work. So that's another problem your computer has. When you're in Recovery, you can do a disk image to make a backup but the file is going to be very large (it looks like you're using about 450GB of the HDD). I need to test another way of doing the backup in Recovery - by the time you have an external HDD, I should have that ready.
Got a tip for us?
Let us know
Become a MacRumors Supporter for $50/year with no ads, ability to filter front page stories, and private forums.
OS Sierra 10.13 error after installing
- Thread starter stuart2102
- Start date
- Sort by reaction score
You are using an out of date browser. It may not display this or other websites correctly.
You should upgrade or use an alternative browser.
You should upgrade or use an alternative browser.
I found this guide from the net, by the way if i have folder files at desktop can method B still get my desktop files or i will go on method A?The screenshot you have is the normal login screen. So safe mode doesn't work. So that's another problem your computer has. When you're in Recovery, you can do a disk image to make a backup but the file is going to be very large (it looks like you're using about 450GB of the HDD). I need to test another way of doing the backup in Recovery - by the time you have an external HDD, I should have that ready.
Method A – If you want to save individual files:
- Go to the menu bar and select Terminal.
- Copy the files you want to rescue using cp. For instance, if you have a folder rescueme on your desktop, you can use the following command:
cp -r /Volumes/mydisk/Users/myusername/Desktop/rescueme /Volumes/mybackupdisk/ This will copy all files and subfolders of rescueme onto your backup drive called mybackupdisk.
- Enter the Disk Utility tool
- Select the Disk that you want to back up
- In the menu bar select File > New Image > Image from “mydisk”
- Select your options. E.g. you may want to compress the image to save some space on the backup disk.
- Press Save and wait.
Do you have your external HDD and are you ready to do the backup? There's a different way I'm going to explain. There's some problems with Method A - it's the correct command to copy files but it your files would all have the date it was copied, not the date that it has on your internal HDD. Also, this method works for regular files but you might have files that have different features. As mentioned, the problem with Method B is that you end up with one gigantic file - over 450GB in your case and I just don't think you should have a disk image that big.
If you're ready, I can give the instructions. It would help if you have the flash drive you used earlier.
If you're ready, I can give the instructions. It would help if you have the flash drive you used earlier.
Yes i got it last night i formated on a mac journal for mac only, a Toshiba 500gb, and yup i still have my spare flash drive and im ready, by the way i also borrow my friends bootable OS installer of HighSiera, just incase if needed i put it stand by for further instructions from youDo you have your external HDD and are you ready to do the backup? There's a different way I'm going to explain. There's some problems with Method A - it's the correct command to copy files but it your files would all have the date it was copied, not the date that it has on your internal HDD. Also, this method works for regular files but you might have files that have different features. As mentioned, the problem with Method B is that you end up with one gigantic file - over 450GB in your case and I just don't think you should have a disk image that big.
If you're ready, I can give the instructions. It would help if you have the flash drive you used earlier.
Download the file I have uploaded and save it to your flash drive. On your flash drive, it should be:
/Volumes/flashdrive/ignore-files.txt where flashdrive is the name of your flash drive.
Go into Recovery. Then go into Disk Utility.
Plug in the external HDD and the flash drive into the MBP.
Make sure that the scheme or partition map of the external HDD is "GUID Partition Map". I think that's what it should have defaulted to. If you're not sure, you can check in Disk Utility - press Command-2 and the external HDD should appear on the left under "External". Click on your new hard drive name - it will be the vendor name, not the name you gave it - and in the boxes at the bottom, "Partition Map" should read "GUID Partition Map". Make note of the name that you gave the new drive. In the steps below, where I say "newdrive", replace that with the name of the external HDD - the name you gave it, not the vendor name. Also make sure the flash drive appears under "External"
The next step is to unlock your "Macintosh HD" as you did earlier.
Once, "Macintosh HD" is unlocked and you can see the external HDD and flash drive in Disk Utility, quit Disk Utility.
Start the Terminal app.
Test to see if Terminal can see your external HDD. Type in:
ls /Volumes/newdrive (then press Enter)
If you get "No such file or directory", there's a problem. Stop to get the problem resolved - otherwise, on to the next step.
Type in:
cd /Volumes/Macintosh\ HD (press Enter)
and then type in:
pwd (press Enter)
What should appear is "/Volumes/Macintosh HD". If this does not appear, stop to get the problem resolved - otherwise, we're ready to start the copy.
Type in:
/Volumes/Macintosh\ HD/usr/bin/rsync -a -x -S -u -E --exclude-from='/Volumes/flashdrive/ignore-files.txt' . /Volumes/newdrive
There is no space in "--exclude-from" - don't press Enter until after /Volumes/newdrive
Make sure you enter the correct command. If you don't, it will give an error message. It will not overwrite your internal HDD. The period towards the end is very important so make sure you have a space - then period - then space and then the rest of the command.
This will take hours to complete. Only error messages will appear. When it is complete the "-bash#" prompt (I think that's what it is).
I need to step away for a few minutes. When I come back, I'll give instructions on how you can monitor the progress of the copy.
[doublepost=1533176053][/doublepost]To view progress of what's happening, on the terminal window, press the "+" on the right side, towards the top. A second tab will appear. You can switch between windows by pressing on the different tabs. In the second tab that you just created, type in:
df -g | grep newdrive and press enter
What should appear is a bunch of numbers. The first number that has a percent shows how much of the disk is filled. The disk should be about 90% filled when completed. The 2nd and 3rd numbers should change as the copy continues. The 2nd number is the number of GB filled, the 3rd number is the number of GB remaining on the HDD. You can repeat this command by pressing the up-arrow key.
Attachments
What do you mean un my flash drive it will appear as /Volume/flashdrive/ignore-ignore.txt in my usb drive as literal view file? As far as i view the file that i downloaded now and put it in my usb is " ignore-files.txt " or you mean the / Volume...can only use the command in terminal? As what i used to be earlier of your instructions, by the this my screen shot about my HDD partion map its look like "Master Reboot Record" not "GUID"Download the file I have uploaded and save it to your flash drive. On your flash drive, it should be:
/Volumes/flashdrive/ignore-files.txt where flashdrive is the name of your flash drive.
Go into Recovery. Then go into Disk Utility.
Plug in the external HDD and the flash drive into the MBP.
Make sure that the scheme or partition map of the external HDD is "GUID Partition Map". I think that's what it should have defaulted to. If you're not sure, you can check in Disk Utility - press Command-2 and the external HDD should appear on the left under "External". Click on your new hard drive name - it will be the vendor name, not the name you gave it - and in the boxes at the bottom, "Partition Map" should read "GUID Partition Map". Make note of the name that you gave the new drive. In the steps below, where I say "newdrive", replace that with the name of the external HDD - the name you gave it, not the vendor name. Also make sure the flash drive appears under "External"
The next step is to unlock your "Macintosh HD" as you did earlier.
Once, "Macintosh HD" is unlocked and you can see the external HDD and flash drive in Disk Utility, quit Disk Utility.
Start the Terminal app.
Test to see if Terminal can see your external HDD. Type in:
ls /Volumes/newdrive (then press Enter)
If you get "No such file or directory", there's a problem. Stop to get the problem resolved - otherwise, on to the next step.
Type in:
cd /Volumes/Macintosh\ HD (press Enter)
and then type in:
pwd (press Enter)
What should appear is "/Volumes/Macintosh HD". If this does not appear, stop to get the problem resolved - otherwise, we're ready to start the copy.
Type in:
/Volumes/Macintosh\ HD/usr/bin/rsync -a -x -S -u -E --exclude-from='/Volumes/flashdrive/ignore-files.txt' . /Volumes/newdrive
There is no space in "--exclude-from" - don't press Enter until after /Volumes/newdrive
Make sure you enter the correct command. If you don't, it will give an error message. It will not overwrite your internal HDD. The period towards the end is very important so make sure you have a space - then period - then space and then the rest of the command.
This will take hours to complete. Only error messages will appear. When it is complete the "-bash#" prompt (I think that's what it is).
I need to step away for a few minutes. When I come back, I'll give instructions on how you can monitor the progress of the copy.
[doublepost=1533176053][/doublepost]To view progress of what's happening, on the terminal window, press the "+" on the right side, towards the top. A second tab will appear. You can switch between windows by pressing on the different tabs. In the second tab that you just created, type in:
df -g | grep newdrive and press enter
What should appear is a bunch of numbers. The first number that has a percent shows how much of the disk is filled. The disk should be about 90% filled when completed. The 2nd and 3rd numbers should change as the copy continues. The 2nd number is the number of GB filled, the 3rd number is the number of GB remaining on the HDD. You can repeat this command by pressing the up-arrow key.
Attachments

Last edited:
The file you downloaded, ignore-files.txt, will be on the flash drive as:
/Volumes/HOPECHANNEL/ignore-files.txt (if you downloaded it to HOPECHANNEL and not a sub-directory). What you want to make sure is that the flash drive does appear in Disk Utility - which it does. Sorry if that was unclear.
So when you type in the name of "TOSHIBA EXT" where I say "newdrive", you will need to enter "TOSHIBA\ EXT" with the backslash before the space.
During the course of the copy, you may get error messages but most of these are not really errors to be concerned about as they will deal with unusual system files. Once you're done, you can upload the output of Terminal so I can take a look at the messages. I need to check the command in the Recovery terminal to see if it's there - I'll give the instructions for this later.
, by the way this my screen shot about my HDD partion map its look like "Master Reboot Record" not "GUID"The file you downloaded, ignore-files.txt, will be on the flash drive as:
/Volumes/HOPECHANNEL/ignore-files.txt (if you downloaded it to HOPECHANNEL and not a sub-directory). What you want to make sure is that the flash drive does appear in Disk Utility - which it does. Sorry if that was unclear.
So when you type in the name of "TOSHIBA EXT" where I say "newdrive", you will need to enter "TOSHIBA\ EXT" with the backslash before the space.
During the course of the copy, you may get error messages but most of these are not really errors to be concerned about as they will deal with unusual system files. Once you're done, you can upload the output of Terminal so I can take a look at the messages. I need to check the command in the Recovery terminal to see if it's there - I'll give the instructions for this later.
Attachments
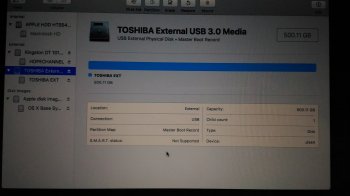
You should re-erase the file to set it to GUID.
To do this, make sure "TOSHIBA External ..." is selected, then press the Erase button at the top. Select "Mac OS Extended (Journaled)" and "GUID Partition Map" for the "Scheme". To save the trouble of not having to type the backslash when entering the command you might want to name it "ToshibaExt" instead of "TOSHIBA EXT" but that's up to you.
To do this, make sure "TOSHIBA External ..." is selected, then press the Erase button at the top. Select "Mac OS Extended (Journaled)" and "GUID Partition Map" for the "Scheme". To save the trouble of not having to type the backslash when entering the command you might want to name it "ToshibaExt" instead of "TOSHIBA EXT" but that's up to you.
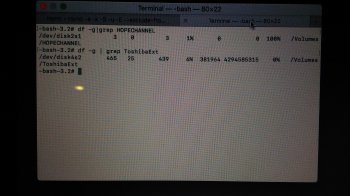
I got the this output, so whats next? Should i go for next command for HDDYou should re-erase the file to set it to GUID.
To do this, make sure "TOSHIBA External ..." is selected, then press the Erase button at the top. Select "Mac OS Extended (Journaled)" and "GUID Partition Map" for the "Scheme". To save the trouble of not having to type the backslash when entering the command you might want to name it "ToshibaExt" instead of "TOSHIBA EXT" but that's up to you.
Attachments

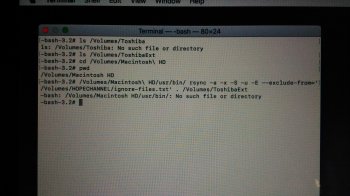
That's good - you notice the first time you spelled it incorrectly and it said "No such file or directory" but the second time it didn't - and it's empty so that's why nothing comes up when you have the correct name. YOu can go to the next command. It's important when you type in the "rsync" command that you have the "/Volumes/ToshibaExt" correct.
i make the second command for HDD after pressing enter key i put the pwd means my "password" is used to unlock my Macintosh at utility disk a minute ago? I try to put it my password if thats what means but i received no such files, by the way i exit my terminal window now and open new one it that ok?That's good - you notice the first time you spelled it incorrectly and it said "No such file or directory" but the second time it didn't - and it's empty so that's why nothing comes up when you have the correct name. YOu can go to the next command. It's important when you type in the "rsync" command that you have the "/Volumes/ToshibaExt" correct.
The command is just "pwd" - it doesn't stand for password. Type in the command and it will confirm that you are at "/Volumes/Macintosh HD" It's very important that you be here - that's why I want you to confirm that before continuing.
If you open a new Terminal window, you should start again at the command: ls /Volumes/newdrive
and then continue through the list. That "cd /Volumes/Macintosh\ HD" is very important - it doesn't carry over from one Terminal Window to another.
If you open a new Terminal window, you should start again at the command: ls /Volumes/newdrive
and then continue through the list. That "cd /Volumes/Macintosh\ HD" is very important - it doesn't carry over from one Terminal Window to another.
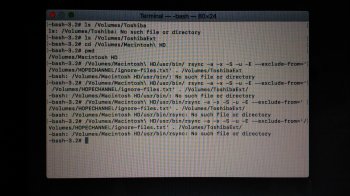
Did i miss some spacing? Msg says " No sucn file or directory" after the las command i type in is "rsync" has no space after "bin/"?The command is just "pwd" - it doesn't stand for password. Type in the command and it will confirm that you are at "/Volumes/Macintosh HD" It's very important that you be here - that's why I want you to confirm that before continuing.
If you open a new Terminal window, you should start again at the command: ls /Volumes/newdrive
and then continue through the list. That "cd /Volumes/Macintosh\ HD" is very important - it doesn't carry over from one Terminal Window to another.
Attachments
You put a space before "rsync" which shouldn't be there. I noticed a mistake on my part. There should be a slash after /Volumes/ToshibaExt, so the command would be:
/Volumes/Macintosh\ HD/usr/bin/rsync -a -x -S -u -E --exclude-from='/Volumes/HOPECHANNEL/ignore-files.txt' . /Volumes/ToshibaExt/
(Although the slash at the end doesn't appear to make a difference, the command I use has a slash at the end.)
/Volumes/Macintosh\ HD/usr/bin/rsync -a -x -S -u -E --exclude-from='/Volumes/HOPECHANNEL/ignore-files.txt' . /Volumes/ToshibaExt/
(Although the slash at the end doesn't appear to make a difference, the command I use has a slash at the end.)
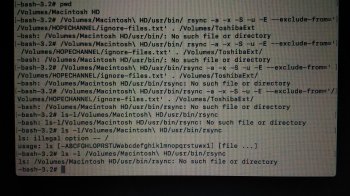
I made a lot of try still not failed, do i need spacing after apostrophe "from='space" then /Volume? I make both space and no space still failedYou put a space before "rsync" which shouldn't be there. I noticed a mistake on my part. There should be a slash after /Volumes/ToshibaExt, so the command would be:
/Volumes/Macintosh\ HD/usr/bin/rsync -a -x -S -u -E --exclude-from='/Volumes/HOPECHANNEL/ignore-files.txt' . /Volumes/ToshibaExt/
(Although the slash at the end doesn't appear to make a difference, the command I use has a slash at the end.)
Attachments
The command as you typed it should work.
In terminal type in:
ls -l /Volumes/Macintosh\ HD/usr/bin/rsync (press Enter)
That's -l which is the "L" character - lower case, not the one character.
Take a picture and post it.
In terminal type in:
ls -l /Volumes/Macintosh\ HD/usr/bin/rsync (press Enter)
That's -l which is the "L" character - lower case, not the one character.
Take a picture and post it.
Here it isThe command as you typed it should work.
In terminal type in:
ls -l /Volumes/Macintosh\ HD/usr/bin/rsync (press Enter)
That's -l which is the "L" character - lower case, not the one character.
Take a picture and post it.
Attachments

Oh yeah i didn't see it but yeah after typing the right command still no such file or directoryYou need to put a space after the "-l"
Attachments
You may be missing files that you need and that maybe why you were having the original problem you were having. I will send you a private text. You can click on the icon at the top that looks like an envelope - it's going to take me a few minutes to write it.
Is this normal? It displays a lot of errors and i notice that my external hdd is no longer blinking the light and from the time i open the terminal window processing 6% and its already almost 2hrs now its still 6%, and when my monitor screen off move or click my mouse pad to open again my monitor and the ligth of my external hdd is now on but not blinking and it dies the light back after few secondsYou may be missing files that you need and that maybe why you were having the original problem you were having. I will send you a private text. You can click on the icon at the top that looks like an envelope - it's going to take me a few minutes to write it.
Attachments

Just wanted to say that treekram is a hero and such a terrific help. Apple should be employing you, man!
Just wanted to say that treekram is a hero and such a terrific help. Apple should be employing you, man!
Thanks very much for your kind words.
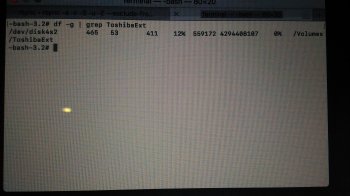
Is this normal? It displays a lot of errors and i notice that my external hdd is no longer blinking the light and from the time i open the terminal window processing 6% and its already almost 2hrs now its still 6%, and when my monitor screen off move or click my mouse pad to open again my monitor and the ligth of my external hdd is now on but not blinking and it dies the light back after few seconds
So, as I had mentioned, the progress doesn't refresh automatically. If you press the up arrow key, Terminal will re-type the previous command and then you press the enter key.
The errors in your screenshot are OK - there are certain files that the OS uses that will show an error when copying and what your screenshot is showing is OK.
Oh i forgot that yeah i recall now about arrow up/down, what i did is type exit close the window and then open again the new terminal and type again the command and yes very slow progress in fact yesterday it start as around 3.40pm transferring overnight until this morning 6.45am but still 12% is this normal?Thanks very much for your kind words.
So, as I had mentioned, the progress doesn't refresh automatically. If you press the up arrow key, Terminal will re-type the previous command and then you press the enter key.
The errors in your screenshot are OK - there are certain files that the OS uses that will show an error when copying and what your screenshot is showing is OK.
Attachments
Register on MacRumors! This sidebar will go away, and you'll see fewer ads.