We all know how "well" the VoiceOver backdoor activation method works in the latest beta of iOS5. OH NOES! Apple has "fixed" it! You can swipe till the cows come home but there will be no Notification Center sliding down at all!
Well, it's time for some serious business!
LOTS of pictures to illustrate the steps to the best of my ability!
[UPDATED] If you want an untethered boot and don't care about jailbreaking, skip installing Cydia. However, SSH will not work while your phone is untether booted.
[UPDATED] Windows users, use PuTTY and WinSCP in place of Terminal and SCP respectively!
[UPDATED] Citing security concerns, please change your system passwords once SSHed in! Type: passwd root followed by passwd mobile in the shell, and remember the password(s) for future ssh logins.
Pre-requisites:
[UPDATED] Any phone that can be officially activated - lock state doesn't matter
[UPDATED] iTunes 10.5 beta 2 - iTunes 10.5b1 will activate iOS5b2 but it will not be able to sync any media.
iOS5 beta 1 and 2 IPSWs – in my case, iPhone 4 GSM:
iPhone3,1_5.0_9A5220p_Restore.ipsw - beta 1
iPhone3,1_5.0_9A5248d_Restore.ipsw - beta 2
redsn0w 0.9.8b1
redsn0w SSH2 bundle - http://sites.google.com/a/iphone-dev.com/files/home/SSH2_bundle.tgz?attredirects=0&d=1
SystemVersion.plist.zip (an attachment to this post) – Unzip and put in the root directory of your hard drive (open your hard drive icon, the same “folder” as where Applications, System, Users are)
Terminal – Found under /Applications/Utilities
Steps:
Put your iPhone in DFU mode (remove your SIM card if you have one inserted)
Option (or shift-restore) to beta 2 IPSW:

Wait for restore to finish:

Slide to set up and join a wireless network, but go no further:
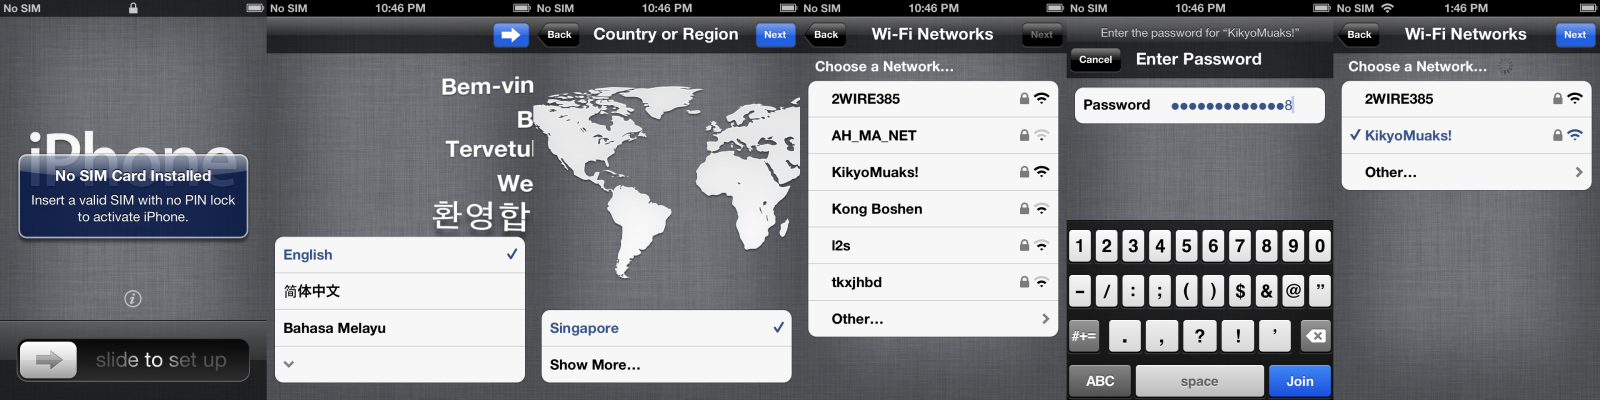
After the wifi icon appears in the status bar, power off the iPhone.
Put device with DFU mode, jailbreak with redsn0w 0.9.8b1 – give it the beta 1 IPSW, uncheck Install Cydia and check Install Custom Bundle – select SSH2_bundle.tgz

The phone will reboot when the jailbreak is complete. Power the phone off once it’s started up and use redsn0w to “just boot tethered”.
Once the phone has rebooted (yet again!) and is at the slide to set up screen, open terminal and prepare to type:
ssh root@<ip address of iphone>
The IP address of the iPhone can typically be acquired from your router’s DHCP clients list:

In this example, 192.168.1.240
Apropos, I would type:
ssh root@192.168.1.240
For the initial connection to a freshly-installed phone, it will take quite a while for the password prompt to appear as some SSH security keys need to be generated on the phone. Answer yes to the key fingerprint prompt.
type “alpine” (without quotes) for the password, and press Enter.

What you are now presented with, is the shell prompt.
Type the following (Enter after each line):
cd /Applications
mv Setup.app Setup.app.old
killall SpringBoard
Note: After the phone resprings, you will see the “classic” 4.2.1+ activation screen!

rm /System/Library/CoreServices/SystemVersion.plist

Open a new terminal window, and type the following – remember the IP address is just an example, and should be replaced with that of your own iPhone’s. (Enter after each line):
scp /SystemVersion.plist root@192.168.1.240:/System/Library/CoreServices/
(alpine for password)

Next, power off the phone and use redsn0w to boot tethered (yet) again.
When the phone comes up, it will still be showing the iOS 4.2.1+ activation screen instead of the new setup wizard type thing. Disconnect the phone from the computer at this point, if it is connected.
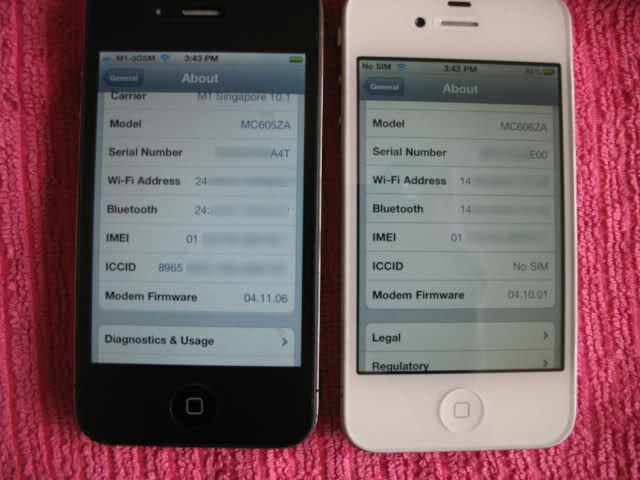
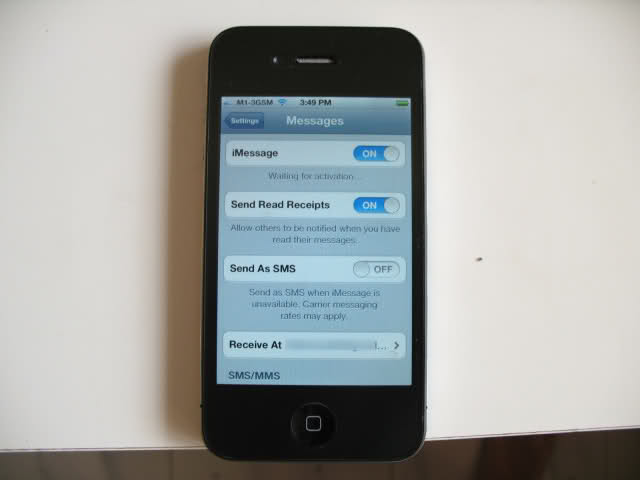
Insert your SIM card into the phone and connect to iTunes just like a “normal” activation. It should activate and the SpringBoard should come up!
This is a proper activation per se, not a hacktivation, so iMessages and the like should work fine.

Put the phone into DFU mode and use redsn0w to install Cydia.
After it comes up, power off the phone and use redsn0w to boot tethered yet yet again.
Now open Cydia and enjoy your completed jailbreak of iOS5 b2!
No trickery was involved, as these “real” picture will prove!


Well, it's time for some serious business!
LOTS of pictures to illustrate the steps to the best of my ability!
[UPDATED] If you want an untethered boot and don't care about jailbreaking, skip installing Cydia. However, SSH will not work while your phone is untether booted.
[UPDATED] Windows users, use PuTTY and WinSCP in place of Terminal and SCP respectively!
[UPDATED] Citing security concerns, please change your system passwords once SSHed in! Type: passwd root followed by passwd mobile in the shell, and remember the password(s) for future ssh logins.
Pre-requisites:
[UPDATED] Any phone that can be officially activated - lock state doesn't matter
[UPDATED] iTunes 10.5 beta 2 - iTunes 10.5b1 will activate iOS5b2 but it will not be able to sync any media.
iOS5 beta 1 and 2 IPSWs – in my case, iPhone 4 GSM:
iPhone3,1_5.0_9A5220p_Restore.ipsw - beta 1
iPhone3,1_5.0_9A5248d_Restore.ipsw - beta 2
redsn0w 0.9.8b1
redsn0w SSH2 bundle - http://sites.google.com/a/iphone-dev.com/files/home/SSH2_bundle.tgz?attredirects=0&d=1
SystemVersion.plist.zip (an attachment to this post) – Unzip and put in the root directory of your hard drive (open your hard drive icon, the same “folder” as where Applications, System, Users are)
Terminal – Found under /Applications/Utilities
Steps:
Put your iPhone in DFU mode (remove your SIM card if you have one inserted)
Option (or shift-restore) to beta 2 IPSW:
Wait for restore to finish:
Slide to set up and join a wireless network, but go no further:
After the wifi icon appears in the status bar, power off the iPhone.
Put device with DFU mode, jailbreak with redsn0w 0.9.8b1 – give it the beta 1 IPSW, uncheck Install Cydia and check Install Custom Bundle – select SSH2_bundle.tgz
The phone will reboot when the jailbreak is complete. Power the phone off once it’s started up and use redsn0w to “just boot tethered”.
Once the phone has rebooted (yet again!) and is at the slide to set up screen, open terminal and prepare to type:
ssh root@<ip address of iphone>
The IP address of the iPhone can typically be acquired from your router’s DHCP clients list:
In this example, 192.168.1.240
Apropos, I would type:
ssh root@192.168.1.240
For the initial connection to a freshly-installed phone, it will take quite a while for the password prompt to appear as some SSH security keys need to be generated on the phone. Answer yes to the key fingerprint prompt.
type “alpine” (without quotes) for the password, and press Enter.
What you are now presented with, is the shell prompt.
Type the following (Enter after each line):
cd /Applications
mv Setup.app Setup.app.old
killall SpringBoard
Note: After the phone resprings, you will see the “classic” 4.2.1+ activation screen!
rm /System/Library/CoreServices/SystemVersion.plist
Open a new terminal window, and type the following – remember the IP address is just an example, and should be replaced with that of your own iPhone’s. (Enter after each line):
scp /SystemVersion.plist root@192.168.1.240:/System/Library/CoreServices/
(alpine for password)
Next, power off the phone and use redsn0w to boot tethered (yet) again.
When the phone comes up, it will still be showing the iOS 4.2.1+ activation screen instead of the new setup wizard type thing. Disconnect the phone from the computer at this point, if it is connected.
Insert your SIM card into the phone and connect to iTunes just like a “normal” activation. It should activate and the SpringBoard should come up!
This is a proper activation per se, not a hacktivation, so iMessages and the like should work fine.
Put the phone into DFU mode and use redsn0w to install Cydia.
After it comes up, power off the phone and use redsn0w to boot tethered yet yet again.
Now open Cydia and enjoy your completed jailbreak of iOS5 b2!
No trickery was involved, as these “real” picture will prove!
Attachments
Last edited:
