Ah, no worries. I didn't even know it wasn't normal or not any sort of a thing until after high school.Sorry to hear about your tinnitus
Ah, no worries. I didn't even know it wasn't normal or not any sort of a thing until after high school.Sorry to hear about your tinnitus
Now I am having fun with installing Tiger on a separate partition.
I found four .iso files online, merged them in Terminal and restored the resulting big file onto a USB. Then I rebooted from open firmware mode.
Strangely I'm shown a connect-a-bluetooth--mighty-mouse screen.
I actually happen to have one of those handy so I dutifully connect it. The computer and the mouse both indicate that the mouse is connected but I am not able to advance the installation further.
It seems strange that this screen would be shown on a computer with built-in trackpad
And even more weirdly, when I tried installing Tiger earlier (though it was the wrong version) I managed to get past this screen and actually complete the install.
Not sure what could be going wrong here. Any ideas?
Thanks heaps in advance
Philip
Yep - that image is 10.4.6 and will work fine on the DLSD.There is a DVD iso in Macintosh Garden, I've used it a few times and it works very well.
Same question - which version?found four .iso files online
Why did you merge the Tiger CD isos? There is a DVD iso in Macintosh Garden, I've used it a few times and it works very well.
Yep - that image is 10.4.6 and will work fine on the DLSD.
[automerge]1599751828[/automerge]
Same question - which version?
It doesn't work that way. You need to burn that DMG (which is the correct oneI've tried the DMG (at #30 on this page) called "Tiger_4_6.dmg_.zip". When I mount that DMG and run the Install Mac OS X app the computer restarts but boots right back into Leopard.
) to a DVD or USB stick and boot the powerbook from it.It doesn't work that way. You need to burn that image (which is the correct one
It doesn't work that way. You need to burn that DMG (which is the correct one
If you are unable to restore the ISO to a USB stick using Disk Utility, you can just rename the .ISO as .CDR and restore the renamed file. I think I struggled to get the ISO to restore properly, but the CDR worked just fine.
. Back to the 17" G4, I love the later one because the backlit keyboard is as bright as my MBP keyboard. My Al 15" and 2003 17" have such dim keyboards it would almost be better if they were off! I mostly use my laptops in low light/getting ready for bed but don't want to stare at my phone browsing, so a nice backlit keyboard is a must for me.I would get a 17". I have a 12, 2 15s (Ti and Al), and 2 17s in my PowerBook G4 collection. As far as the 17s go, I have an early one (2003) and the last one before MBP (2005) and I love it. Specifically the newer 17". I got mine AS-IS for parts for $70 shipped. It was a gamble, and kind of a big one if I am being honest but it was in IMMACULATE shape, like it looks like I just opened it in 2005. Got it in and popped in a charger and it turned on! HDD clicking so swapped it and it now happily runs Leopard. I did move on to regularly using a 17" MBP 4,1 with the dosdude tool running Mojave as I wanted something I could at least watch YouTube on and do some very light modern programming on, but other than the iSight camera and the higher res display, it looks the same
Congrats - this will also run Jaguar and Panther if you feel like experimenting with those.I bought a 17" (a1095) as a repair project.
I just took a look under the hood of my 15"PB-DLSD. That particular machine came a bit bruised and battered with a loose display-release-button-assembly too.Hello again everyone
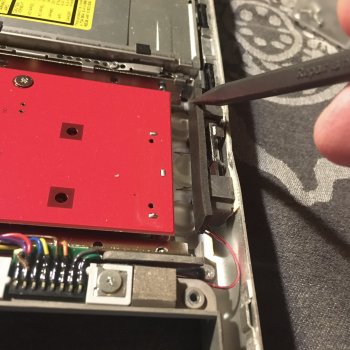
I'm having trouble with the "display release button", you know the one on the front with the cute white LED.
The little assembly on the inside holding this button has come loose from the inside wall of the case. I've searched and searched and find no instrux for how to fix this. Does anyone have an idea?
Here's how it looks
View attachment 953393
I can't recall, it the A1095 the only one you've purchased so far? Or is it an additional one?Thank you for sharing your thoughts. As I recently confessed in the eBay bargains thread, I bought a 17" (a1095) as a repair project. It's in the mail to my mother's place in Sweden so it will be a while before I get my teeth into it but I look forward to getting it up and running
Duct tape and plywood to fix a computer? Brings a tear of joy to the eye of my inner redneck Bubba 😅I just took a look under the hood of my 15"PB-DLSD. That particular machine came a bit bruised and battered with a loose display-release-button-assembly too.
In my machine, the retaining-bracket of the harddrive was missing and the drive was fixed with double-sided duct-tape. There was a rubber-sheet between the spinning drive and the button-assembly and the button assembly was pressed against the bottom-case by the inbuilt spinning drive. You can see at the iFixit-repair-page, that there is a "black pad" sticking at the end of the hard drive, that is meant to put pressure on the release-button-assembly.
I think, that metal assembly for the display-release-button is normally glued or soldered to the bottom-case and is additionally held in place by pressure from the harddrive through that "black pad".
So after I've built in the mSATA-IDE-Converter-frame, there was a gap between the frame and the release-button-assembly and the assembly just fell off like your's does.
My workaroud was a wooden spatula rolled in with clear sticky tape to make the edges of the mSATA-converter-frame press against the release-button-assembly again.
You may in addition glue the display-button-assembly into the right place against the bottom-case (me, or maybe the previous owner just used double-sided duct-tape). @CooperBox might give advise about proper glue, since he even managed to glue a metal screw (which fixes the heatsink of a 12"PB) back onto the Powerbook's logic-board.
Here some pictures about my barefoot-mending.
You may need something replacing the "black pad" too, but maybe it's still sticking at the spinning-drive you've just replaced.
– was attached to the inside by a sticky rubbery film. I think you're right that the sticky film keeps it in place well enough provided there's pressure from the hard drive's pad.I just took a look under the hood of my 15"PB-DLSD. That particular machine came a bit bruised and battered with a loose display-release-button-assembly too.
In my machine, the retaining-bracket of the harddrive was missing and the drive was fixed with double-sided duct-tape. There was a rubber-sheet between the spinning drive and the button-assembly and the button assembly was pressed against the bottom-case by the inbuilt spinning drive. You can see at the iFixit-repair-page, that there is a "black pad" sticking at the end of the hard drive, that is meant to put pressure on the release-button-assembly.
I think, that metal assembly for the display-release-button is normally glued or soldered to the bottom-case and is additionally held in place by pressure from the harddrive through that "black pad".
So after I've built in the mSATA-IDE-Converter-frame, there was a gap between the frame and the release-button-assembly and the assembly just fell off like your's does.
My workaroud was a wooden spatula rolled in with clear sticky tape to make the edges of the mSATA-converter-frame press against the release-button-assembly again.
You may in addition glue the display-button-assembly into the right place against the bottom-case (me, or maybe the previous owner just used double-sided duct-tape). @CooperBox might give advise about proper glue, since he even managed to glue a metal screw (which fixes the heatsink of a 12"PB) back onto the Powerbook's logic-board.
Here some pictures about my barefoot-mending.
You may need something replacing the "black pad" too, but maybe it's still sticking at the spinning-drive you've just replaced.
I can't recall, it the A1095 the only one you've purchased so far? Or is it an additional one?
Duct tape and plywood to fix a computer? Brings a tear of joy to the eye of my inner redneck Bubba 😅
Well done my friend!
Me too - and there's a couple of very long words in German as wellI loooove long words, too bad English doesn't let us write them together as we can in other languages
Or Teslas today...Like repairing cars in the good old days.

 www.extremetech.com