@thecraftycraven
"The two I have in mind one are the 2017 5k version and the other being the 5k 2019 version."
Either year is more of less identical, although the speakers are slightly redesigned (improved?) on the 2019.
For the screen what matters is how many hours it has been in use, and how hot the iMac was run during it's life.
Normal use is fine, but some screens do show slight degradation if they have had a hard life.
So the condition of the screen is the way to choose.
"COMPATIBILITY TO MONITOR WITH M1 PRO"
Compatibility is easy, all the available boards work with any Apple silicon Mac.
There is a list of all the available conversion boards in the first post on Page 1 of this thread.
"
Camera and speaker functionality"
Since 2012 Apple has used a direct PCIe connection to their internal webcams. This only works with an original Mac logic board, so no post-2012 iMac camera is usable in a DIY conversion.
So you have four choices:
Internally fit a low quality USB 2 webcam from a 2009-11 iMac or an Apple Thunderbolt Display.
Internally fit a slightly better USB webcam kit from AliExpress.
Externally attach a better quality USB webcam to the top of the iMac case.
Or, for the best quality, use an externally mounted iPhone - using Apple's
Continuity Camera feature.
This is the only way to get proper audio for a microphone in a DIY monitor.
For the Speaker, it is easy.
The original speakers can be connected to the audio output of any of the conversion boards - through a crossover kit.
But. The audio quality that you get is better the more expensive the conversion board...

"
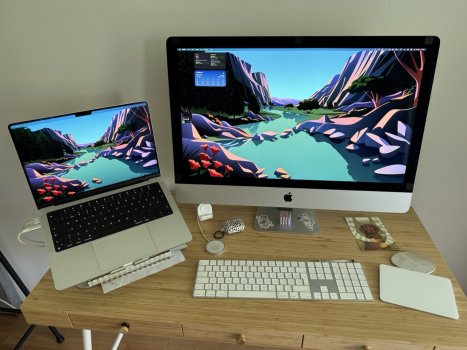
TRUE 5K@60HZ
Best picture quality"
All the boards do 5K/60 through the DisplayPort input. Some have USB-C inputs which use the DP protocol.
All have HDMI inputs, but some can only run at 4K/60 using HDMI.
The 2017/19 iMac screens will display the high quality P3 10 bit colour mode.
The cheapest board (the JRY-W9CUHD-AA1) will only run at 8 bits.
All the more expensive boards display 10 bits using DP (or USB-C).
HDMI is usually 8 bits, in all boards except the most expensive R1811 HDMI 2.1 version, which does 10 bits on all inputs..
"
Reasonable budget staying underneath $500 for the parts ONLY
The Less Parts the Better"
If you include the price of the iMac in this, then you will only have the money left for the cheaper boards.
Basically, you get what you pay for, and the more expensive boards have better firmware (more user friendly, more fully featured).
For instance, the cheaper JRY-xxx boards don't fully implement DDC control, which means controlling brightness or volume from the Mac keyboard may not work, or work as expected.
Only the R1811 (or the older R9A18) has IR remote control, which means it is far easier to adjust the OSD. On the cheaper board you have to get the button strip mounted in an accessible position, which is not necessarily easily solved. 😉
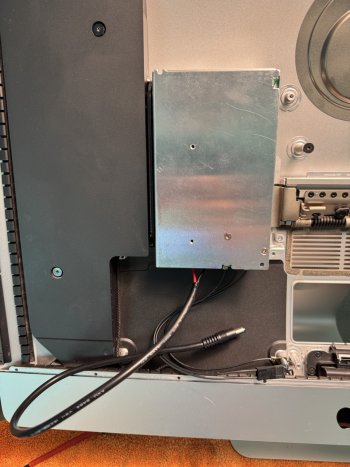
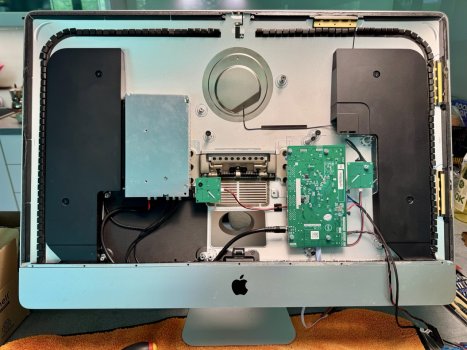
The parts you need depend on the complexity of your conversion.
If you plan to use 3D-printed mounting parts then you have to source (or make) those.
Everything is described by previous builders in this thread.
You can use the search facility to find the info you need, or, if in doubt ask here.
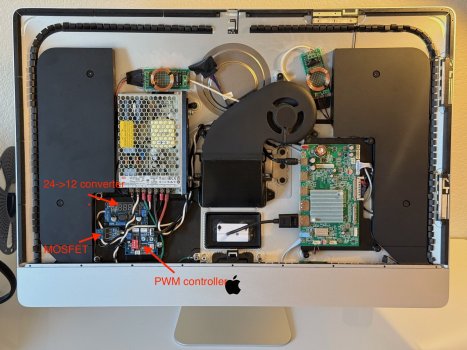
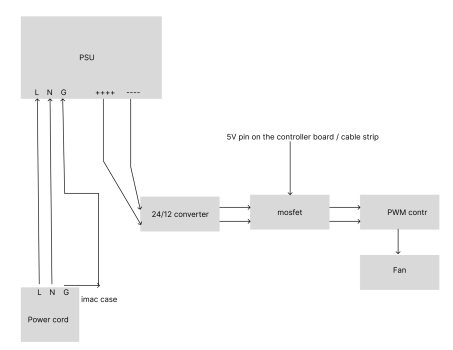
You don't say whether you are using a MacBook Pro (or Air), and if you want to power it from the monitor.
That has to be taken into consideration - you need a more powerful PSU (which may need cooling).
Lastly. If all this planning and designing and executing a build is too daunting, then buying a good condition LG 5K Ultrafine is a good option.
You get 5K/60 10 bit using TB3, but only get 4K with non-TB3 USB-C or an adapter from HDMI/DP, and the fragility of the USB-C ports has been a problem.
It is a Thunderbolt 3 (only) monitor, which means it needs its own port on the Mac, and doesn't really share ports well connected to a dock.
But the 5K image quality is more or less identical to the original iMac, or a good DIY conversion.
"Goal is to start and finish by the end of the month."
That's do-able, but please, do take care...
With fragile electronics, one slip and everything could go up in a flash and puff of smoke... 😶
If you read through the thread, it.has.happened.