Not yet, I tried the reset but no change. I ordered a new crossover kit, waiting to try that.@benqo "I have a problem with the speakers again on the FA1, they just stopped working, I don't think I changed anything. The mute reverse doesn't seem to work. I can't get it to work. Any ideas?"
Did you manage to solve this?
If it's still not working you could try to Reset the FA1 board, which should set it back to Factory settings.
Here's a pic where to find it in the OSD, (select Other, at the bottom of the Menu).
Got a tip for us?
Let us know
Become a MacRumors Supporter for $50/year with no ads, ability to filter front page stories, and private forums.
DIY 5k Monitor - success :-)
- Thread starter fiatlux
- WikiPost WikiPost
- Start date
- Sort by reaction score
You are using an out of date browser. It may not display this or other websites correctly.
You should upgrade or use an alternative browser.
You should upgrade or use an alternative browser.
- Status
- The first post of this thread is a WikiPost and can be edited by anyone with the appropiate permissions. Your edits will be public.
@braunico "From my understanding of Cole's build...
So i suspect when turning off the board it shut's down the fans through the mosfet but i don't see how it could shut down the whole PSU (which would be nice).
It would required a mosfet before the entrance of the psu, but then the mosfet would shut down the PSU, not sure the on/off button would work (since the board is no longer on) to turn it back on. For this I was simply thinking a global switch outside of the build."
I was complicating the issue with a switched mains supply to the PSU - for that a simple switch is easiest, as you suggest.
You are right as to what Cole has done.
The green LED provides a constant source of 5v when the board in ON, which triggers the Mosfet board to switch 12V to the fan, through the PWM speed control circuit.
He has modified the original power source circuit - as shown in the image below.
Cole's circuit has the 4 wire PWM controller board after the output of this Mosfet board, as this is for a 2/3 wire PWM controller, and a 4 wire controller is needed for am iMac fan.


 outofdarts.com
So i suspect when turning off the board it shut's down the fans through the mosfet but i don't see how it could shut down the whole PSU (which would be nice).
It would required a mosfet before the entrance of the psu, but then the mosfet would shut down the PSU, not sure the on/off button would work (since the board is no longer on) to turn it back on. For this I was simply thinking a global switch outside of the build."
I was complicating the issue with a switched mains supply to the PSU - for that a simple switch is easiest, as you suggest.
You are right as to what Cole has done.
The green LED provides a constant source of 5v when the board in ON, which triggers the Mosfet board to switch 12V to the fan, through the PWM speed control circuit.
He has modified the original power source circuit - as shown in the image below.
Cole's circuit has the 4 wire PWM controller board after the output of this Mosfet board, as this is for a 2/3 wire PWM controller, and a 4 wire controller is needed for am iMac fan.
Versatile Single Stage MOSFET Board
The Versatile Single Stage MOSFET board offers a switch platform for your Nerfing needs! This board is a bit larger than our mini mosfet board but is our only MOSFET that can be used with a PWM signal reliably and is compatible with any pair of standard flywheel motors we offer.The TRIG/PWM...
I just ordered a AA1 Board from the GIVIFENI Store you mentioned. It arrived today and I can confirm that it has the LED connector Board.Blown away by the amount of info here! I did my best to read through everything and not clog this down with redundant info but I do have a couple questions.
I'm getting ready to order parts for my conversion. Since I have a a late 2014, 10 bit is not an option. I don't need audio or video, but I do want 5k with a single cord.
I plan to run a thunderbolt to DisplayPort cable for my m4 mini and leave a usb c connection to connect and power my work M1 Pro when needed.
Seems like JRY-AA1 can handle this with the benefit of being the most cost effective.
The only feature I would like, which seems to be unconfirmed is the keyboard brightness adjustment through MonitorControl. @dnptr was able to achieve this back on post 2498 but it looks like his board came with a backlight control board that I haven't seen anywhere else. It also doesn't show and isn't listed on the link he posted: GIVIFENI Store. Hoping someone might have some more info on this but not a deal breaker either.
I was planning to order from stonetaskin, can anyone recommend if it's worth bundling their power supply and usb-c cable. It's only 15 dollars more, I can't imagine them to be of great quality but hopefully serviceable and convenient.
Excited to get this up and running and hopping to do a more thorough build in the future if I can find a newer 10 bit display.
I can reply again when I finished the Installation and tested the brightness adjustment through MonitorControl.
EDIT: I can confirm that keyboard brightness adjustment through MonitorControl is working. Sound is working with eqMac.
Attachments
Last edited:
Thanks to this threads, I made my own 5k display. Thank you, guys...
But, I have question. Does any one who use this 5k monitor with type-c cable at Windows PC.
Especially, not Mainboard C-port but GPU C-port. I found out only few GPUs have the C-Port (ex...the RTX2080, RT2080TI, AMD 6900xt). I worder the few GPUs' C-port can display 5k resolusion with our 5k display.
If it possible, I try to use Win PC and Mac PC with C-type KVM (like this https://www.aliexpress.com/item/100...9ed166!12000045838489562!ct!KR!139416152!!1!0)...
USB-C can do 5K60 with the following:But, I have question. Does any one who use this 5k monitor with type-c cable at Windows PC.
Especially, not Mainboard C-port but GPU C-port. I found out only few GPUs have the C-Port (ex...the RTX2080, RT2080TI, AMD 6900xt). I worder the few GPUs' C-port can display 5k resolusion with our 5k display.
If it possible, I try to use Win PC and Mac PC with C-type KVM (like this https://www.aliexpress.com/item/100...9ed166!12000045838489562!ct!KR!139416152!!1!0)...
- 4 lanes of HBR2 with DSC (10 bpc). Allows USB 2.0 to the display. Which boards support this mode?
- 4 lanes of HBR3 without DSC (8bpc). Allows USB 2.0 to the display. Which boards support this mode?
- 4 lanes of HBR3 with DSC (10bpc). Allows USB 2.0 to the display. Which boards support this mode?
- 2 lanes of HBR3 with DSC (10bpc). Allows USB 3.x to the display. Do any of the boards have USB 3.x from USB-C?
Quote: @joevt "USB-C can do 5K60 with the following:..."
Basically the USB-C input parameters of the available video boards isn't known.
All the boards use either the RealTek RTD2718Q or MediaTek MT9801 video chip.
Except the R9A18, the JRY-W9CUHD-AA1 and U49 boards that have an earlier generation Realtek or MediaTek chip.
The boards closely follow the chip maker's Reference Design.
"Do any of the boards have USB 3.x from USB-C?"
No.
None of the boards with USB-C inputs have any connection between the 4 high speed lanes (HBR2/3) and the USB hub controller chip on the board.
So only the USB 2 lanes are connected to the USB hub on the board, and that signal is the only one available if the board has USB output ports.
One board, the JRY-W9RQUHD-SA1, has a USB 3 hub with a USB-B (USB 3.x) input socket and two USB-A (USB 3.x) outputs.
These outputs receive a USB 2 input from the board's USB-C video input, but for the outputs to work at USB 3.x speed there has to be a separate USB 3.x input to the USB-B input port.
..."Which boards support this mode?"
Using DisplayPort/USB-C the JRY-W9CUHD-AA1 and the R9A18 (with a single input cable) only work at 8 bit (Reduced Bit Rate).
All the other boards can do full 10 bit RGB 4.4.4.
Using HDMI the results are more varied, with the JRY--AA1 only managing 5K/30, and the others with HDMI 2.0 only managing 4K/60.
Those with HDMI 2.1 normally still only give 5K/60 at RBR results, although Better Display can get 10 bit with the R1811 HDMI 2.1 board.
Last edited:
Not sure what you mean by RBR.Using DisplayPort/USB-C the JRY-W9CUHD-AA1 and the R9A18 (with a single input cable) only work at 8 bit (Reduced Bit Rate).
RBR is DisplayPort 1.62 Gbps per lane (5.184 Gbps of data for 4 lanes) which is enough for 1920x1200 10bpc RGB 154 MHz.
Maybe you mean HBR3? HBR3 x4 without DSC has a limit of 8bpc RGB for 5K60.
These must use DSC to get 10bpc RGB for 5K60 from USB-C.All the other boards can do full 10 bit RGB 4.4.4.
RBR is a DisplayPort link rate. I don't know what it means for HDMI. Do you mean CVT-RB (reduced blanking) timing?Those with HDMI 2.1 normally still only give 5K/60 at RBR results, although Better Display can get 10 bit with the R1811 HDMI 2.1 board.
I plan to use my Stonetaskin R1811 also without fan. What is the experience with people who did the same?Hi! Now i'am using it without fan and it works fine. Don't worry, you can remove the fan, but keep radiator.
But if you want to use it with a fan, than Noctua fan is almost inaudible. I was use resistor like this (see image).
Maybe then remove the power adapter outside the imac?
@gerwinnaar "I plan to use my Stonetaskin R1811 also without fan."
This has been done.
One way is to fit the heatsink from the R9A18 board.
However fans were fitted to cool the case, so there was active cooling in the conversion - although the board was fitted above the fans, so the cooling wouldn't be effective...
If you retain the existing heatsink (with no fan) then the temperature will rise, but shouldn't exceed the maximum of 65º C - the board may get damaged above this.
Using the board to power a laptop will increase the current through the board, and it will get hotter.
The easiest solution is to reduce the existing fan speed by adding a 180-200 ohm resistor (about 3-5 watt) in series with the fan.
This cuts down the speed to inaudibility, but maintains enough cooling to the heatsink.
Last edited:
@joevt "These must use DSC to get 10bpc RGB for 5K60 from USB-C."
Yes. DSC is reported on. The OSD also reports 4 Lane HBR2 operations (for the R1811).
Which is to be expected, as the RealTek chip the R1811 uses dates from the DP1.2 era, with firmware upgrades to work in the DP1.4 era.

The JRY Mediatek MT9801 boards have a newer driver chip, so it's possible that they may work in HBR3 mode, but they don't have sophisticated enough firmware to give any information.
"Not sure what you mean by RBR."
I'm taking the description from the R1811's OSD when using an HDMI 2.1 cable (from an M4 Pro mini):
It initially works at 8 bits YCbCr, but I've used Better Display to enable 10 bit operation.
The HDMI 2.1 input is being used (the monitor identifies as H2.1 5K DSC):

Yes. DSC is reported on. The OSD also reports 4 Lane HBR2 operations (for the R1811).
Which is to be expected, as the RealTek chip the R1811 uses dates from the DP1.2 era, with firmware upgrades to work in the DP1.4 era.
The JRY Mediatek MT9801 boards have a newer driver chip, so it's possible that they may work in HBR3 mode, but they don't have sophisticated enough firmware to give any information.
"Not sure what you mean by RBR."
I'm taking the description from the R1811's OSD when using an HDMI 2.1 cable (from an M4 Pro mini):
It initially works at 8 bits YCbCr, but I've used Better Display to enable 10 bit operation.
The HDMI 2.1 input is being used (the monitor identifies as H2.1 5K DSC):
Last edited:
If it's connected via HDMI, then the DisplayPort Debug Message is useless. There's no DisplayPort connection so it reports the lowest DisplayPort link rate?I'm taking the description from the R1811's OSD when using an HDMI 2.1 cable (from an M4 Pro mini):
It initially works at 8 bits YCbCr, but I've used Better Display to enable 10 bit operation.
The HDMI 2.1 input is being used (the monitor identifies as H2.1 5K DSC):
Something weird is happening. Why isn't there any HDMI info shown in the OSD?
@joevt
I guess because it's just lumped into the DP Debug Message category whatever the actual protocol.
I think the software used to create the OSD is very generic/simple.
Maybe the video stream is analysed after an HDMI to DP conversion within the scaler chip?
The Splash screen at boot up shows the operating parameters.
Here's a composite pic of the R1811 running through it's HDMI input when powered by an HDMI 2.0 Mac, so it’s only running at 4K:
Last edited:
Thanks for the suggestions!@gerwinnaar "I plan to use my Stonetaskin R1811 also without fan."
This has been done.
One way is to fit the heatsink from the R9A18 board.
However fans were fitted to cool the case, so there was active cooling in the conversion - although the board was fitted above the fans, so the cooling wouldn't be effective...
If you retain the existing heatsink (with no fan) then the temperature will rise, but shouldn't exceed the maximum of 65º C - the board may get damaged above this.
Using the board to power a laptop will increase the current through the board, and it will get hotter.
The easiest solution is to reduce the existing fan speed by adding a 180-200 ohm resistor (about 3-5 watt) in series with the fan.
This cuts down the speed to inaudibility, but maintains enough cooling to the heatsink.
View attachment 2541800
Is there a way to monitor the temperature of the driver board?
For now i will only use my fanless r1811 v4 via HDMI, so i would to measure if it stays below 65 degrees.
I just looked in how to put the suggested ohm resistor between the board and stock fan, but i am not that experienced with electronics, so is there a guide somewhere and a suggested part i can order?
Hopefully i can just order something that i can plug into the driver board and then plug the stock fan into the resistor part.
As you said, this would sound as the best option also when i want to hook up my macbook via usb-c.
Agreed. Needs improvement so that it doesn't show weird incorrect info - not just missing info.I think the software used to create the OSD is very generic/simple.
Maybe, but no way RDR is correct on the DP side of the conversion.Maybe the video stream is analysed after an HDMI to DP conversion within the scaler chip?
Lacks info. bits per component? pixel encoding: RGB/4:4:4/4:2:0/4:2:2? It has the color range: SDR/HDR at least.The Splash screen at boot up shows the operating parameters.
Here's a composite pic of the R1811 running through it's HDMI input when powered by an HDMI 2.0 Mac, so it’s only running at 4K:
I like the PCLK. 594 MHz matches HDMI timing. HDMI 2.0 can do 4K60 8bpc 4:4:4 or RGB. 4:2:2 is not required.
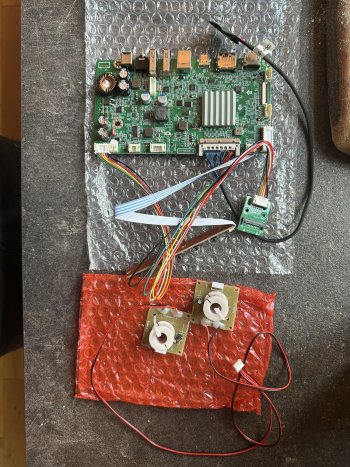
Hi everyone! I think it's finally time to describe my conversion, after 4 months of successful usage.
I decided to use JRY-W9RQUHD-FA1 board on a 2017 27" iMac, the original speakers are successfully converted with this kit and they sound decent after eqMac equalization, it uses 24v5 power supply which is connected to original power cables and is turned on by original power button.
I'm pretty sure if you will search enough on YouTube you can also find the video of a German guy and another video of Japanese guy both showing how they managed original power cables and button which make setup look cleaner.
Unfortunately I forgot to take a photo of the inside, but everything else is already described and can be found in this thread or YouTube.
Here are a few points that I figured out myself and I think it wasn't mentioned:
There's a very important thing that nobody mentioned and even StoneTaskin couldn't help me. On a 2018 intel MacBook Pro, the screen hardly ever displayed 5K, instead it only did 4K. Not really sure why, but Apple silicon MacBooks never had this issue and after updating to M1 MacBook I got stable 5K.
Unfortunately speakers do not work when the audio jack extension is inserted so I hardly ever use them because it is hard to insert and take out the cable from the board through the back. I've also seen somebody reusing original Jack port, but it was not worth it for me.
Talking about cooling - I did nothing for it, the power brick and the board are both getting warm inside and they are positioned not so far from each other but I had zero issues so far. I've messaged a few guys from this thread about their cooling and maximum they did for cooling was removing the apple logo or placing the power brick outside of the body. This summer I've used this setup in a 30-35°C heat with no AC in the room, so we can make some conclusions about this board's reliability and heat tolerance.
Another point to mention - USB-C to DisplayPort cable works better than HDMI cable, at least because it allows changing the display's brightness instead of faking it by just making the colors darker.
Thanks to all the heros of this forum, for answering my and all the previous questions and making this real!
Regarding the pink edges for 2015 iMac LM270QQ1 SD(B1) panels, I can confirm it is present on mine. I bought it for 100 Euros and the effects are not noticeable when I'm not looking directly at it, so I am still a happy camper.@obesechess "Anything I need to make it work other than a R1811 V4 control board, an appropriate power supply, and a Thunderbolt cable? Do I need a separate backlight control board, or does the v4 handle that well enough?"
The 2015 iMac's LM270QQ1 SD(B1) screen can develop 'pink edges' with age, and it only supports ~91% Display P3, and since you don't intend to use the iMac's speakers, you could get good results with the cheaper JRY-W9RQUHD-SA1 board as an alternative to the R1811 V4.
The major thing you would lose is an I/R remote control.
And a lower spec audio amplifier, which won't be a concern for you
However if you intend to use the HDMI input for 5K, with the HDMI 2.1 version of the R1811, then that is the one to go for.
The other advantage of the R1811 HDMI 2.1 version is that it comes with better firmware, which gives more info about the board's operational parameters.
For ordinary use you won't need the extra DZ-LP0818 backlight control board with the R1811, as the board's internal backlight circuit is fine for everything but use of the screen in constant direct sun on the glass.
You don't need a TB3/4 cable, as an 8K video-capable USB-C cable is OK.
But it may be easier to go with a TB/4 cable as that guarantees good video performance.
Good luck with the conversion. 😉
BTW, I've been writing up my build as I'm going through it. Unfortunately my writing has not kept up with my implementation. I chose the R1811 V4 (with DP1.4 + HDMI 2.1 support) and the companion DZ-LP0818 50W Constant Current board from stonetaskin.com. I 3D printed some mounts for the boards and have them temporarily installed with Command Strips until my polyurethane Gorilla Glue arrives.
My writeup is at https://github.com/kurtshuler/imac-5k-monitor-conversion.
Let me know if you would rather I put my text in a forum post.
@CaliSpain Nice build you have in progress. ")
Please let us know as it progresses.
Also, how you find the DZ-LP0818 works with your screen.
For info, the resistor value for the Noctua RC7 low speed adapters is 50 ohms, so you have ended up with 100 ohms in series with the fan.
It can be 150-180 ohms for lower noise.
Here is a list of the values for the various Noctua resistors:
LNA 50Ω
ULNA 80Ω
NA-RC6 80Ω
NA-RC7 50Ω
NA-RC8 150Ω
NA-RC9 100Ω
NA-RC10 50Ω
NA-RC11 100Ω
NA-RC12 150Ω
Thank @PaulD-UK ! Your guidance had been great!
Regarding the DZ-LP0818, I haven't seen much difference, but I think this is because the panel I received was already very bright. Too bad I got the pink edges, but at least I have a blindingly bright screen!
The only panel flickering I experienced was when I had my MacbookPro M1 connected directly to the controller board with a Thunderbolt cable. I added in the DZ-LP0818 and experienced the same behavior. I remembered one of your post (at least I think it was yours) and it dawned on me that I probably triggered the board to do PD charging of my Mac and the poor little 24V 5A brick that Stonetaskin sent couldn't keep up. When I use my CalDigit TS3 Plus dock to power my Mac, I connect the dock to the display using a USB-C to DisplayPort cable and everything is stable.
I have two NA-RC7s in series and am using them right now, but I purchased some 180 ohm resistors on Aliexpress and will replace the NA-RC7s with a resistor.
My "fun project" to help me learn Adobe Fusion and 3D printing is to create PCB trays for all the boards. In addition, my "big lift" is to replace the RA-1811 controller ribbon cable and PCB with my own set of 6x6mm tactile switches located at the USB ports (within a 3D printed object), and to create USB port-sized button tops. I'll also put a VS1838B IR sensor at the top of the panel where the webcam used to be. I bought some 10-pin JST 2.0 PH cables to replace the current one.
Once I'm done with this project, I'll have extra ribbon cables, IR sensors, tactile switches, resistors and who knows what else. I hope to be able to give them away to other folks on the forum. Of course, that assumes I get things right the first time without frying all of them
Gathering together the parts for my first diy 5k monitor build and have a question.
I've read a fair chunk of posts here, but one thing is nagging me.
I've managed to get a near pristine 2017 imac 27" for a decent price.
I'm waiting on delivery of a JRY-W9CUHD-AA1 from aliexpress - and there's a nagging at the back of my mind that I've made a mistake on this one and should've gone for the JRY-W9RQUHD-SA1 instead.
Going back to the awesome first post, the AA1 is 8-bit and the HDMI port only handles 30 Hz refresh at 5k.
I have three computers I'd like to connect to the monitor, because I currently have three connected to my LG Ultrafine.
One of them is going to have to be that HDMI, but I could just run my Linux gaming box at QHD resolution I guess.
The other two are:
My work issued macBook M1 pro.
My personal mac mini M4 pro.
That gives some insight into my use case.
Will the AA1 suffice - I've read that it is prone to getting hot?
If the imac I'd got was not pristine, I wouldn't really care as much for my first build, but my eBay order arrived today and it's just in such good condition for an 8 year old computer, I really want to do it justice.
Anyone who has tried both the cheaper AA1 and the far better SA1 - what would you recommend?
Will the AA1 do the job for me?
It does feel like 8-bit is hobbling the capability of the display. My bad for not doing another hour of research prior to purchase of the controller board!
I don't want to rush this build, I want to take it slow and read more and more posts and end up with something that'll last me years.
The JRY—AA1 can give good results, but it is an older generation board than the newest SA1.
The AA1 can do 4K/60 with its HDMI port.
But the SA1 uses the latest MediaTek video chip and has better firmware.
The 2017 iMac’s panel can give such a gorgeous picture I think it’s worth running it at 10 bits… 🙂
The AA1 can do 4K/60 with its HDMI port.
But the SA1 uses the latest MediaTek video chip and has better firmware.
The 2017 iMac’s panel can give such a gorgeous picture I think it’s worth running it at 10 bits… 🙂
Thanks, good info.The JRY—AA1 can give good results, but it is an older generation board than the newest SA1.
The AA1 can do 4K/60 with its HDMI port.
But the SA1 uses the latest MediaTek video chip and has better firmware.
The 2017 iMac’s panel can give such a gorgeous picture I think it’s worth running it at 10 bits… 🙂
I'm going to risk returns to aliexpress for the AA1.
My spend was £387 - an extra £70 won't break the bank.
I'm sure everyone feels like this who gets a pristine 27" imac from the 2010's - it's going to be so hard to gut the machine, as it really is one of the best bits of kit Apple ever released.
I shall do it carefully. I'm already considering an SSD upgrade and putting it back on eBay to make an extra £50 and then buying a 2015 27" iMac for a lot cheaper... but then I'm pushing my luck, BIG time.
@bb_mac I bought a 2015 27" iMac for 100 Euros, but it does have the pink edges. Not a big deal for me but it could drive some people nuts. From reading this thread I think this might be a common issue with the 2015 panels. Probably better to stick with 2017 if you think it might bug you....buying a 2015 27" iMac for a lot cheaper... but then I'm pushing my luck, BIG time.
Yeah - it really would - I'm trying to get something better than my LG Ultrafine 4k, which in fairness, is a pretty good monitor for the price. Having done a quick boot from an external ventura disk, the 2017 mac I've got is absolutely perfect - pin sharp, no issues at all.Probably better to stick with 2017 if you think it might bug you.
I guess it's stating the blindingly obvious that the older the mac you use, the more chance there is of LCD ageing issues and/or issues that aren't "cosmetic" - depends how often the display was used, I guess - how many hours of use.
Regardless of what I do, the HDD on this iMac is intermittently faulty, so if I wanted to resell it at a profit - risky move - I'd have to take the screen of anyway to bung in a 500gb SSD I have spare.
I think I'm going to just bite the bullet and do a build ... very slowly. I expect the screen to be taped up right through to Xmas as I learn from this thread. May as well do the best job I can - webcam, speakers, microphone, see what others have done to keep things tidy. Always keep the option open to reassemble for resale if needs be.
I don't know if USB-PD would introduce that much more heat? It's delivering 20V from its 24V source, and I bet the efficiency isn't terrible.
Regardless, I noticed that the heatsink for the driver board in my original design was too hot to touch after just a couple of hours of use. I did a small redesign and repurposed the original iMac fan together with a Noctua NA-FC1 PWN Fan controller. My driver board was flipped and now faces out towards the back vents.
My build page on GitHub is updated to reflect this change and the parts list is updated.
I found your old post about the pinout for the fan PaulD, but here's a picture for any other modders out there. Again, all of this can be found on the build page on GitHub.
It's not using the ducted airflow design like the original iMac, for now. I do believe we are at a different order of magnitude in terms of heat output on these monitor conversions compared to the original i7 7700K Radeon 580X iMacs we are replacing.
View attachment 2314633
View attachment 2314634
View attachment 2314631
View attachment 2314632
My apologies for the reply almost 2 years after this particular post, but wanted to ask how you cut the perspex for the board mount. I've got some acrylic that I could potentially use, but have had minimal success making holes in it (without cracking) so far. Wondering if 3D printing a mount would be better
Hi everyone,
I've started working my way through the post for clues, but at 123 pages it's quite the feat!
Basically, I've moved from 2x iMacs I had side by side that were starting to struggle to one of the new Studio ones that I upgraded heavily. I thought I'd save the £3,000 buying the retina displays by sacrificing the 2 old iMacs, but it hasn't worked out as intended.
I've got identical parts for both monitors and while one works perfectly fine, the other screen has lines forming across it with occasionally blacking out - mainly when it gets warmer. Equipment in both monitors is as below:
- 2x JRY-W9CUHD boards LM270QQ1 Ali Express Clicky Link
- 2x 12v 5amp PSU
- 2x poverty spec cables Clickerty click
I've since tried a third board thinking that was the culprit and gutted another iMax 27" to try it's screen, but it's the same outcome; one of the screens is perfect all the time, yet the other goes odd after about 15 minutes.
I've also noticed that when plugging in a scond monitor, even before it's physcally plugged in, it causes the monitor to go black for around 5 seconds and sometimes you can see a small electrical arc to the unit chassis.
Any ideas?
Register on MacRumors! This sidebar will go away, and you'll see fewer ads.